Tag: room planning

  • Living Room Sectional Layout That Actually Works

    Living Room Sectional Layout That Actually Works

    You've measured the wall, chosen a deep chaise, and found a sectional that looks perfect in the showroom. Then delivery day arrives, the sofa fits through the door, and suddenly nobody can reach the recliner without turning sideways. The problem usually isn't the upholstery, color, or shape. It's that the living room sectional layout was never tested as a traffic plan.

    A sectional is a large architectural object. It directs movement, frames a television or fireplace, and can separate a living area from a dining or kitchen zone. The right arrangement starts with clearances, focal points, and the route people typically use through the room. Style comes after those decisions.

    Why Most Sectionals Feel Wrong in the Room

    A 110-inch-wide sectional can fit along a wall and still make the room unusable. One shopper chose a deep chaise after confirming the wall was technically long enough. On delivery day, the chaise reached into the only route from the entry to the rear of the room. Access to the recliner became awkward, the doorway felt narrow, and a generous room turned into a daily obstacle course.

    That failure comes from clearance planning. Usable floor area includes doors, walkways, fireplace access, and the space required to pull out a chair or reach a table. Wall length alone cannot show whether a sectional supports ordinary movement.
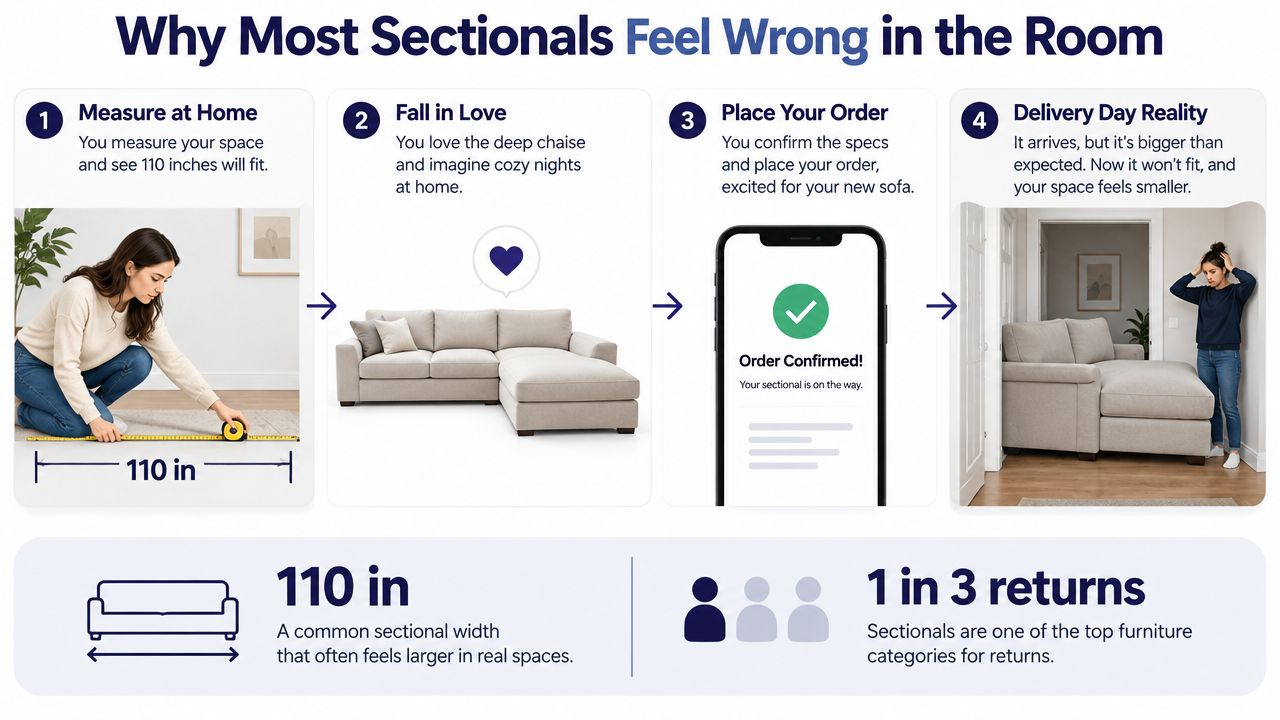
    An infographic illustrating the common buyer's remorse when purchasing sectionals that are too large for their space.

    Three problems appear repeatedly

    • The sofa consumes the walkway. A route that looks open on a floor plan can feel tight when someone carries laundry, toys, or groceries through it. General sectional guidance places comfortable circulation in the 30 to 36 inch range, with 36 inches or more preferred for high-traffic paths (Wayfair's sectional measuring guide, Cozey's sectional size guide).
    • The seating misses the focal point. If the main seats face away from the TV or fireplace, people twist their bodies or crowd onto one end. A deep chaise does not correct an uncomfortable viewing angle.
    • The return interrupts the natural route. The path from the front door to the kitchen, hallway, patio, or stairs should remain clear and easy to read. If people must cut across seated laps, the configuration conflicts with the home's circulation.

    Showroom rule: Measure first, configure second, decorate third. A rug and coffee table can clarify a sound layout, but neither can restore a blocked route.

    Sectionals have long served a practical planning role. Furniture historians trace modern sectional forms to multi-unit seating designs from around 1820, while modular seating became widely recognizable in living rooms during the 1930s and 1940s. By the 1940s, Harvey Probber was often credited with a rearrangeable modular sectional concept, reflecting a shift from fixed formal seating toward flexible groups (Hunker's history of the sectional sofa). That flexibility helps only when each piece leaves the room's routes usable.

    Measure the Room Before You Measure the Sofa

    A sectional that fits the wall can still make the room unusable. Sketch the room, mark the usable floor, and tape the proposed footprint before shopping. Product listings show furniture dimensions. Your floor plan shows whether those dimensions leave room for doors, drawers, and daily movement.

    Start with a room map

    Draw the room on graph paper and record every fixed element that affects placement:

    1. Record the walls and openings. Measure wall lengths, door widths, window positions, ceiling height, outlets, radiators, heat vents, and built-ins. Mark the TV or fireplace because the focal point usually determines which seats need the clearest view.
    2. Measure difficult corners. Record the diagonal where a chaise or return may sit. A sectional can fit the wall length yet collide with a window casing, stair rail, or unusual angle.
    3. Identify the main route. Mark the path from the entry to the rest of the home. Leave at least 30 inches for a basic walking lane, aim for 36 inches along the primary route, and use 42 inches where two people regularly pass or where the living room connects directly to dining or kitchen areas (Interior Insider's sectional arrangement guidance, The Decor Mag's sectional configuration guidance).
    4. Tape the proposed shape. Use painter's tape for the sofa, chaise, coffee table, and any recliner. Walk the route normally, open doors, pull out drawers, and sit in the main seats. If the taped footprint feels intrusive, the upholstered version will feel larger.
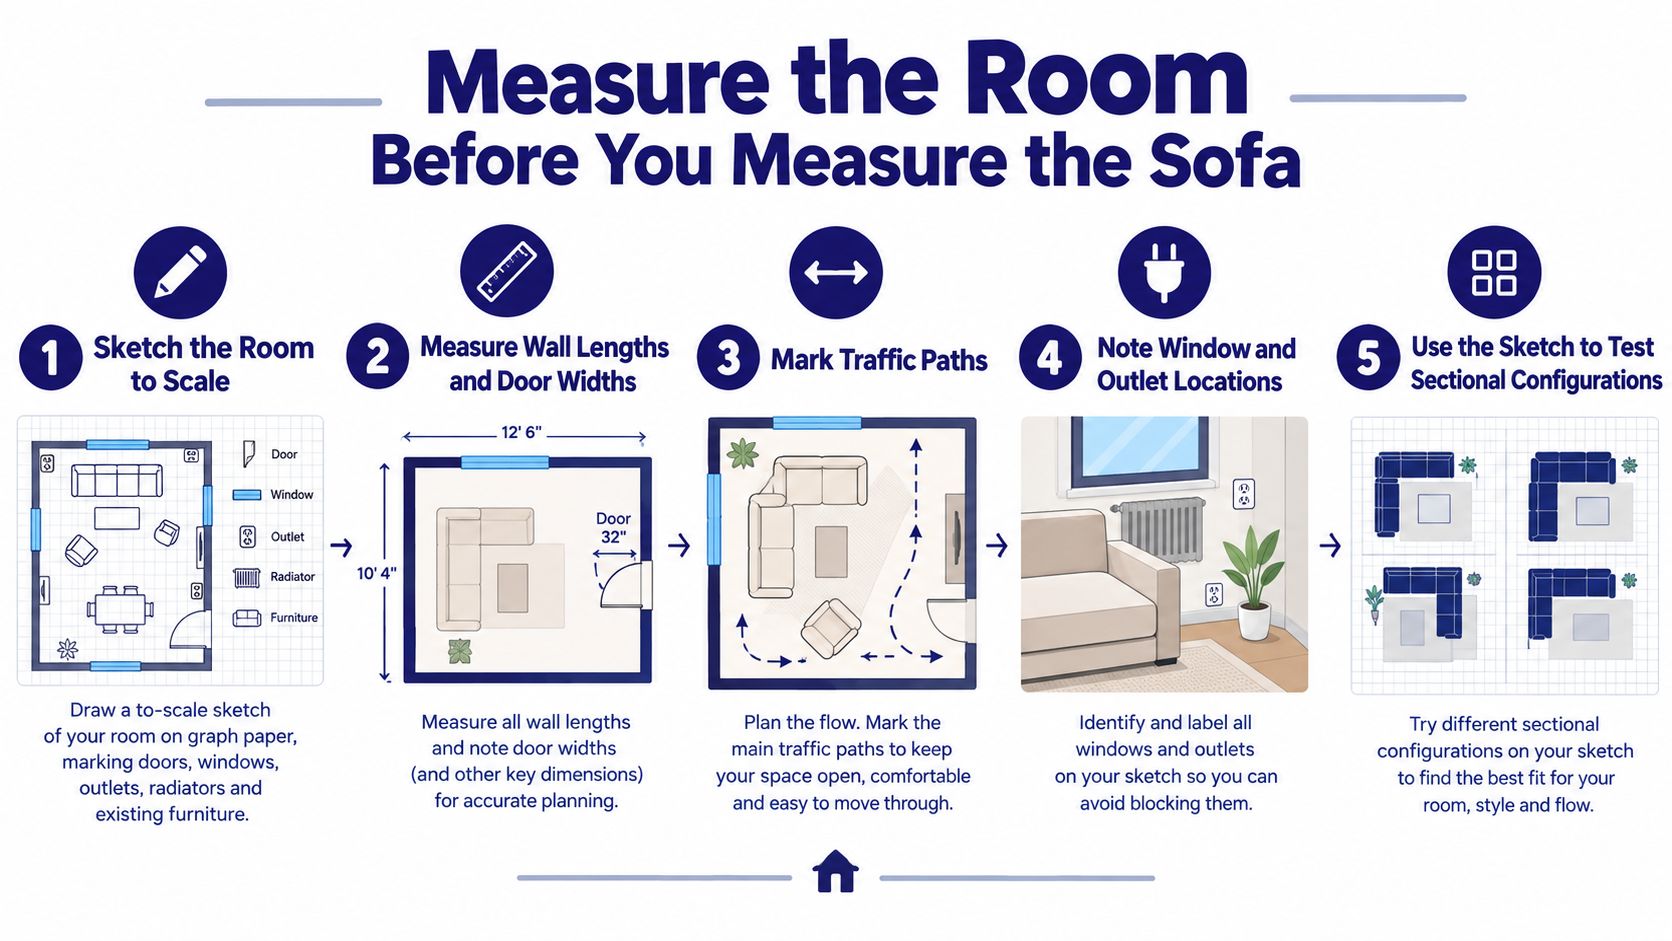
    An infographic illustrating five easy steps for measuring a room before purchasing a new sectional sofa.

    Bring the sketch and measurements to the showroom. Depth matters as much as width. Residential sectionals commonly have overall depths around 35 to 40 inches, while many measure roughly 94 to 156 inches overall (Interior Insider's sectional measurement guidance). A chaise can therefore consume central floor area faster than shoppers expect.

    A practical demonstration of the tape-and-paper approach is included below.

    Subtract the sectional's back-to-front depth from the usable room depth before you shop, not after the truck arrives.

    Pick the Right Configuration for Your Room Shape

    A sectional that looks right on the showroom floor can block a doorway at home. The correct configuration follows room geometry, usable clearances, and the way people move through the space. An L-shape can suit a narrow rectangle but fail in a doorway-heavy room. A U-shape creates a strong gathering zone, yet needs open circulation around it. Modular seating offers flexibility, but separate pieces can still occupy a large footprint.

    Compare the main options

    An L-shaped sectional usually suits a narrow rectangular room when its long side follows the longer wall and the return projects into the room. This leaves the opposite wall available for a media console and defines a seating corner. Measure the route beside the return rather than assuming the middle will stay open. A chaise or return can narrow that passage quickly.

    A corner sectional is often practical in rooms under 14 feet wide, especially when placing it against the walls preserves central floor space. You trade some rearrangement freedom for clear, predictable boundaries. In a room with several doors, a loveseat-plus-chaise may work better because its open side gives people a cleaner route than a full L-shaped return.

    For a square room under 12 by 12 feet, a compact U-shape can provide more seats, but it requires at least 36 inches of clearance on all three open sides. Use it only if people can circulate around the outside. If every route funnels through the center, the seating count will not compensate for the daily obstruction.

    A modular sectional suits a great room with two focal points, such as a fireplace and a TV. Pieces can separate around the fireplace, preserve screen sightlines, and form a conversation zone without committing the entire room to one fixed return. Check cushion construction alongside the floor plan. These sag-proof sofa cushion tips help when comparing how different seating designs may behave over time.

    Room Shape Best Configuration Min. Wall Length Min. Clearance Around Sofa
    Narrow rectangle L-shape with return toward the room Measure the longest wall and subtract fixed obstructions 30 inches for a secondary lane, 36 inches for the main route
    Door-heavy room Loveseat plus chaise Measure the uninterrupted wall behind the loveseat 36 inches along the entry route
    Square room under 12 by 12 feet Compact U-shape Confirm each section fits without covering openings 36 inches on all three open sides
    Open great room Modular sectional Use the longest usable wall or float the pieces 36 inches on primary paths, 42 inches where traffic crosses zones
    Room under 14 feet wide Corner sectional Confirm the corner and return depth Preserve the widest route at 36 inches or more

    Viewing geometry must also fit the chosen shape. Guidance commonly places the main seating at 1.5 to 2.5 times the screen diagonal from the TV, with the principal seat, screen, and coffee table forming a comfortable triangle. A deep chaise increases the effective distance from the screen, even when the sofa back appears correctly positioned. Check the seated eye line from the chaise and the main sofa before fixing the TV location, rather than treating every seat as equivalent.

    Layer the Rug, Coffee Table, and Lighting

    A sectional can meet every clearance target and still feel awkward if the supporting pieces are added in the wrong order. Set the sofa and confirm the walking routes first. Then build the seating zone outward with the rug, coffee table, and lighting.

    Use the rug to connect the pieces

    Size the rug for the seating group rather than the room's total floor area. Aim for roughly 8 inches of visible floor around the seating area, and place both front legs of the sectional on the rug. That alignment connects the sofa, table, and nearby chair into one usable zone instead of leaving each piece visually isolated.

    A long L-shape or chaise needs extra attention. Extend the rug beneath the chaise end, then walk the route beside it to make sure the edge will not buckle or catch feet. In a busy passage, a low-pile rug is easier to live with because doors, chair legs, and shoes are less likely to snag the edge.

    Hard flooring adds another variable. Review the surface before choosing the rug and pad. A natural stone tile living area, for example, may need a pad that stays fixed and an edge that remains flat under repeated traffic. This natural stone tile living area resource can help when the flooring forms part of the layout decision.

    Place the table after the sofa

    Keep the coffee table 14 to 18 inches from the sectional edge. The tighter end makes drinks and books easier to reach. The wider end gives people more room to stand and pass, as long as it does not reduce the planned main lane (Medley Home's sectional sizing guide).

    Choose the table shape according to the room's movement pattern. A round or oval table softens an L-shaped corner and removes sharp points from common collision paths. A rectangular table works well with a long sectional, provided its depth does not consume the route around the chaise. It should serve the main seats without forcing people to squeeze between the table and sofa.

    Add lighting without creating glare

    Start with one fixture for the seating zone, then add a table lamp or floor lamp beside the open end for reading. An accent piece opposite the chaise can balance the room, but it should not narrow an already tight passage. Measure the remaining route after every lamp, plant, or cabinet is placed.

    A pendant over the coffee table can work with a ceiling at least 8.5 feet high, provided the table and walkways retain their planned clearances. Check the viewing angle from the sofa as well. A lamp that reflects into the television, or sits directly behind someone watching, creates glare and irritation regardless of its decorative effect.
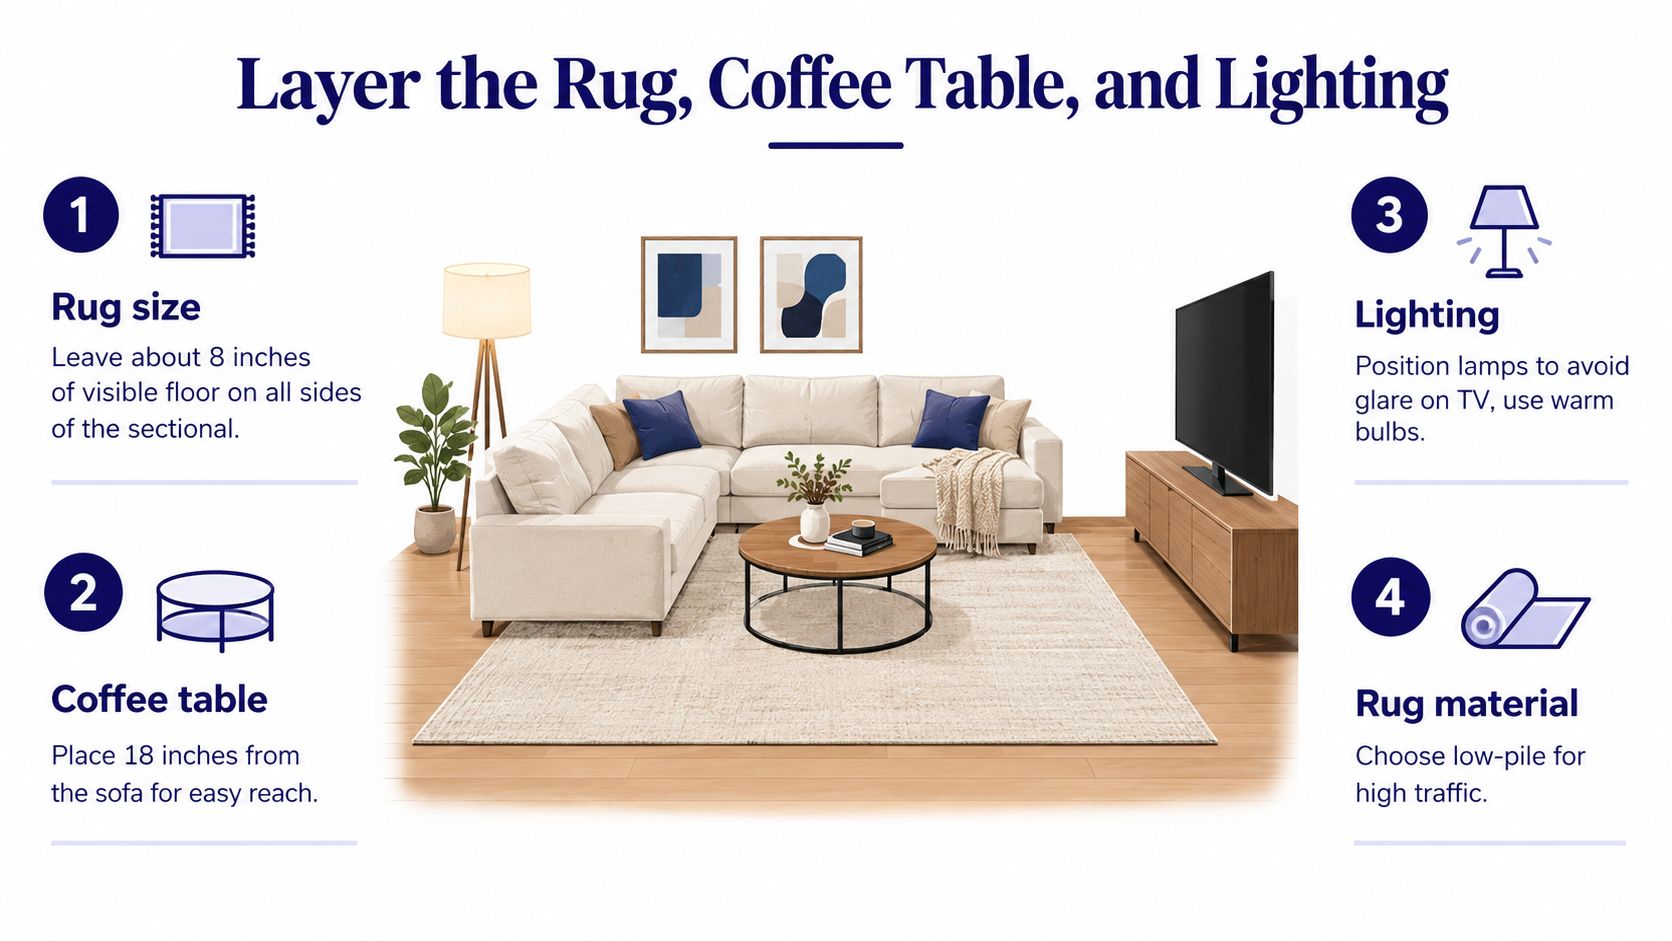
    A diagram illustrating interior design tips for a living room with a sectional sofa, rug, and lighting.

    Layouts for Families and Multi-Use Rooms

    A family room changes throughout the day. Children cut between the sofa and dining area, homework spreads across a table, and someone still needs a clear route to the door. Plan the sectional around those movements first. Keep at least 30 inches of clear floor between the sofa and any doorway, hallway, or regular play path. If the route serves several purposes, widen it rather than relying on a tight pass-through.

    Place the open end of the L away from the busiest doorway whenever the room allows. This keeps traffic from crossing directly through seated space and gives the chaise a calmer position. In a living room beside the dining area, protect the route between both zones with the wider clearance you planned for the room. A few extra inches can prevent chairs, children, and serving dishes from competing for the same passage.

    Match the upholstery to the household

    Fabric selection affects how confidently the room gets used. A sectional that needs constant covering or cautious handling can limit snacks, naps, and pets, even when its footprint is correct. Consider performance fabrics rated above 50,000 double rubs, washable slipcovers, or bonded leather if the household accepts its different feel and maintenance needs. Treat these as selection criteria, not guarantees. Cleaning instructions, sunlight, pets, and sitting habits still determine how the material performs.

    Separate functions without building obstacles

    In a combined living, dining, and homework room, use the sectional to define the seating zone while preserving routes around it. The configuration should support the room's main activity without making people cross seated laps to reach a desk or dining table.

    Use Case Sectional Shape Minimum Traffic Clearance Zoning Anchor
    Family TV room L-shape with chaise away from the entry 30 inches on the play route, 36 inches on the main path One rug under the seating group
    TV and dining combination Three-seat L backing toward the dining table 36 inches between major zones Rug defining the living area
    Homework and conversation room U-shape around a homework island 36 inches around open sides Separate work surface and rug
    Two-focal-point great room Two-piece modular split 36 inches on primary routes Distinct rugs or furniture groupings
    Flexible family space Modular sectional with TV-facing chaise 36 inches where people cross zones Storage or a low console behind the sofa

    Keep an open 18-inch gap between zones where the plan calls for a buffer. Check that gap after adding chairs, bins, and storage, not only when the room is empty. A sectional can divide an open plan effectively, but every household member still needs a direct, comfortable route around it.

    Run a Final Walkthrough Before the Truck Arrives

    The sectional can fit the taped footprint and still fail on delivery day. Check the route into the home as carefully as the final position, especially if the piece must pass through tight doors, stairs, or hallway turns.
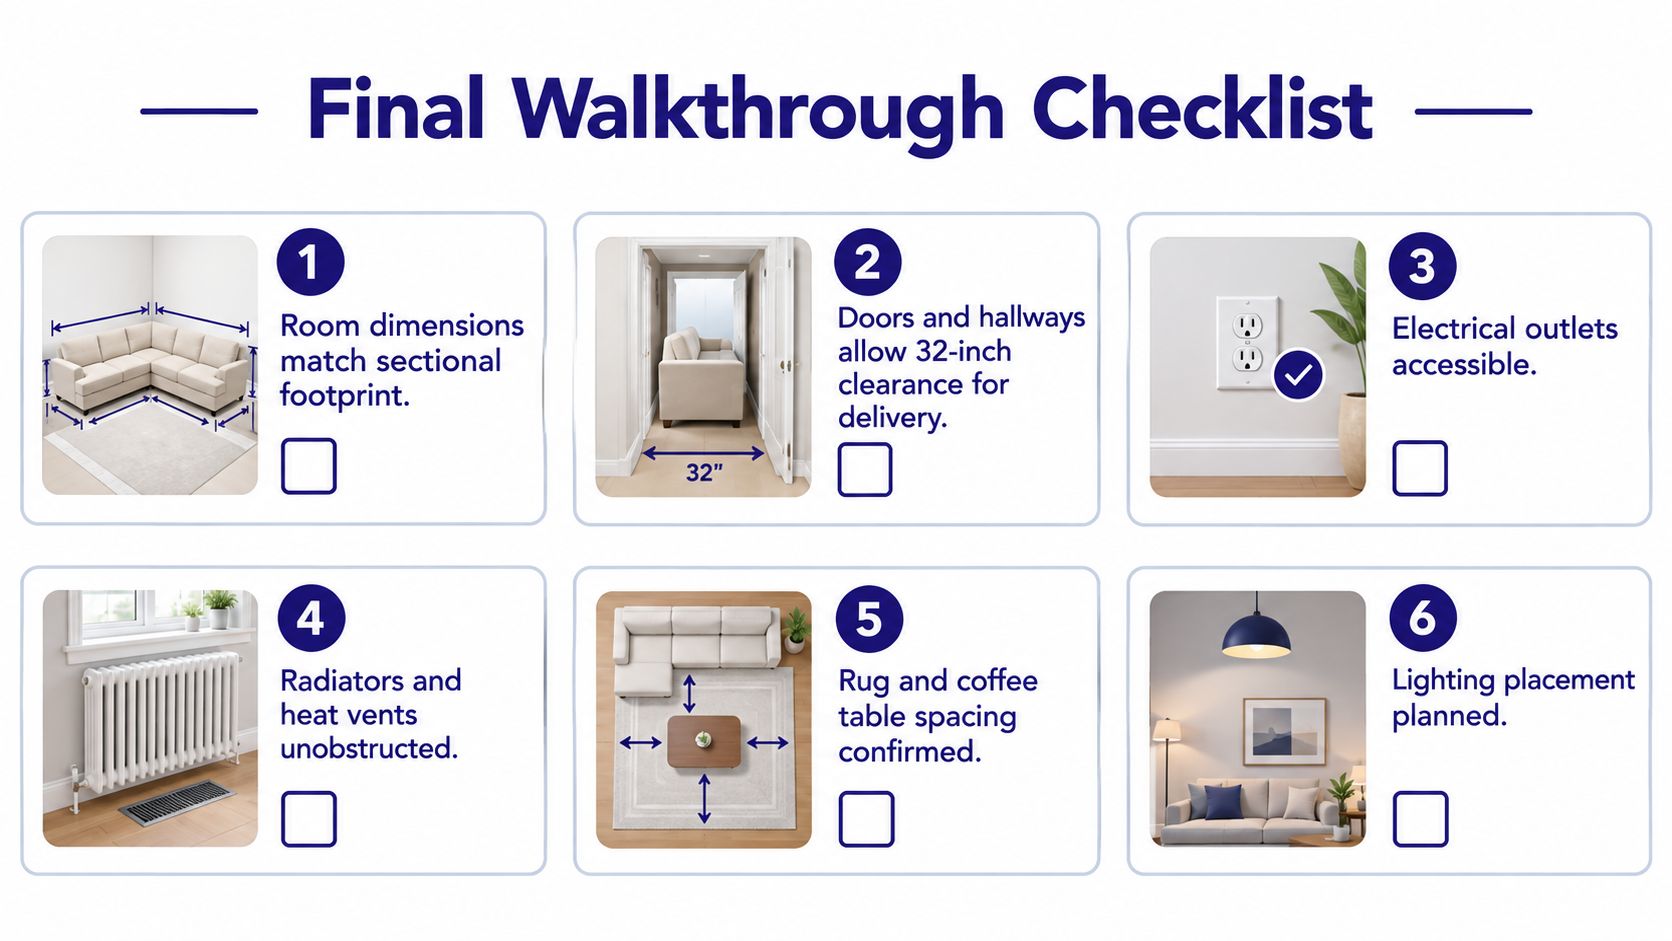
    A six-point checklist for preparing a living room to ensure a sectional sofa fits correctly.

    Confirm the footprint and the path

    Run through these checks in order:

    1. Compare the outer dimensions. Match the sectional's total width, depth, return, and chaise against the taped footprint. Include recliner extensions and movable backs when the model has them.
    2. Check the delivery openings. Measure doors, stairs, hallway turns, and elevator openings against the largest packed piece. Keep at least 2 inches of additional width and height beyond that piece as a practical delivery margin.
    3. Walk every side. Recheck the planned 30 to 36 inch paths around the seating. Give the main route the wider clearance, as established earlier.
    4. Protect fixed features. Confirm that outlets remain reachable and that radiators and heat vents are not covered.
    5. Coordinate the accessories. Arrange for the rug to arrive before the sofa, then confirm that the coffee table remains within the planned 14 to 18 inch distance.
    6. Test the focal point. Sit in the principal seat and check the sightline to the TV or fireplace. An angle around 15 degrees provides a practical test for whether the seat depth and focal point work together.

    Delivery-day habit: Photograph carton damage before the driver leaves, even if the interior furniture appears protected.

    Rehearse the installation before the truck arrives. Place the largest section near its final position, arrange two helpers for anything over 150 pounds, and keep the old sofa usable until the new one passes a 24-hour comfort sit-test. Use that time to assess seat depth, chaise direction, table reach, and walking routes during ordinary use, rather than during a rushed installation.

    Small oversights create the biggest frustrations. A blocked outlet, an unreachable lamp switch, or a chaise that narrows the entry path can compromise an otherwise attractive room. The layout works when people can sit, stand, walk, watch, read, and reach what they need without adjusting around the furniture.

    Woodstock Furniture & Mattress Outlet offers sectional options with configurations such as a chaise, extra armless seats, and a corner wedge. Its Room Planner tool lets shoppers test arrangements before committing. Bring a room sketch and taped measurements to Woodstock Furniture & Mattress Outlet to compare configurations in person and discuss fit, circulation, and delivery planning.
  • L Shaped Couch Dimensions: A Practical Sizing Guide

    L Shaped Couch Dimensions: A Practical Sizing Guide

    You're probably standing in your living room with a tape measure, trying to answer a simple question that turns into five different ones. Will an L shaped sectional make the room feel finished, or will it eat the walkway? Will the chaise belong on the left or the right? And when a product page lists a long side, a short side, and a depth, what does that mean once the couch is in your home?

    That's where most sizing guides stop too early. They give you inches, but they don't translate those inches into usable floor space, traffic flow, or delivery reality. A sectional can fit against the wall on paper and still feel oversized once you account for the path to the doorway, the coffee table gap, and the corner where people walk.

    What You'll Be Able to Decide After This Guide

    By the time you finish reading, you should be able to narrow your choices from “some kind of sectional” to a real size range and layout that makes sense for your room. That means knowing whether you're shopping for a compact L shape, a standard one, or something larger that belongs in an open-plan space.

    You should also be able to tell whether a left-facing or right-facing return works better with your walls, windows, and traffic path. That matters more than many first-time buyers expect. The wrong orientation can block an entry route even when the overall dimensions look acceptable.

    The decisions that matter most

    Here's what usually needs to be settled before you walk into a showroom or start comparing listings online:

    • Footprint choice: whether your room can handle a smaller return or a more generous L shape
    • Orientation: which side the chaise or return should sit on when you're facing the sectional
    • Scale: whether a standard-size sectional makes sense, or whether an apartment-scale option will live better in the space
    • Access: whether the pieces can get through the door, hall, stair turn, or elevator without trouble

    Practical rule: A sectional doesn't just need to fit the wall. It needs to fit the way people move through the room.

    Most confusion starts because shoppers look at sofa size as one number. L shaped couch dimensions don't work that way. You're usually dealing with two legs of the sectional plus the overall depth, and those numbers need to be translated into how much room the piece really claims.

    What this guide helps you avoid

    A few common mistakes show up again and again:

    1. Buying based on seat count instead of actual dimensions
    2. Ignoring the inside corner and treating the sectional like a plain rectangle
    3. Forgetting to leave enough space for walking, turning, and everyday use

    At the end, you should have a short list of sizes worth shopping, not just a vague sense that “something around 100 inches” might work.

    The Three Numbers That Define L Shaped Couch Dimensions

    Start with three measurements, because an L shaped sectional is really two connected runs plus one front-to-back depth. If you only look at a single width number, you miss how the piece will sit in the room.

    Those three numbers are the long side, the short side, and the overall depth. Major sizing guides commonly describe mid-size residential sectionals within these ranges: 95 to 120 inches on the long side, 60 to 85 inches on the short side, and 36 to 40 inches in depth, according to Coleman Furniture's sectional couch dimensions guide.

    What each number means

    Measurement What It Describes Why It Matters in a Real Room
    Long side The main run of the sectional, usually the side that reads like the “sofa” portion This is the number that often decides whether the piece overwhelms one wall or sits in proportion
    Short side The return, chaise side, or loveseat side that creates the L This is the part that reaches into the room and often affects walkways more than shoppers expect
    Overall depth The distance from the back to the front edge of the seat and frame This shapes how far the sectional projects into floor space before you even add breathing room around it

    A simple way to read those numbers helps. The long side tells you how much wall or visual span the sectional wants. The short side tells you how far the L extends into the room. The depth tells you how thick the piece is from back to front, which changes how tight or open the seating area feels.

    Seat count will not tell you that. A five-seat sectional with slim arms can live very differently than another five-seat sectional with broad track arms and deep seat cushions, even if the product photos make them look close.

    One common planning example from RoomSketcher's sectional sofa dimensions guide shows a sectional listed at 108 by 72 inches, which is a good reminder that L shaped couches are usually measured by two legs, not by one simple width.

    That is the part many first-time buyers miss. The tag may make the sofa sound tidy and straightforward. In practice, you are choosing how much wall it claims, how far it reaches outward, and how much front-to-back floor area it occupies before anyone has even walked around it.

    Arm width and back height matter too, but as secondary numbers. They shape how heavy or airy the sectional feels to your eye. These three core measurements decide whether it belongs on your shortlist at all.

    Real Footprint, Not Just Nominal Size

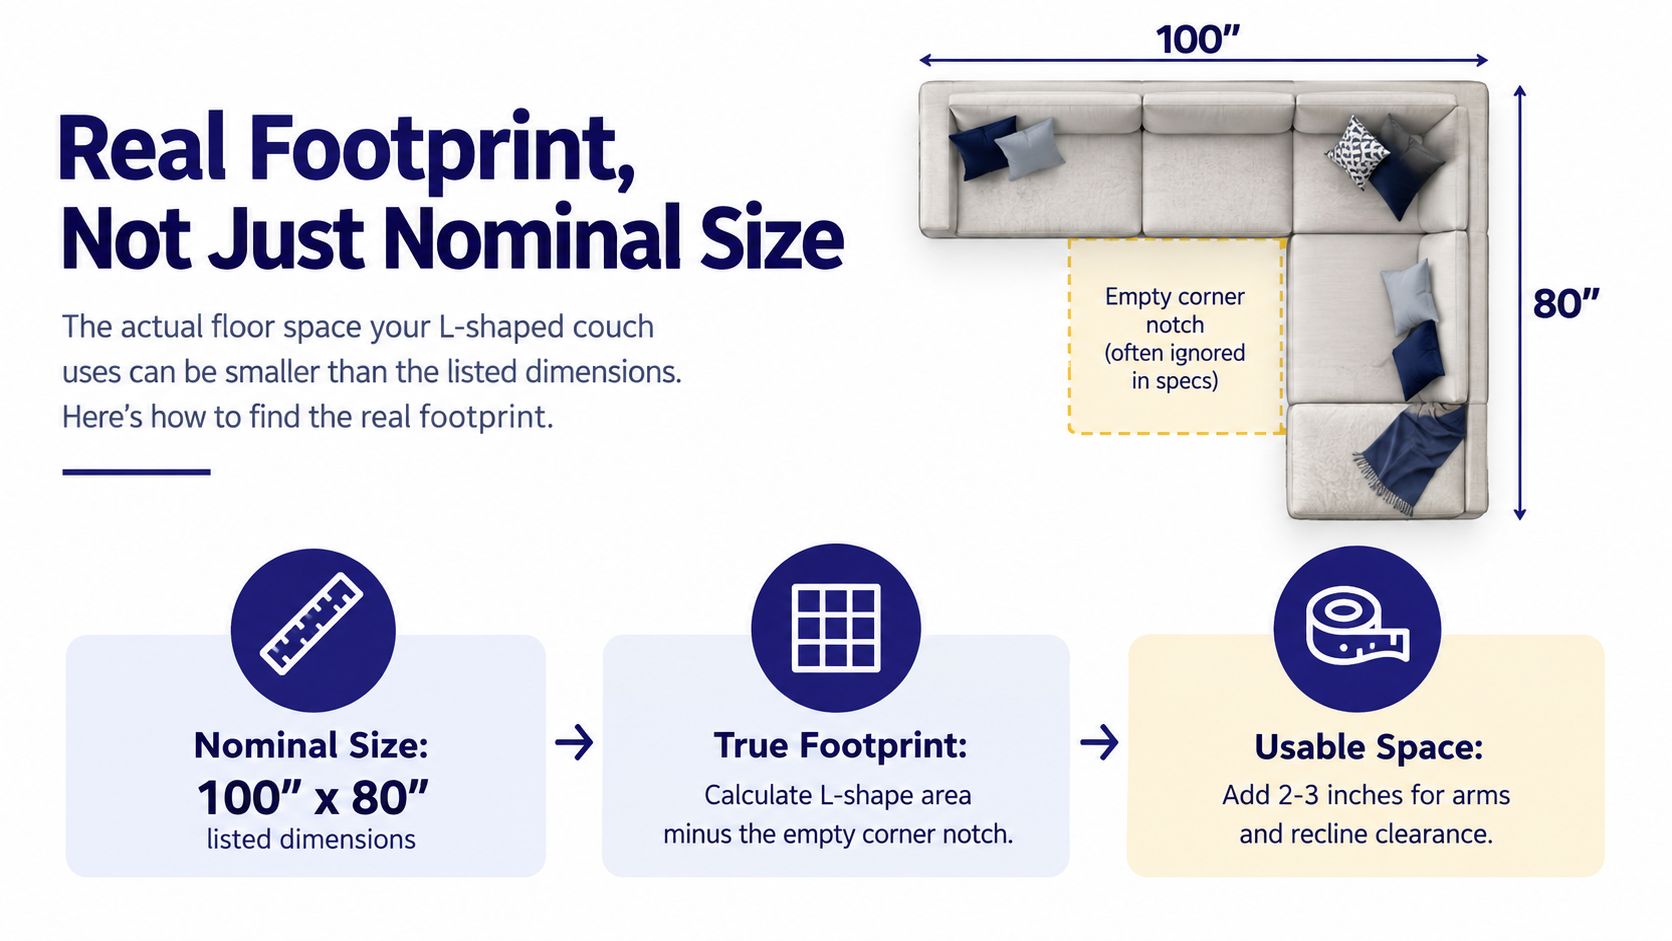
    A sectional can look modest on a product page and still crowd a room once it is in place. A listing that says 100 by 80 inches only describes the outer limits of the frame. It does not tell you how much working floor area the piece will claim once people need to walk past it, reach a side table, or sit without brushing another piece of furniture.

    That gap between listed size and lived-in size is where many first-time buyers get stuck.

    An L shaped couch also uses space differently from a straight sofa. The two legs create an inside corner, so the piece does not fill space like one clean rectangle. A layout such as 108 by 72 inches can sound manageable on paper, but the long run, the return, and the open corner all shape the room in different ways, as explained in Get Poche's sofa dimensions guide.

    A diagram explaining how to calculate the real footprint and usable space of an L-shaped couch.

    What the listed size leaves out

    Use the tag as the starting point, not the whole answer.

    A sectional's real footprint includes more than the frame itself:

    • The inside corner: the cutout may be open floor, but it still controls where the sectional can sit
    • The arm build: wide arms reduce usable seat width and make the piece read heavier in the room
    • The end style: a chaise or extended return reaches farther into open space than many buyers expect
    • Daily clearance: room to pass by, stretch out, and use nearby tables matters as much as the sofa shell

    How to think in usable floor space

    A better question is, “What area of the room stops being flexible once this sectional goes in?”

    Designers often plan seating with circulation space in mind, not just furniture dimensions. The Spruce's living room layout guidance recommends leaving about 14 to 18 inches between seating and a coffee table, and about 30 to 36 inches for a comfortable walkway. Those numbers help translate a sectional from a catalog measurement into a real floor plan.

    Here is the plain-English version. If the sofa body takes up one zone and the walkway around it takes up another, the sectional is effectively larger than the tag suggests. A piece can fit against the wall and still pinch the room where people move.

    That is the shift that matters. Do not judge an L shaped couch only by whether its two sides fit inside your room dimensions. Judge it by whether the room still works after the couch is there.

    Matching Sectional Size to Your Room

    A sectional can fit on paper and still make the room feel blocked the first time you walk around it. That usually happens when shoppers match the sofa to the room's full dimensions instead of the part of the room that is open and usable.

    A better method is to match the sectional to the room's working shape. Start with the space that is available after you subtract door swings, window trim, hearths, built-ins, floor vents, and any path people use every day. In a showroom, this is the difference between asking, “Will a 10-foot sectional fit?” and asking, “How much clear floor will still be left once this piece is in place?”

    Room labels such as small, medium, and large do not help much by themselves. Two living rooms with the same square footage can handle very different sectionals if one is a clean rectangle and the other has openings on two sides.

    A practical room-match table

    Room Type Minimum Room Size Recommended Sectional Footprint Key Clearance
    Small apartment living room Around 10 by 12 feet Compact L shape with a shorter return Leave a clear path so the room still works for daily movement
    Mid-size living room Around 12 by 15 feet Standard L shape with a balanced main run and return Keep easy access between seating, entry points, and tables
    Open-plan great room 16 by 20 feet or larger Larger modular sectional or expanded L shape Protect the main walking route so the seating zone does not sprawl into it

    Use that table as a first pass, not a final answer. A compact L-shape can work in a mid-size room if the arms are slim and the return stays out of the main path. A larger room can still need a smaller sectional if several openings cut through it.

    What changes the fit in real homes

    Three room features regularly shrink the usable zone more than buyers expect:

    • Fireplace hearths
    • Built-in shelving
    • Window bays or trim that cut into wall length

    Each one steals placement space in a different way. A hearth pushes the sectional farther into the room. Built-ins shorten the wall you thought you had. A window bay may not touch the sofa, but it can interfere with the return or side table placement. Measure the open stretch the sectional can occupy, not the full wall from corner to corner.

    Orientation matters too. A left-hand return and a right-hand return can have the same listed dimensions and behave like two different pieces in the same room. One may frame the seating area neatly. The other may stick into the route between the foyer and kitchen like a parked shopping cart.

    One useful local reality

    In many North Georgia homes, the living room connects directly to a kitchen, foyer, or hallway. In that kind of layout, the sectional is not just seating. It also shapes the traffic lane and acts as a soft divider between zones.

    That is why product details by component can help more than a single overall width. Woodstock Furniture & Mattress Outlet lists dimensions by individual sectional pieces on some product pages, which can make it easier to compare left-arm, right-arm, armless, and corner units when the room has tight constraints or multiple openings.

    Clearance, Doorways, and Delivery Day

    A sectional doesn't arrive by magic. It has to travel from the truck, through the entry, around corners, and into the room. Many “it should fit” plans fall apart.

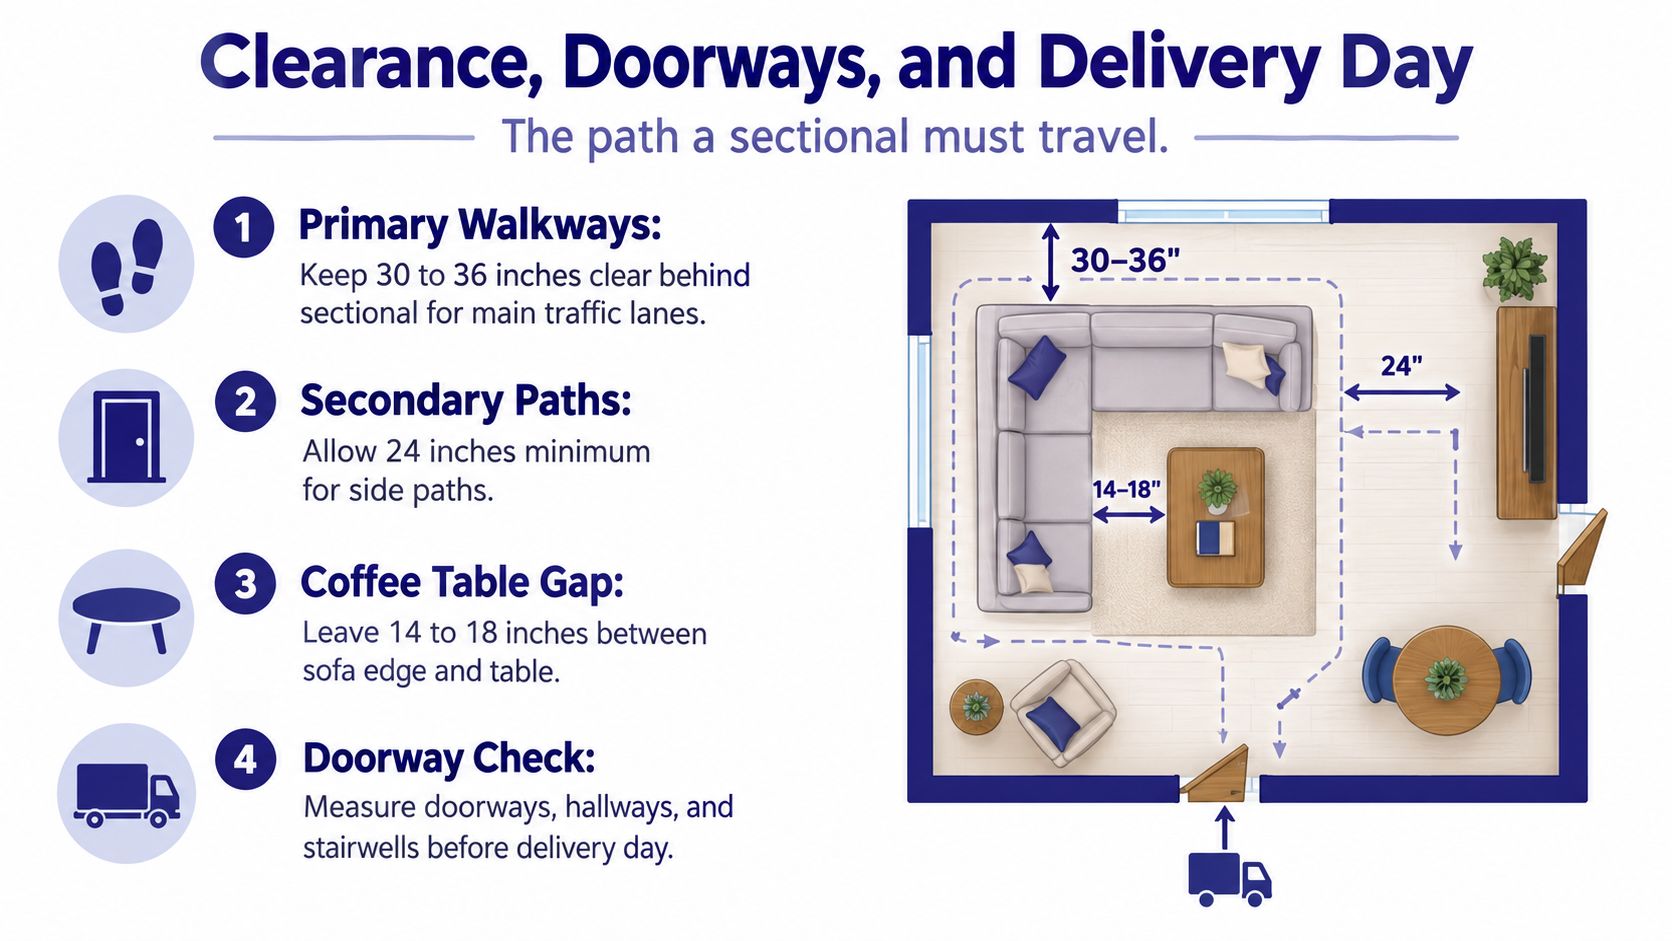
    For room planning, experts commonly recommend at least 30 to 36 inches of clearance around a sectional for walking paths, and some guidance specifically calls for 36 inches to the nearest perpendicular wall or furniture piece when an L-shaped sectional runs along one wall, according to Cozey's sectional sofa size guide.

    An infographic showing recommended clearance measurements and floor layout tips for placing a sectional sofa.

    The clearances that matter most

    Another sizing reference recommends at least 36 inches of walkway space around sectionals, with 42 to 48 inches preferred in high-traffic paths, and also notes 6 to 12 inches behind a sofa to a wall depending on the layout, based on My IKEA Bedroom's sectional sofa size calculator guide.

    That gives you a plain way to judge your room:

    • Main traffic path: closer to the broader clearance guidance
    • Less-used side path: can be tighter if people won't pass there constantly
    • Back to wall: a little space can help the room feel less pinched, depending on the layout

    Measure every opening the pieces will pass through, not just the space where the sofa will sit.

    Delivery day is its own measurement problem

    Sectionals often arrive in multiple pieces, but that doesn't make delivery automatic. Tight stair landings, low soffits, and hard turns can still force a smaller choice than the one you liked in the showroom.

    If you're storing a sectional briefly before move-in or protecting pieces during a renovation, a resource like Heavy Duty Sofa Furniture Protector Cover Bag can help you think through handling and protection before the furniture gets carried across thresholds and corners.

    A quick visual helps here before you place an order:

    Measure again the morning of delivery, then clear the path completely. Floor tape is useful, but delivery crews still need open space to pivot, lift, and reconnect the pieces.

    Seat Depth and How Your Household Actually Sits

    Two sectionals can share nearly the same outside dimensions and feel nothing alike once you sit down. That difference usually comes from seat depth.

    A recent guide highlights a wide spread, from about 20 to 22 inches for compact models to around 26 inches or more for extra-deep lounge-first sectionals, while standard overall depth is often listed around 36 to 40 inches. The same source also notes a projected 2026 trend toward oversized and modular L-shaped sectionals, with some oversized models described at 120 to 168 inches wide and 36 to 45 inches deep, as discussed in WellWhisk's guide to L shape sofas for small living rooms.

    Upright sitting versus lounging

    A shallower seat usually works better when people:

    • sit upright for conversation
    • get up and down often
    • use the sofa for laptop time or casual reading
    • have shorter legs or want feet flat on the floor

    A deeper seat usually suits households that treat the sectional more like a lounging zone. People stretch sideways, curl up in corners, or settle in for movies.

    Same footprint, different comfort

    Say you're comparing two L shapes with similar outside dimensions. One has a tighter seat and a more upright sit. The other uses a deeper cushion and swallows more of the inside space for lounging comfort.

    Neither is automatically better.

    Showroom note: The better choice is the one that matches how your household actually spends time on the couch.

    If your room is modest and the sectional needs to do several jobs, a more balanced depth often feels easier to live with. If the room is primarily for relaxing and the household leans casual, deeper seating may make sense even if the overall dimensions are similar.

    A Simple Measurement Routine Before You Shop

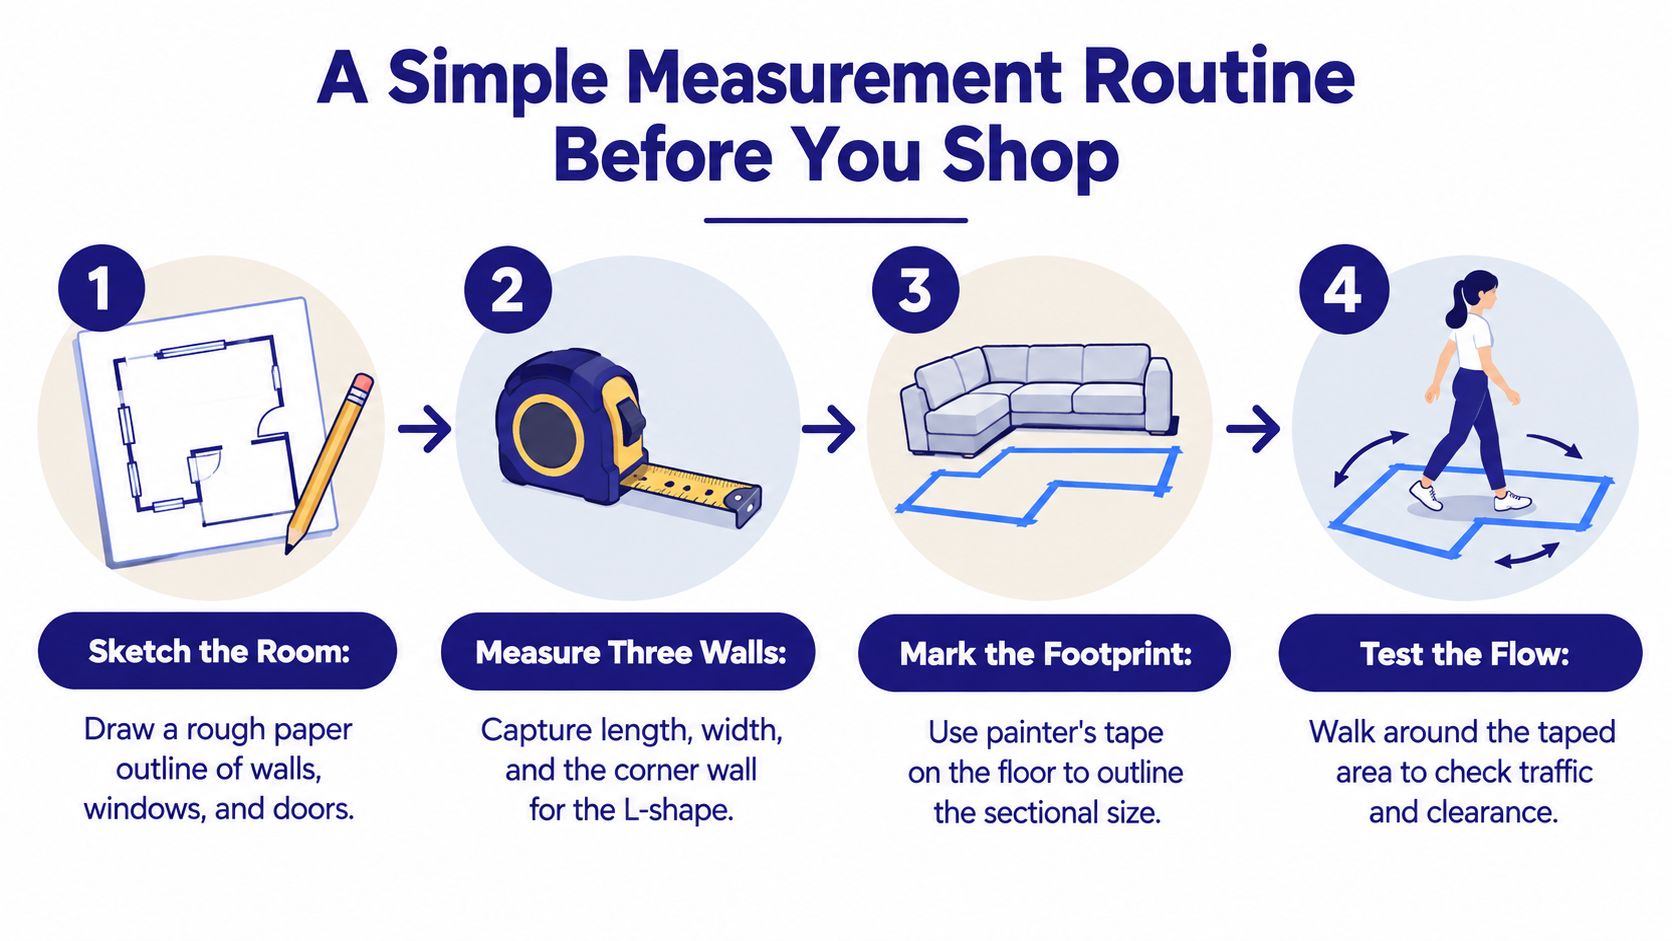
    A design software subscription isn't necessary to measure for a sectional. A pad of paper, a tape measure, and about half an hour are all that's needed.

    Start with a rough sketch of the room. It doesn't have to be pretty. Mark the wall where the sectional may go, the adjoining wall that would catch the return, the windows, the doorway swing, and anything permanent that steals floor space.

    A four-step infographic showing how to measure a room before buying an L-shaped sectional couch.

    The afternoon routine I'd give a first-time buyer

    1. Sketch the room first.
      Draw the basic outline and label doors, windows, vents, and built-ins.

    2. Take the three room measurements that matter most.
      Measure the main wall, the perpendicular wall, and the open floor in front of the proposed seating zone.

    3. Mark the sectional on the floor.
      Use painter's tape to outline the size you're considering so you can walk around it.

    4. Walk the route you use every day.
      Move from the entry to the seat, from the seat to the TV area, and from the seating zone to any nearby doorway.

    Why the taped outline helps so much

    People see scale more clearly when it's on the floor than when it's on a product page. The taped footprint exposes awkward pinch points fast. It also tells you whether the chaise corner feels natural or misplaced.

    If you want a simple companion read for taking room measurements carefully, this piece on practical flooring measurement advice is useful because the same habit applies here. Measure the actual usable space, not just the broad room size.

    A final tip. Don't stop with the room itself. Measure the doorway, hallway turns, and any tight approach into the living area while you still have the tape measure in hand.

    Your Pre-Shopping Checklist and Next Step

    You have probably reached the point where every sectional starts to sound right on paper. This is the moment to slow down and reduce the decision to three plain checks you can trust in the store.

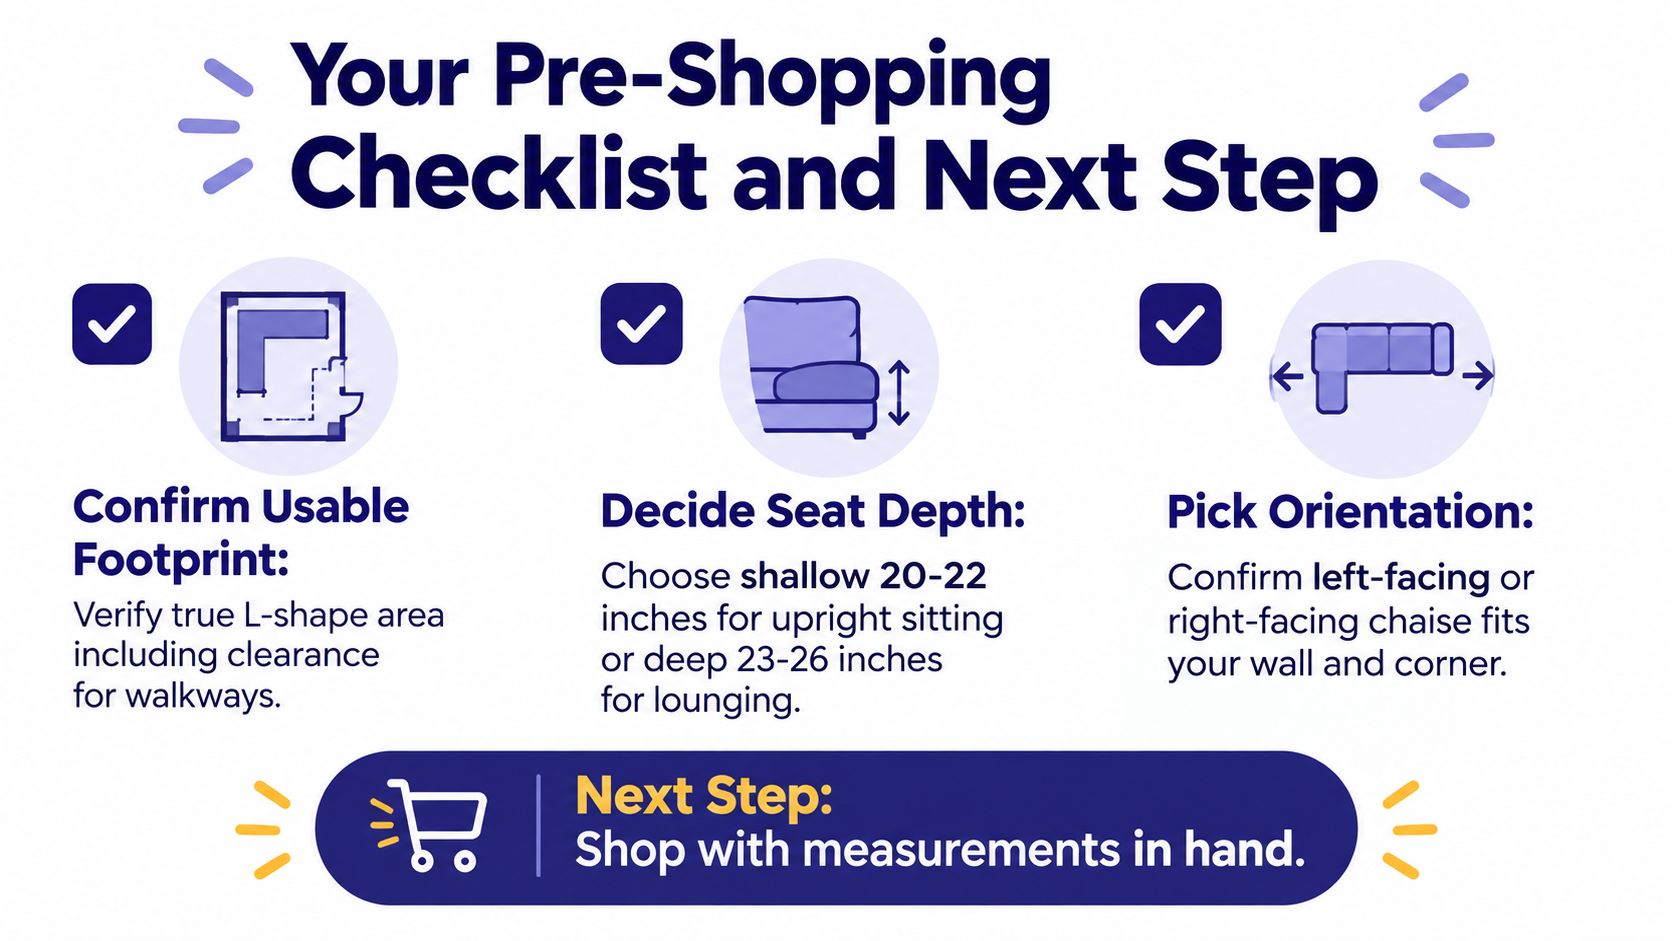
    First, confirm the usable footprint you identified earlier. The question is not whether the sectional touches two walls and technically fits. The question is whether that L shape still leaves enough open floor for people to pass, turn, and sit down without sidestepping a coffee table. A sectional works like a parked SUV in a garage. If it fills the bay but leaves no room to open the doors, the size is wrong for daily use.

    Second, choose seat depth based on how your household sits. Upright readers, older adults, and anyone who likes both feet on the floor often prefer a shallower sit. Households that nap, lounge, or pile in for movies usually want more depth. Outside dimensions tell you how much room the sectional takes. They do not tell you whether your knees, lower back, and lounging habits will like it.

    Third, verify delivery access before you order. A sectional can fit your living room and still get stuck at the front door, a hallway turn, or the last corner before the room opens up.

    A helpful pre-shopping checklist infographic for choosing an L-shaped couch including measurements and orientation.

    A short checklist worth saving

    • Confirm the footprint: make sure the size you marked out earlier still leaves comfortable walking space around the sectional
    • Choose the depth on purpose: match the sit to your household, not just the room measurements
    • Verify the path in: check doors, halls, stair landings, corners, and the final room entry before ordering

    The right sectional size supports movement in the room as much as it supports the people sitting on it.

    One last practical step helps. Bring your sketch, room measurements, and delivery-path notes when you shop so you can compare a product tag to your actual home instead of guessing from memory.

    If you want to test these measurements in person, Woodstock Furniture & Mattress Outlet offers sectionals in a range of sizes and configurations, along with product dimensions that can help you compare layouts more carefully. Bring your room measurements, walk the footprint, sit in different depths, and use the numbers from this guide to narrow down what will really work at home.

  • Living Room Furniture Arrangement with Fireplace Ideas

    Living Room Furniture Arrangement with Fireplace Ideas

    You've moved the sofa twice, the coffee table still blocks the walkway, and the television seems to compete with the fireplace from every angle. That's the central challenge of a living room furniture arrangement with fireplace: the room must support conversation, viewing, circulation, and safe use of the hearth without letting one feature dominate every decision.

    A workable layout starts with measurements, not furniture. Once you know where people walk, how far upholstered pieces must stay from the firebox, and which feature should attract attention first, you can choose seating that fits the room instead of forcing the room to fit the furniture.

    Measure the Room Before Moving Furniture

    A fireplace can make a room feel organized, but it can also hide planning problems. A sofa that looks appropriately sized in a showroom may block a doorway, crowd the hearth, or leave no comfortable route between the entry and the seating area. Measure the room while it's empty, or move pieces temporarily so you can see the complete floor plan.

    Record fixed features first

    Sketch the room on graph paper or in a room-planning tool. Record the length of every wall, the ceiling height, the fireplace opening, hearth projection, mantel height, built-ins, windows, outlets, vents, and light switches. Door swings matter too. A chair that fits on paper may still interfere with a door that opens into the room.

    Measure your existing sofa, chairs, tables, and cabinets by their full footprint, including arms and protruding legs. Photograph the room from the doorway and each corner. Those views often reveal blocked sightlines or awkward furniture depth that a flat sketch doesn't show.

    A floor plan infographic showing how to measure a living room with a fireplace and built-ins.

    Map movement before placing seating

    Draw the natural route from the entry to adjoining rooms, windows, storage, and frequently used outlets. Leave 30 to 36 inches for main walkways as a practical planning range, and allow 42 to 48 inches around major seating pieces when the room permits, so people can sit, stand, and pass without squeezing through the group.

    Next, mark the fireplace's heat-clearance zone. General furniture guidance commonly uses at least 36 inches of clearance near the fireplace opening, while manufacturer instructions should take priority for the specific fireplace and surround. Johansson Design's fireplace layout guidance also discusses keeping rugs away from the hearth and placing furniture so the seating group remains visually connected.

    Practical rule: Measure the clearance from the firebox opening, not only from the front edge of the mantel or hearth.

    A sofa may be several feet from the wall and still sit too close if the hearth projects into the room. Mark that zone with painter's tape before you test furniture positions. If the taped area makes the room feel unusable, the answer may be smaller seating, a different focal-point strategy, or a layout that floats the conversation group farther into the room.

    Choose the Room's Visual Focus

    A fireplace room rarely has only one possible focal point. The right arrangement depends on how your household uses the space, how often the fireplace is lit, and whether people gather for conversation or mostly watch television.

    A fireplace-centered layout gives the mantel, hearth, and artwork above it the strongest visual role. A sofa and chairs can form a U or semi-U around the fire, while the television sits on a perpendicular wall or in a side cabinet. This arrangement usually supports conversation well, but viewers may need to turn their bodies to watch television.

    A television-centered layout makes sense when evening viewing is the room's primary activity. The sofa faces the screen, and the fireplace becomes a secondary feature styled with restrained objects, artwork, or a mirror. This can improve viewing comfort, but the hearth may feel visually distant when the fire is burning.

    A balanced-room approach gives two features related importance. For example, the fireplace may occupy one wall while a bookshelf, window seat, or architectural feature occupies a perpendicular wall. Seating then faces the overlap between both features rather than pointing directly at only one.

    Strategy Best For Main Trade-Off
    Fireplace-centered Conversation, reading, and frequent fireside use The television may sit off-axis
    Television-centered Households that watch television most evenings The fireplace becomes a secondary feature
    Balanced room Rooms with strong features on multiple walls The arrangement requires more careful sightline planning

    The fireplace's history helps explain why this decision feels so important. Earlier hearth-centered homes used large walk-in fireplaces, while by the mid-20th century the fireplace had become an intended centerpiece of parlors, living rooms, and family rooms. That evolution helped turn fireplace design into a distinct building-products category, as described in Architect Magazine's history of fireplace design.

    Choose the focal point based on behavior, not tradition. If people rarely light the fireplace but gather for films, a television-led arrangement may serve the room better. If the room supports conversation, reading, and occasional fires, give the hearth more visual authority without forcing every seat to face it directly.

    Match Seating to Room Size and Fireplace Placement

    Furniture scale determines whether the fireplace feels like a welcoming anchor or a small detail trapped behind upholstery. The same sofa-and-chair arrangement can work beautifully in one room and make another feel crowded, especially when the hearth projects into the seating area.

    Small rooms need a lighter footprint

    In a room under 12 by 12 feet, a compact L-shaped arrangement can preserve both conversation and circulation. A loveseat placed perpendicular to a small sofa keeps seating near the fireplace without extending across the entry path. A large sectional may provide more seats, but its depth and corner can overwhelm the room, crowd the mantel, and reduce flexibility.

    Use pieces with manageable arms, moderate depth, and open space beneath when possible. The aim isn't to fill every wall. It's to create one complete seating group while leaving the doorway and hearth visually clear.

    A diagram illustrating ideal living room furniture arrangements tailored to small, medium, and large room scales.

    Medium rooms support a classic conversation group

    Rooms around 12 by 16 to 14 by 18 feet can often accommodate a sofa and two chairs. The sofa may face the fireplace, with the chairs angled slightly inward rather than placed in a rigid straight line. This creates the familiar U-shaped or semi-U seating pattern, keeps sightlines open, and lets guests face both the fire and one another.

    Center a coffee table within comfortable reach of the seats, but don't let it become a barrier between the group and the hearth. Homes & Gardens' fireplace furniture guidance describes this arrangement as a useful starting point, provided the rug and pathways are large enough for the room.

    Large and irregular rooms need zones

    Large rooms can support two conversation areas, a long sectional with accent chairs, or a main seating group plus a reading corner. Keep the fireplace zone coherent instead of scattering seats across the entire floor. A second area might serve reading, work, or television viewing, but it shouldn't sit in a direct traffic line.

    Corner fireplaces work best when the seating acknowledges the diagonal. Angle chairs toward the hearth or float a sofa so its orientation relates to the fireplace, while leaving the opposite wall available for a media unit or shelving. In open-plan rooms, a large rug and a floating furniture group define the living area without requiring walls. The back of a sofa can separate the seating zone from a dining or kitchen area, but preserve a clear route around it.

    Across these room types, the fixed rules remain the same: protect the hearth, preserve circulation, and choose seating that supports conversation. The adjustable elements are the number of pieces, their orientation, and how much of the room becomes a dedicated fireplace zone.

    Plan the TV and Media Area Around the Fireplace

    A television should fit into the room's use pattern without forcing every other piece into an uncomfortable position. Start by measuring the fireplace surround, mantel height, heat vents, nearby outlets, and the seated eye line before choosing a mount or media cabinet.

    Placing the TV above the fireplace saves wall space, but it can create a viewing angle that feels too high. Ergonomic guidance commonly keeps the top of the image no more than about 15 degrees above eye line, and TV Mount Men's guidance on TV height over a fireplace identifies angles above that threshold as a potential source of discomfort within 30 minutes. The fireplace manufacturer's instructions and the television manufacturer's requirements also matter, particularly where heat and ventilation are concerned.

    Placement Focal Point Effect Best For Watch Out For
    Above the fireplace Combines both features into one vertical composition Rooms with limited wall space High viewing angle, heat, and reduced mantel styling
    Opposite wall Separates fire and television into distinct views Longer rooms with flexible seating Seats may need to rotate between activities
    Side cabinet or adjacent wall Preserves the fireplace as the primary anchor Rooms with built-ins or strong side walls Glare, limited cabinet width, and competing focal points

    If the television sits on a separate wall, a media console should be at least as wide as the fireplace opening so it has visual weight without overpowering the hearth. Check its depth against the planned walking route. A deep cabinet can turn an otherwise clear passage into a cramped corner.

    Finish the media plan before ordering furniture. Confirm outlet locations, cable routes, heat vents, and whether the screen can be viewed from the intended seats without crossing the fire-clearance zone. In some rooms, the most comfortable answer is not the most symmetrical one.

    Use Rugs, Lighting, and Accessories to Anchor the Layout

    A rug defines where the seating conversation begins and ends. For a sofa with two chairs, choose one large enough for at least the front legs of every main seating piece to rest on it. A small rug tucked beneath only the coffee table can make the group feel disconnected. An 8 by 10 foot rug can anchor the arrangement, as discussed in Architect Magazine's fireplace design history and layout discussion.

    Leave some visible floor around the rug in a medium or large room so its boundary looks deliberate. Keep a 12 to 18 inch buffer from the hearth where layout guidance calls for it, and check whether a 6 by 9 foot rug leaves the sofa and chairs partly stranded. Confirm the fireplace manufacturer's requirements before bringing any textile near the hearth. In a narrow room, orient the rug with the seating and preserve a clear route past the fireplace. In an open plan, its edges can mark the living area without blocking circulation.

    A visual guide titled Anchor Your Layout showing four key interior design rules for rugs, lighting, accessories, and plants.

    Build three layers of light

    Use ambient lighting for the room's general glow, task lighting beside a reading chair, and accent lighting to draw attention to the mantel or artwork. A floor lamp can serve the reading seat. Sconces or a picture light add vertical emphasis without taking floor space, which helps in a corner layout.

    Accessories should reinforce the chosen focal point. Keep objects near the television visually restrained, while a taller element on the opposite side can balance the fireplace across the room. On the coffee table, group objects in odd numbers so the center feels arranged rather than scattered. Keep décor clear of the hearth and traffic paths.

    For a softer layer beside stone, brick, or painted surrounds, personalized home decor by That Blanket Co offers ideas for adding texture without another large furniture piece.

    Avoid Fireplace Furniture Layout Mistakes

    A sofa can look correctly aligned with the mantel yet make the room difficult to use. If it crowds the hearth, blocks a doorway, or forces people to turn away from the rest of the seating, the layout needs revision. Treat the fireplace as a heat source with a protected zone, not as another wall.

    Keep upholstered furniture outside that clearance zone. General guidance commonly allows at least 36 inches from the fireplace opening, while a sofa may sit at least 3 feet away. A viewing distance of 4 to 6 feet can feel more comfortable, depending on the room and seat depth. Re-Design's fireplace furniture arrangement guidance emphasizes measuring first and mapping traffic before anchoring the sofa.

    Fix the problems that show up most often

    • Oversized seating: A deep sectional can swallow a narrow room. Use a sofa, loveseat, or separate chairs that preserve a visible hearth and leave room for circulation.
    • Blocked walkways: Keep the main route from the entry clear, with 30 to 36 inches wide where possible. Remove the Johansson Design link here because its spacing guidance was already cited earlier.
    • Crowded coffee tables: Move the table far enough from the seating for people to pass without sharp detours or crossing the fire-clearance area.
    • High television placement: Do not raise the TV to clear a tall mantel. Check seated sightlines first. An adjacent wall may balance the television and fireplace more comfortably.
    • Competing artwork: Give one side of the fireplace stronger visual weight. Let the other side support it with quieter artwork or fewer objects.

    An infographic showing common fireplace furniture layout mistakes and their corresponding professional design solutions.

    Before finalizing, check the room in use. Is the hearth unobstructed? Can someone walk from the entry without weaving through seating? Can the primary seats view the fireplace or television comfortably? Do doors, drawers, and recliners still open without stealing the room's breathing space? A layout that passes these tests will work better in daily life, especially in narrow, corner, and open-plan rooms.

    Test Sample Floor Plans and Shop With Confidence

    The best way to compare fireplace layouts is to test the reasoning against different room shapes. The measurements change, but the important constraints remain consistent: protect the hearth, preserve traffic paths, and size furniture to the room rather than the wall.

    A centered fireplace in a 12 by 14 foot room

    A fireplace centered on the long wall can support a fireplace-led arrangement with a sofa facing the hearth and chairs angled inward. Keep the sofa outside the marked heat zone, place the coffee table inside the seating group, and use a rug large enough for the front legs of the seating to rest on it. The television may work on the opposite wall if viewing remains comfortable, but an adjacent wall can reduce direct competition between the two focal points.

    The fixed elements are the centered firebox, doorway, and walking route. Adjust the sofa depth and chair angle until the entry remains clear rather than trying to fill the entire wall.

    A corner fireplace in a 15 by 20 foot open-plan room

    A corner hearth creates a diagonal focal point. Float a sofa and chairs on an area rug so their orientation acknowledges the fireplace, while the back of the sofa helps define the living zone from the dining or kitchen area. A second seating or reading area can occupy the far end, provided it doesn't interrupt the primary route through the open plan.

    The fireplace location stays fixed, but the furniture group can rotate around it. A television may sit on a perpendicular wall or in a side cabinet, depending on glare, outlets, and whether the room is used more for conversation or viewing.

    A long narrow room with the fireplace on the short wall

    A sofa facing the short-wall fireplace can make the room feel like a corridor if the seating extends too far into the center. Use a compact sofa with chairs angled toward the hearth, then reserve one side for a clear passage. If the television needs to remain in the room, place it on a side wall or use a low media piece that doesn't create a second obstruction.

    In all three scenarios, draw the furniture footprints before shopping. Include the full depth of reclining chairs, the swing of doors, and the path to windows or storage. A room planner can help you create walls, add openings, and drag furniture into position before you commit to a purchase.

    A pre-shopping checklist can prevent an attractive piece from becoming a delivery problem:

    • Re-measure access points: Check doorways, stair turns, and elevator openings, not only the living room.
    • Confirm furniture depth: Compare sofa and chair depth with the floor plan and the planned hearth clearance.
    • Test scale: Ask whether pieces can be sketched to scale in an in-store room planner.
    • Verify upholstery placement: Confirm that upholstered items remain outside the fireplace's required clearance zone.
    • Bring home photographs: Use doorway and corner photos to judge scale, sightlines, and traffic flow before committing.
    • Ask practical questions: Discuss delivery access, setup, warranty terms, and return support before ordering.

    Woodstock Furniture & Mattress Outlet offers sofas, sectionals, chairs, tables, media furniture, décor, and room-planning resources that can help you compare pieces for a fireplace layout. Visit Woodstock Furniture & Mattress Outlet with your measurements, photographs, and marked floor plan so you can evaluate furniture scale and hearth clearance in person.


    Visit Woodstock Furniture & Mattress Outlet with your room dimensions and photos to explore living room seating, tables, media pieces, and décor that fit your planned arrangement. Use the available room-planning tools and knowledgeable staff to test proportions before you choose, then confirm delivery access and fireplace clearance for every upholstered piece.

  • Your Guide to Dining Table Dimensions for a Perfect Fit

    Your Guide to Dining Table Dimensions for a Perfect Fit

    Picking out a new dining table isn't just about finding a style you love—it’s about making sure it actually works in your home. The right dining table dimensions are the secret ingredient to a room that feels just right, never cramped or oddly empty. It ensures you have plenty of space for everything from holiday feasts to homework sessions. This guide is here to take the guesswork out of the process and help you find a great fit.

    Why Getting Dining Table Dimensions Right Matters

    Have you ever been to a dinner party where you felt pinned against the wall, with no room to scoot your chair back? Or maybe you've tried to host a big family meal, only to realize your table is way too small for all your guests? We've all been there, and these common frustrations point to one simple truth: a dining room's success all comes down to the right proportions.

    A table that’s too big for the room can be a disaster. It swallows up the space, blocks walkways, and makes just pulling out a chair feel like a chore. On the other hand, a table that’s too small can look lost and out of place, failing to be the welcoming gathering spot you need it to be.

    Taking a few minutes to measure your room and think about how you'll use the table is easily the most important part of the entire shopping process. It's the one thing that will save you from the headache of bringing home a beautiful piece of furniture that just doesn't fit.

    The goal is to find that sweet spot between seating everyone you need to and still having room to move around comfortably. Your dining table should anchor the room, not dominate it. Think inviting centerpiece, not a cluttered obstacle course.

    We're going to walk through the practical side of things. We'll cover everything you need to know, from standard table measurements to the crucial clearance space you need to leave around it. Our goal is to take you from feeling overwhelmed by all the options to feeling confident that you can pick a table your family will love for years to come. After all, a great table doesn't just fit your room; it fits your life.

    Getting the dimensions right from the start takes care of so many potential problems. It ensures:

    • Comfortable Seating: Everyone has enough elbow room and can get in and out of their seat without a struggle.
    • Easy Traffic Flow: You and your guests can walk around the table without having to turn sideways and squeeze past.
    • A Visually Balanced Room: The table is the right scale for the room, creating a layout that looks and feels harmonious.

    Understanding Standard Dining Table Measurements

    To make sense of the dining table puzzle, let's start with the basic numbers. Getting a handle on standard dining table dimensions is the first real step toward finding a piece that fits both your room and how you live in it. These measurements are surprisingly consistent for one simple reason: they’re built for people.

    Most dining tables you'll find have a standard height between 28 and 30 inches from the floor to the tabletop. This isn't some random number; it's the industry-wide sweet spot that gives the average adult enough legroom and knee clearance when sitting in a normal dining chair.

    Table Width and Length

    Next up, let's talk about width. You'll want a table that's at least 36 inches wide to feel comfortable. This gives everyone enough space for their own place setting without bumping elbows, and it leaves a nice bit of room down the middle for serving bowls or a centerpiece. Anything narrower can start to feel cramped, especially when you've got a full house.

    While width is all about personal space, length is all about seating capacity. It’s pretty straightforward: the longer the table, the more friends and family you can gather around it. For instance, a 60-inch table is great for seating four to six people, but if you're hosting bigger holiday dinners, a 96-inch table can easily handle eight to ten guests.

    Getting this right is the difference between a frustrating, cramped dining room and a space that just works.

    Concept map shows choosing the right dining table size, progressing from a cramped room to a confident fit.

    These standard American dimensions have stood the test of time. A 30-inch height keeps your knees from knocking the table, and a 36-inch width makes passing the potatoes a breeze. Here in North Georgia, where we see everything from compact townhomes to sprawling family houses, round tables are a popular option for smaller spaces because they can improve the flow of a room. And with more families hosting regular get-togethers, flexible options like extendable tables have become a go-to solution.

    Dining Table Length and Seating Capacity

    Use this quick reference to understand the relationship between table length and the number of people it can comfortably seat. As a general rule, you should plan for about 24 inches of space for each person at the table.

    Table Length (Inches) Comfortably Seats
    48" 4 people
    60" – 72" 4-6 people
    80" – 87" 6-8 people
    92" – 108" 8-10 people
    120" 10-12 people

    With a solid understanding of height, width, and length, you’re much better prepared to look at different dining tables and know what will actually work for your home and your needs.

    The Most Important Measurement: The Clearance Zone

    Believe it or not, the most common mistake we see people make when choosing a dining table has nothing to do with the table itself. It’s forgetting about the space around it. This buffer, which we call the clearance zone, is the single most important part of creating a dining room that’s actually comfortable and functional.

    Without enough clearance, even the most beautiful table can turn your dining area into an obstacle course. Think of it like personal space, but for your furniture. You need to give your table room to breathe so you don't end up with that cramped, chaotic feeling where chairs scrape the wall and guests can't get up without a major shuffle.

    Overhead sketch of a dining room showing a table with chairs, 36-inch clearances, and a 48-inch high-traffic walkway.

    The Rule of Three Feet

    An easy-to-remember and very effective guideline is the "Rule of Three Feet". This simply means you should leave at least 36 inches (or 3 feet) of open space on all sides of your dining table. This isn't just for looks; it's a practical minimum for a room to work properly.

    This 36-inch buffer is non-negotiable for basic function. It provides just enough room for a person to pull out their chair and sit down, and for someone else to walk behind them without having to turn sideways.

    This measurement is designed to accommodate two key things happening at the same time:

    • Seated Guests: A person sitting at the table takes up a certain amount of space.
    • Walking Path: Another person needs a clear path to move through the room.

    When to Expand the Zone

    While 36 inches is the bare minimum, some room layouts need a bit more breathing room. If your dining table is placed along a major walkway—say, the main path from the living room to the kitchen—you’ll definitely want to increase that clearance.

    For these high-traffic areas, we recommend aiming for a clearance of 42 to 48 inches. This wider path lets people walk by comfortably without bumping into anyone seated at the table. This is also a key consideration if you plan to put other furniture, like a buffet or server, against the same wall. You have to add the depth of that piece to the 36-inch minimum to make sure your room stays functional and inviting.

    How to Measure Your Room for the Perfect Table Size

    Alright, now that we've covered the basics of table sizes and why clearance space is so important, it's time to bring it all home—literally. Measuring your dining space is the one step that takes all the guesswork out of shopping. It empowers you to walk into a showroom knowing exactly the maximum size table you can get, ensuring you find a piece that truly completes your room instead of cramping it.

    The first step couldn’t be simpler. Grab a tape measure and get the total length and width of your dining room or the area you’ve designated for dining. Go ahead and jot those two numbers down; they’re the foundation for everything that comes next.

    Calculating Your Maximum Table Size

    Once you have your room’s measurements, we can get to the most important calculation. To make sure everyone can move around comfortably, you have to subtract that clearance zone we talked about from your room's total dimensions. Remember, the magic number is 36 inches (or 3 feet) of clearance on all sides of the table.

    This means you’ll need to subtract a total of 72 inches (6 feet) from your room's overall length and another 72 inches from its width. What’s left over is the absolute largest table your space can comfortably handle.

    Let's walk through an example. Say your dining room measures 14 feet long by 12 feet wide.

    1. Length: 14 feet (168 inches) – 72 inches = 96 inches (your maximum table length)
    2. Width: 12 feet (144 inches) – 72 inches = 72 inches (your maximum table width)

    So, in this room, the biggest table you should consider would be 96 inches long and 72 inches wide.

    Making Adjustments for the Real World

    This simple math gives you a great starting point, but let’s be honest—most rooms aren't perfect, empty boxes. You’ll need to account for any real-world obstacles that jut out into your dining area.

    Keep an eye out for things like:

    • Doorways and the natural walking paths people use to get through them.
    • Bay windows that might look lovely but cut into your usable square footage.
    • Existing furniture you plan to keep, like a buffet, server, or china cabinet.

    For instance, if you have a beautiful server that’s 18 inches deep sitting against one wall, you must subtract that depth from your available space before you do the main calculation. Getting these little details right is just as critical as knowing how to measure for a perfect fit with window treatments—it’s the key to a flawless room layout.

    Considering the average American dining room is about 14×14 feet, it's no wonder rectangular tables are so popular. For these common spaces, understanding the relationship between your room's dimensions and your table's size is what turns a good dining area into a great one.

    Choosing the Right Shape for Your Room and Lifestyle

    Sketches illustrating different dining table shapes: rectangular, square, round, and oval, with their benefits.

    So you've measured your room and figured out the biggest table you can technically fit. That's a great start, but size is only half the battle. The table's shape is what really brings the space to life, defining its personality and how you’ll use it day-to-day.

    The right shape impacts everything from how easily people can walk around the room to the overall vibe you create for meals. It's a decision that works hand-in-hand with your measurements to make a dining room that’s both practical and genuinely inviting.

    Rectangular: The Classic Choice

    There’s a good reason rectangular dining tables are the most popular choice you’ll see. They're incredibly efficient, especially if you have a larger family or love to host big gatherings where you need to maximize every inch of seating space.

    Most dining rooms are longer than they are wide, and a rectangular table’s linear shape just naturally fits these spaces. This layout leaves clear, easy-to-navigate pathways around the table. If you're working with a long, narrow room, a rectangular table will complement the layout perfectly instead of looking awkward or out of place.

    Square: Fostering Intimacy

    Looking for a cozier, more connected dining experience? A square table might be your answer. They place every guest an equal distance from one another, which is perfect for sparking conversation and making sure everyone feels included.

    Because they’re symmetrical, square tables look best in square-shaped rooms where they create a wonderful sense of harmony and balance. They can feel a bit off in a long, rectangular room, but they’re a great choice for a dedicated breakfast nook or a smaller, squarish dining area.

    For many homeowners, a key goal is creating a space that encourages conversation. Round and square tables naturally draw people in, making everyone feel equally included in the discussion.

    Round and Oval: Improving Flow

    If your dining area is a bit tight or doubles as a major walkway in your home, round and oval tables are the undisputed champs of traffic flow. With no sharp corners to bump into, they make it much easier to move around the room. This is a huge plus in busy homes, especially those with active little ones running around.

    A round table is fantastic for making a small room feel bigger because it takes up less visual space. Oval tables, on the other hand, offer a brilliant compromise—you get the soft, flowing edges of a round table but with an extended length that can seat more people, much like a rectangle. Both shapes are masters at creating a cozy, communal feel where every seat feels like the best seat in the house.

    Practical Considerations for a Flawless Fit

    Okay, so you've got your tape measure out and have a good handle on the basic dimensions. But getting a table that truly works in your home goes beyond just the numbers on a page. A few final, practical details can be the difference between a table that just fits and one that feels absolutely perfect for years to come.

    Think about how you really use your dining space. Is it just for quiet family dinners, or do you love to host lively holiday gatherings? For many of us, the answer is both. That's where one of the most useful features in the dining world comes into play: an extendable table with leaves.

    The Value of Flexibility

    A table with leaves offers incredible flexibility, solving the classic dilemma of wanting a big table for guests without sacrificing precious floor space every other day of the year. For daily life, you keep it compact, making the room feel open and spacious. When company comes over, you simply pop in the leaves to make sure everyone has a comfortable spot at the feast.

    Think of it as a table that grows with your needs. It’s compact for Tuesday night homework sessions but expansive enough for a full Thanksgiving feast, giving you the best of both worlds in a single piece of furniture.

    Chair Compatibility and Final Checks

    The chairs you choose are just as critical as the table itself. There’s nothing worse than buying a beautiful set only to find out the chairs don't quite work. Here's what to check to ensure they're a perfect match:

    • Chair Height: You need enough legroom to be comfortable. A good rule of thumb is to have about 10-12 inches between the top of the chair seat and the bottom of the tabletop.
    • Chair Width: Measure the width of your chairs, especially at their widest point. This will tell you how many can actually fit along the side of your table—paying close attention to the space between the table legs.
    • Armrests: If you're eyeing chairs with armrests, do a quick check to make sure the arms are low enough to slide completely under the table's apron. This is a huge space-saver when the chairs aren't being used.

    Trying to picture all these pieces together can be tough. For the more visually-minded, learning some basic interior design sketching techniques can be a fantastic way to map out your space and see how different shapes and sizes will look.

    Ultimately, there’s no substitute for seeing it all in person. Sometimes the best way to know for sure is to experience the scale and feel of the furniture firsthand. We always invite you to come visit one of our showrooms. You can sit at different tables, try out the chairs, and get a real sense of how the dimensions feel. Our knowledgeable team at Woodstock Furniture & Mattress Outlet and our experts at the Design Center are always here to help you navigate these final choices, so you can walk away confident in your decision.

    Answering Your Top Dining Table Dimension Questions

    Even after you’ve measured your space and reviewed all the guidelines, it’s completely normal to have a few questions rattling around. We get it. Picking out a dining table is a big decision! To make sure you feel totally confident in your choice, we’ve put together a few of the most common questions we hear from shoppers just like you.

    What Is the Standard Height of a Dining Table?

    The industry standard height for just about any dining table you’ll find is between 28 to 30 inches high, measured from the floor to the tabletop. This isn't just a random number; it's designed to work perfectly with standard dining chairs, which usually have a seat height of around 18 to 19 inches. This combination gives the average adult plenty of comfortable legroom.

    Think of a table and its chairs like a well-fitted suit. You're aiming for that sweet spot of a 10 to 12-inch gap between the chair seat and the tabletop. This gives you enough room to be comfortable without feeling like you're sitting too high or too low.

    How Much Space Do I Need Between My Dining Table and the Wall?

    As a rule of thumb, you should always try to leave a minimum of 36 inches (or 3 feet) of space between the edge of your table and the nearest wall or piece of furniture. We call this the "clearance zone," and it's absolutely essential for making the room usable.

    This buffer zone ensures your family and guests can:

    • Easily slide their chairs in and out without bumping into anything.
    • Have a clear path to walk behind people who are already seated.

    If your dining area is also a major walkway through your home, it's an even better idea to expand that zone to 42 to 48 inches. This will help prevent traffic jams and keep the whole space feeling open and easy to move through.

    What Size Round Table Do I Need for 6 People?

    To comfortably seat six people at a round table, you’ll want to look for one with a diameter between 44 and 54 inches. If you like having the flexibility to squeeze in an extra guest or two for holidays or parties, a 60-inch round table can often seat up to eight people without feeling too crowded.

    Round tables are absolutely fantastic for creating a cozy, conversational vibe where everyone feels included. Plus, since they don't have any sharp corners, they're a great choice for improving the flow of traffic, especially in smaller or square-shaped dining rooms.


    Feeling ready to find your perfect fit? The best way to make the final call is to see your options in person. At Woodstock Furniture & Mattress Outlet, our knowledgeable staff would love to help you browse our great selection of dining tables and chairs to find the one that fits your home and your life.

    Visit one of our North Georgia showrooms to get started

  • 10 Practical Bedroom Furniture Arrangement Ideas

    10 Practical Bedroom Furniture Arrangement Ideas

    Arranging bedroom furniture is more than just deciding where the bed goes; it's about creating a space that feels balanced, functional, and genuinely restorative. A well-planned layout can transform a cluttered room into a peaceful sanctuary, improve traffic flow, and even contribute to better sleep. Many homeowners, however, face common challenges that generic advice fails to solve. How do you handle an awkward L-shaped room or a small bedroom where every square foot counts? How do you integrate a sitting area into a master suite without it feeling cramped?

    This guide provides actionable solutions to these real-world problems. We move beyond the basics to deliver ten distinct, problem-solving bedroom furniture arrangement ideas tailored to specific needs and room types. Each layout is designed to address a common pain point, from maximizing floor space in a kid's room to optimizing the flow in a bedroom with an ensuite bathroom.

    Inside, you will find practical rules, specific furniture sizing guidance, and clear traffic-flow tips to help you implement each concept effectively. We’ll explore proven layouts that work for various room shapes and sizes, helping you create a bedroom that not only looks thoughtfully designed but truly supports your daily lifestyle. Forget the guesswork and start building a functional, serene space today.

    1. The Centered Focal Point Layout

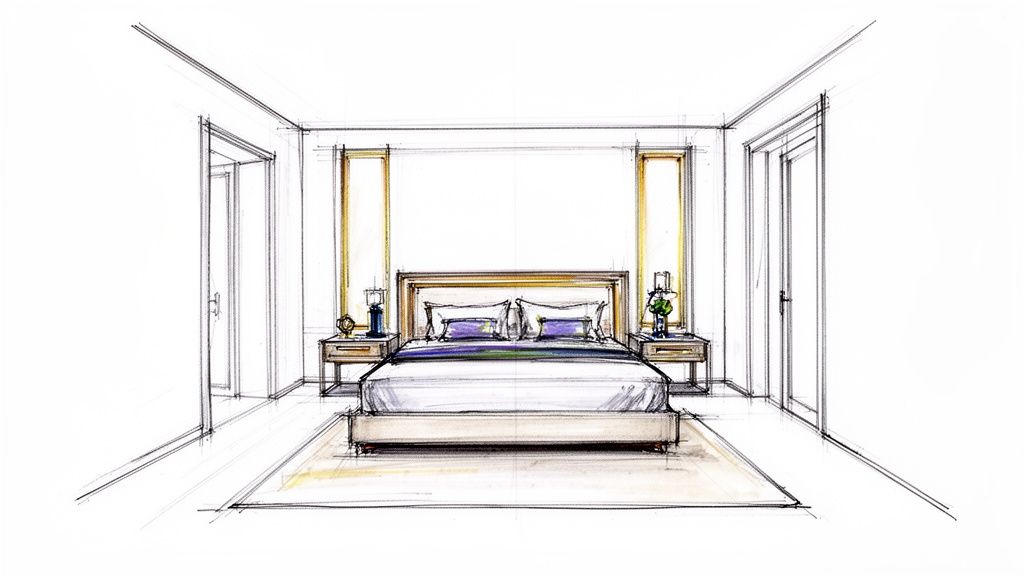
    The Centered Focal Point Layout is a timeless and popular approach to organizing a bedroom. This classic arrangement establishes the bed as the room's undisputed centerpiece by placing it against the longest, most prominent wall, usually the one you see first when entering. It's a foundational technique in interior design that creates a sense of order, calm, and deliberate composition, making it one of the most reliable bedroom furniture arrangement ideas.

    This layout is prized for its inherent symmetry and balance. By positioning the bed in the middle and framing it with matching nightstands, you create a visual anchor that the rest of the room revolves around. This approach not only looks intentional but also feels restorative, which is ideal for a space dedicated to rest. It is commonly seen in thoughtfully designed hotel rooms and master suites.

    A hand-drawn sketch of a contemporary bedroom layout featuring a bed, two nightstands, and two doors.

    How to Implement This Layout

    Successfully executing a centered layout depends on proportion and thoughtful placement. Your goal is to achieve harmony without making the space feel rigid or cluttered.

    • Establish the Anchor: Choose a substantial headboard to solidify the bed's role as the focal point. A well-chosen headboard can add texture, height, and style.
    • Balance with Nightstands: Select nightstands that are proportional to your bed. A large, king-sized bed looks well-balanced with wider nightstands, while a full or queen bed pairs well with more moderately sized tables. Ensure their height is level with or just slightly below the top of your mattress for easy access.
    • Maintain Clear Pathways: To ensure comfortable movement, leave at least 24 to 36 inches of clear walking space on both sides of the bed.
    • Create Symmetrical Storage: For complete visual balance, place a dresser or media console directly opposite the foot of the bed. This arrangement creates a satisfying sense of equilibrium.
    • Lighting and Finishing Touches: Mount matching wall sconces or place identical table lamps on each nightstand to reinforce the symmetry. To add softness and dimension, consider adding a bed skirt.

    2. The Corner Bed Placement Strategy

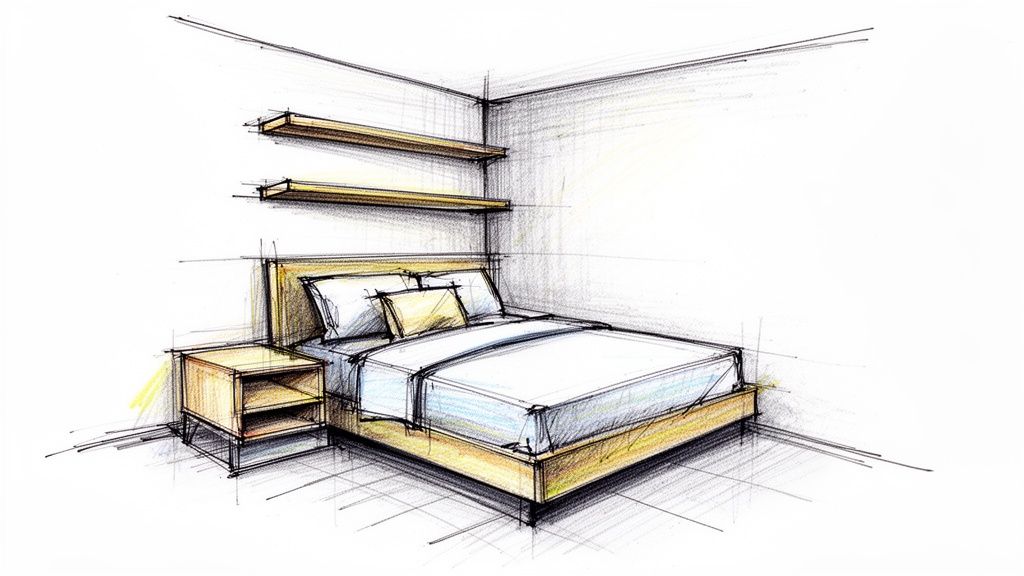
    The Corner Bed Placement Strategy is an innovative approach that tucks the bed into a corner, using two walls as an anchor. This arrangement creates a cozy, intimate sleeping nook and is one of the most effective bedroom furniture arrangement ideas for maximizing floor space. It is particularly useful in smaller bedrooms, studio apartments, or rooms with challenging layouts, like those often found in efficient Atlanta metro area homes or kids' bedrooms.

    This layout is a favorite in Scandinavian design because it challenges the traditional "bed against the center of a wall" rule. By pushing the bed into a corner, you open up a significant amount of central floor space, which can make a compact room feel surprisingly airy and spacious. This setup feels intentional and snug, transforming an underutilized corner into the room's most comfortable and functional zone. It's an ideal solution for guest rooms or multi-purpose spaces where flexibility is key.

    A hand-drawn sketch of a minimalist bedroom interior with a bed, nightstand, and floating shelves.

    How to Implement This Layout

    Successfully creating a corner bed layout is about smart furniture choices and space-saving techniques. Your goal is to make the corner feel like a deliberate design feature, not an afterthought.

    • Choose the Right Bed Frame: Opt for a low-profile headboard or no headboard at all to avoid a cramped look. A frame without a bulky footboard is essential to keep sightlines open and maintain a feeling of spaciousness.
    • Utilize Vertical Space: Install floating shelves above the bed in the corner. This provides a perfect spot for books, decor, and a small lamp without taking up any floor space.
    • Streamline Your Nightstand: Place a single, compact nightstand on the accessible side of the bed. This keeps essentials within reach while maintaining a clean, uncluttered look.
    • Think About Lighting: Since one side is against a wall, traditional lamps may not work. Consider mounting a wall sconce or a plug-in pendant light in the corner to provide focused task lighting for reading.
    • Keep Colors Light: Use light, neutral paint colors on the walls within the corner. This prevents the sleeping nook from feeling dark or enclosed and helps reflect light throughout the room.

    3. The Floating Bed Island Layout

    The Floating Bed Island Layout is a contemporary and dramatic approach that positions the bed away from the walls, turning it into a sculptural centerpiece. This sophisticated arrangement creates a "floating" effect, making a bold statement in larger bedrooms. It is one of the more daring bedroom furniture arrangement ideas, ideal for open-concept lofts or spacious master suites where you want to create distinct functional zones.

    This layout transforms the bed from a simple piece of furniture into a destination within the room itself. By pulling it away from the walls, you establish a dynamic and luxurious atmosphere often seen in boutique hotels and architectural magazine features. This approach requires ample square footage but rewards you with a unique, high-design aesthetic that redefines the entire space.

    How to Implement This Layout

    Executing this layout successfully is about creating a deliberate, well-anchored composition rather than just placing a bed in the middle of a room. The goal is to make the arrangement feel intentional and integrated.

    • Anchor the Space: Use a large area rug (at least 8×10 feet) to define the sleeping zone and visually ground the bed. The front legs of the bed and nightstands should sit comfortably on the rug.
    • Choose a Statement Headboard: Since the back of the bed is exposed, a headboard with a finished back or a compelling design is crucial. A substantial, well-crafted headboard can serve as a stunning focal point.
    • Maintain Ample Clearance: Ensure at least 30 to 36 inches of clear pathway on all sides of the bed. This generous spacing is essential for the layout to feel open and luxurious, not cramped.
    • Create a Functional Backdrop: Place a low console table, bench, or a pair of chairs behind the headboard to create a functional and stylish backdrop. This adds visual weight and utility to the arrangement.
    • Rethink Your Lighting: Traditional table lamps may not work if power outlets aren't in the floor. Instead, consider pendant lights hung from the ceiling over each nightstand or elegant floor lamps to provide balanced, ambient light.

    4. The Dual-Purpose Master Suite Layout

    The Dual-Purpose Master Suite Layout transforms a large bedroom into a multifunctional sanctuary that accommodates both rest and daily activities. This sophisticated approach is ideal for modern living, where the primary bedroom often doubles as a home office, a reading nook, or a private lounge. It stands out among bedroom furniture arrangement ideas by thoughtfully zoning a single space to serve distinct purposes without feeling cluttered.

    This layout is perfect for spacious master bedrooms where homeowners want to maximize every square foot. By creating separate zones for sleeping and living, you craft a resort-style environment that feels both luxurious and highly functional. It’s a design seen in high-end properties, offering a practical solution for remote workers or anyone seeking a private retreat within their own home.

    How to Implement This Layout

    Successfully creating a dual-purpose layout hinges on clear visual separation and cohesive design. The goal is to define distinct areas while maintaining a harmonious flow throughout the room.

    • Define Zones with Rugs: Use area rugs to create visual boundaries. Place a large rug under your bed and a separate, complementary rug in your seating or work area to clearly delineate the two spaces.
    • Create Functional Areas: Position a seating area or workspace opposite or perpendicular to the bed. For a home office zone, ensure you have a comfortable desk chair and dedicated task lighting to prevent eye strain.
    • Balance Furniture and Storage: Choose furniture that works for both zones. A versatile dresser, for instance, can store clothing while also organizing office supplies. Maintain at least 30 to 36 inches of pathway between zones for easy movement.
    • Layer Your Lighting: Install different lighting for each function. Use soft, ambient lighting like table lamps near the bed and brighter, focused task lighting over a desk or reading chair.
    • Maintain Cohesion: Tie the zones together by using a consistent color palette and similar furniture finishes. A neutral backdrop allows you to add unique accents to each area, giving them personality while ensuring the entire room feels connected. Consider an open bookshelf as a gentle divider that adds storage without closing off the space.

    5. The Window-View Priority Layout

    The Window-View Priority Layout is an arrangement that elevates your bedroom's best architectural feature: its window. This approach positions the bed to either face or frame the window, making natural light and the outdoor scenery the room's main attraction. It’s one of the most refreshing bedroom furniture arrangement ideas, especially for rooms with scenic views.

    This layout is deeply rooted in biophilic design principles, which emphasize a connection to nature to improve well-being. By prioritizing the view, you create a dynamic and calming environment that changes with the time of day and seasons. It's an ideal choice for transforming a master suite into a resort-like retreat, where waking up to sunlight and nature becomes part of your daily routine.

    Watercolor sketch of a serene bedroom with a bed, large window overlooking nature, and floating shelf.

    How to Implement This Layout

    Successfully creating a window-focused layout is about enhancing the view, not obstructing it, while maintaining functionality and comfort.

    • Orient the Bed: Place your bed directly facing the window for an immersive experience, or on the wall adjacent to it so the view is to your side. A bed with a low-profile headboard is an excellent choice to keep sightlines clear.
    • Control the Light: Invest in a layered window treatment. Combine sheer curtains for daytime privacy and light diffusion with blackout curtains to ensure you can control light levels for restful sleep.
    • Frame the Feature: Use decorative drapery panels on either side of the window to frame it like a piece of art. This adds softness and a touch of elegance to the focal point.
    • Create a Functional Zone: Enhance the window area by adding a comfortable armchair or a low bench beneath it. This creates a cozy reading nook and makes the space more intentional.
    • Balance the Room: Place a dresser or console table on the wall opposite the window. This provides necessary storage without competing for attention and helps balance the room's visual weight. Ensure pathways remain clear, with at least 24 to 30 inches for easy movement around the furniture.

    6. The L-Shaped Bedroom Configuration

    The L-Shaped Bedroom Configuration is a strategic approach designed to maximize the potential of rooms with unconventional layouts. This method embraces architectural quirks, such as alcoves or angled walls, by arranging furniture to create distinct, functional zones. It’s a smart solution for rooms that defy a simple, symmetrical setup, transforming awkward spaces into highly practical and organized bedrooms.

    This layout is particularly valuable in homes with unique architectural features. Instead of fighting against an irregular floor plan, this configuration works with the room's natural lines. By thoughtfully placing furniture within the two "legs" of the L-shape, you can establish separate areas for sleeping and other activities like dressing, working, or reading. This is one of the most effective bedroom furniture arrangement ideas for making an odd-shaped room feel intentional and cohesive.

    How to Implement This Layout

    Successfully arranging an L-shaped room depends on careful measurement and creating a sense of visual harmony across the different zones. The goal is to make the unconventional shape feel like a deliberate design choice rather than a limitation.

    • Anchor the Main Zone: Place the bed against the longest, most prominent wall in the main section of the L. This establishes a clear primary zone dedicated to rest and relaxation.
    • Utilize the Secondary Leg: Position secondary furniture, like a dresser, vanity, or small desk, in the shorter leg of the L. This creates a functional secondary zone that feels separate yet connected.
    • Choose Proportional Furniture: Select pieces that fit comfortably within each specific area. Avoid oversized furniture that can overwhelm one section and make the room feel unbalanced. Modular furniture can be an excellent choice for its adaptability.
    • Unify with a Rug: Use a large area rug to visually connect the two zones. Placing the rug so that it bridges both sections helps tie the entire room together and defines the space.
    • Create Visual Cohesion: Paint all walls the same color to minimize the irregularity of the room's shape and create a unified backdrop. You can also use mirrors strategically to reflect light and make the space feel larger and more open.
    • Plan Your Lighting: Install lighting that serves both zones effectively. Consider a central overhead fixture for general illumination, supplemented by task lighting like a desk lamp or reading sconce in the secondary area.

    7. The Bedroom with Ensuite Bathroom Flow Layout

    The Bedroom with Ensuite Bathroom Flow Layout is a modern approach that prioritizes a seamless connection between your sleeping area and a private bathroom. This arrangement strategically positions furniture to create an intuitive and unobstructed path to the ensuite, enhancing daily routines while preserving the bedroom's tranquil atmosphere. It's a crucial consideration in master suites where the integration of bedroom and spa-like bathroom is a key element of the home's design.

    This layout transforms a master bedroom into a cohesive personal retreat. By carefully planning the flow, you avoid creating an awkward or disjointed space, ensuring that frequent trips to the bathroom don't disrupt the room's primary purpose: rest. It is a hallmark of thoughtful residential architecture, commonly seen in new construction and luxury properties aiming for a resort-style living experience. This is one of the more functional bedroom furniture arrangement ideas for contemporary living.

    How to Implement This Layout

    Creating a successful ensuite flow is about balancing accessibility with privacy. The goal is to make the two spaces feel connected yet distinct, supporting both your morning and evening routines without compromise.

    • Prioritize Privacy: Position your bed so it is not in the direct line of sight from the bathroom door. This creates a sense of separation and comfort, especially in a shared space.
    • Define Zones with Rugs: Use area rugs to visually separate the main sleeping area from the path to the bathroom. A well-placed runner or a large rug under the bed can establish clear zones without physical barriers.
    • Coordinate Finishes: Create visual harmony by selecting a color palette and materials that complement both the bedroom and bathroom. This continuity makes the transition between spaces feel natural and intentional.
    • Create a Transition Area: Place a stylish bench at the foot of the bed or a small seating area with an accent chair just outside the bathroom. This creates a functional "buffer zone" for dressing or relaxing.
    • Choose Appropriate Furniture: If placing a dresser or chest near the bathroom entrance, consider materials with moisture-resistant finishes. Many brands feature durable options suitable for various home environments.
    • Manage Lighting: Ensure bathroom lighting doesn't spill into the bedroom and disturb a sleeping partner. Dimmers and targeted task lighting in the ensuite are essential for nighttime use.

    8. The Multi-Purpose Kids' Bedroom Layout

    The Multi-Purpose Kids' Bedroom Layout is a functional and adaptable approach designed to accommodate sleeping, studying, playing, and storage within a single room. This arrangement prioritizes durability, safety, and age-appropriate design, allowing the space to evolve with a child from toddler to teen. It’s an essential strategy for maximizing limited space and is one of the most practical bedroom furniture arrangement ideas for growing families.

    This layout excels at creating distinct "zones" for different activities, which helps maintain order and gives children a sense of ownership over their environment. By clearly defining areas for rest, work, and play, you can design a room that feels both organized and spacious, even when square footage is tight. This thoughtful approach helps select furniture that can serve multiple functions and support a child's development.

    How to Implement This Layout

    Creating a successful multi-purpose kids' room is about smart furniture choices and strategic zoning. The goal is to build a flexible environment that supports various needs without feeling chaotic.

    • Zone the Space: Use area rugs and furniture placement to create separate zones. For instance, place a desk and chair near a window for a dedicated study nook, and use a small rug and storage bins to define a play area.
    • Go Vertical: Maximize floor space with bunk beds or loft beds. This opens up valuable room below for a desk, a reading corner, or additional storage, making it ideal for shared sibling bedrooms.
    • Select Quality Bedding: Choose a durable twin or full mattress that provides proper support for growing bodies and ensures restorative sleep.
    • Prioritize Smart Storage: Incorporate modular furniture that can be reconfigured as your child grows. Use under-bed drawers, wall-mounted shelving, and storage ottomans to keep toys, clothes, and books organized and accessible.
    • Layer the Lighting: Use multiple light sources to suit different activities. A bright task lamp is essential for the desk, a soft, warm lamp works well for a reading corner, and an overhead light can illuminate the entire play space.
    • Plan for Durability: Choose furniture with resilient finishes and opt for washable paint on the walls. A child's room should be built to handle daily life, from homework sessions to creative messes.

    9. The Under-Window Bed Nook Layout

    The Under-Window Bed Nook Layout is a charming arrangement that positions the bed directly beneath a window or a series of windows. This design choice transforms the bed into a cozy, light-filled nook, creating an intimate and inviting sleeping environment. It’s an effective strategy for maximizing natural light and turning an architectural feature into the room's highlight, making it one of the most aesthetically pleasing bedroom furniture arrangement ideas.

    This layout is celebrated for its ability to make a room feel both airy and snug. Placing the bed under a window draws the eye upward, highlighting the room's height and the view outside. It is a hallmark of cottage, farmhouse, and Scandinavian design styles, which prioritize natural elements and a sense of warmth. This arrangement is particularly effective in smaller bedrooms, guest rooms, or historic homes with distinctive window frames, where it adds character and charm.

    How to Implement This Layout

    Creating a successful under-window nook requires balancing light control, functionality, and comfort. The goal is to craft a space that feels intentional, cozy, and practical for daily use.

    • Choose a Low-Profile Bed: Select a bed with a low headboard or no headboard at all to avoid obstructing the window and your view. This maintains clear sight lines and allows maximum sunlight to enter the room.
    • Prioritize Light Control: Install effective window treatments to manage light and privacy. Blackout curtains or cellular shades provide excellent control, allowing you to darken the room for sleep.
    • Create Functional Bedside Storage: Since traditional nightstands might block window access, consider using floating shelves on either side of the window. C-shaped tables that can slide over the mattress also work well as space-saving solutions.
    • Manage Thermal Comfort: Windows can be a source of drafts or heat. Invest in a mattress with temperature-regulating properties to ensure you stay comfortable regardless of the season.
    • Enhance the Nook Feeling: Add layers of texture with throw pillows and a plush blanket to make the space feel extra cozy. Wall-mounted reading lights on either side of the window frame can provide focused lighting for nighttime reading.

    10. The Adjacent Nightstand Storage Solution Layout

    The Adjacent Nightstand Storage Solution Layout is a highly functional approach that prioritizes organization and accessibility. This method treats storage furniture not as afterthoughts but as integral components of the bedroom's core design. By strategically placing dressers and nightstands adjacent to and around the bed, this layout creates an efficient, cohesive, and clutter-free environment perfect for modern living.

    This arrangement is particularly valuable for those who need to maximize every square inch for storage without sacrificing style. A thoughtful layout can showcase both aesthetic harmony and real-world functionality. It turns your bedroom into a well-organized sanctuary where everything has its place, making daily routines smoother and more peaceful.

    How to Implement This Layout

    Creating a storage-centric layout requires a focus on proportion and smart placement. The key is to integrate storage pieces seamlessly so they enhance the room's flow and feel intentional rather than crowded.

    • Select Smart Nightstands: Choose nightstands with multiple drawers or shelving. For optimal bedside convenience and storage, carefully consider the placement and style of nightstands to complement your bed arrangement. Many brands offer options with both style and ample storage.
    • Balance with a Dresser: Position a substantial dresser directly across from the foot of the bed or along an adjacent wall. This creates visual balance and consolidates clothing storage in one accessible zone.
    • Maintain Clear Pathways: To ensure the room remains easy to navigate, leave at least 24 to 36 inches of clearance around major furniture pieces like the bed and dresser.
    • Go Vertical with Storage: Install floating shelves above your dresser for displaying photos, books, or decorative items, freeing up the surface for daily-use items.
    • Coordinate for Cohesion: Opt for a matching bedroom set or pieces with coordinating finishes and hardware. This creates a unified look that makes the integrated storage feel deliberate and high-end. Use drawer dividers to maximize the efficiency of every inch of storage space.

    Top 10 Bedroom Layouts Comparison

    Layout Implementation complexity Resource requirements Expected outcomes Ideal use cases Key advantages
    The Centered Focal Point Layout Low — straightforward, symmetrical setup Moderate — bed, matching nightstands, clear wall space Balanced, organized visual focus Master bedrooms, hotels, most room sizes Strong symmetry, easy to style
    The Corner Bed Placement Strategy Low–Medium — simple placement, access trade-offs Low — compact frames, possible single nightstand Space-saving, cozy sleeping nook Small bedrooms, studios, rentals Maximizes floor area, intimate feel
    The Floating Bed Island Layout High — requires careful clearance and anchoring High — large room, area rug, bespoke lighting Dramatic, modern, clearly zoned space Large master suites, lofts, designer homes High-end aesthetic, 360° access
    The Dual-Purpose Master Suite Layout High — complex zoning and balance High — extra seating, desk, larger square footage Multifunctional, hotel-like retreat Remote workers, spacious master bedrooms Increases functionality and resale appeal
    The Window-View Priority Layout Medium — light and sightline management needed Moderate — quality window treatments, low headboard Enhanced natural light, outdoor connection Rooms with scenic windows, biophilic designs Better circadian alignment, strong views
    The L-Shaped Bedroom Configuration Medium–High — requires measurement and planning Moderate — scaled or custom/modular pieces Makes odd shapes functional; distinct zones L-shaped or angled rooms, attics, historic homes Turns awkward plans into usable space
    The Bedroom with Ensuite Bathroom Flow Layout Medium — traffic flow and visual coordination Moderate — coordinated finishes, humidity control Efficient routines, cohesive bedroom-bath flow Master suites with attached baths, luxury homes Convenience, improved daily workflow
    The Multi-Purpose Kids' Bedroom Layout Medium — flexible planning for multiple zones Moderate — durable furniture, storage solutions Organized, adaptable space for play/study/sleep Kids' and teen rooms, shared bedrooms Multi-functionality, grows with the child
    The Under-Window Bed Nook Layout Low–Medium — light control and headboard choices Low–Moderate — good window treatments, low bed Cozy, light-filled alcove Small to medium bedrooms, cottages, bay windows Charming aesthetic, preserves wall space
    The Adjacent Nightstand Storage Solution Layout Medium — balancing storage and circulation Moderate — coordinated nightstands, dressers Highly organized, accessible storage Families, practical master bedrooms, staged homes Maximizes storage and daily convenience

    Bringing Your Ideal Bedroom Layout to Life

    Choosing the right bedroom furniture arrangement is about more than just fitting pieces into a room; it’s about crafting an environment that supports your lifestyle, promotes tranquility, and reflects your personal taste. Throughout this guide, we've explored ten distinct layout strategies, from the classic Centered Focal Point that creates immediate balance to the clever Corner Bed Placement designed to maximize every square inch of a compact room. We’ve seen how a Floating Bed Island can add a touch of luxury to a spacious master suite and how a Dual-Purpose Layout can seamlessly integrate a home office or a relaxing reading nook into your personal sanctuary.

    Each of these bedroom furniture arrangement ideas serves as a blueprint, not a rigid rule. The true magic happens when you adapt these concepts to your unique space and needs. Remember the core principles we've discussed: establishing a clear focal point (usually the bed), ensuring unobstructed traffic flow with at least 30-36 inches for main pathways, and layering lighting to create both function and ambiance. Whether you're tackling an L-shaped room or optimizing flow around an ensuite bathroom, the goal remains the same: to build a cohesive, comfortable, and highly functional space.

    Key Takeaways for Your Design Journey

    As you move from planning to placement, keep these essential takeaways in mind:

    • Measure Everything: Before you move a single piece of furniture or make a new purchase, measure your room, your doorways, and your existing furniture. A detailed floor plan, even a simple sketch, is your most powerful tool for avoiding costly and frustrating mistakes.
    • Function First, Form Second: Ask yourself what you need your bedroom to do. Is it purely for sleep? Does it need to accommodate a workspace, a vanity area, or extensive storage? Prioritizing your functional needs will guide your layout decisions and ensure the final arrangement serves you well day in and day out.
    • Embrace Iteration: Your first attempt at a new layout might not be perfect, and that's okay. Live with an arrangement for a few days. Walk through the space at different times, notice any pinch points or awkward transitions, and don't be afraid to tweak the placement of a chair, a rug, or a lamp until it feels just right. Sometimes, the most effective solutions are discovered through trial and error.

    Expert Insight: The most successful bedroom designs are those that feel personal and intentional. Don't be afraid to break from convention if it means creating a layout that genuinely works for you. To move beyond traditional designs and truly personalize your space, explore some uncommon furniture arrangements that can work wonders in any room, including your bedroom.

    Ultimately, mastering these bedroom furniture arrangement ideas empowers you to transform your most personal space into a true haven. It's a skill that allows you to adapt to new homes, evolving needs, and changing tastes with confidence. By applying these principles, you can create a bedroom that is not only beautiful and organized but also a powerful tool for enhancing your daily well-being and ensuring restorative rest. Your perfect bedroom is waiting to be discovered, one well-placed piece of furniture at a time.


    Ready to find the perfect pieces for your new layout? Visiting a showroom allows you to see, touch, and experience furniture firsthand, making it easier to visualize how it will work in your space. At Woodstock Furniture & Mattress Outlet, our friendly, knowledgeable team can help you navigate our great selection and provide expert guidance to bring your ideal bedroom furniture arrangement ideas to life.

  • How Big is a Queen Size Bed? A Guide to Dimensions and Room Fit

    How Big is a Queen Size Bed? A Guide to Dimensions and Room Fit

    If you're wondering, "how big is a queen size bed?", the standard queen mattress measures 60 inches wide by 80 inches long. It’s the most popular mattress size in the United States, offering a good balance between spacious comfort and a manageable footprint that fits well in most bedrooms.

    The Standard Queen Bed Dimensions Explained

    Understanding the exact measurements of a queen bed is the first step in making sure it’s the right fit for your room and your lifestyle. For couples, singles who enjoy spreading out, or guest rooms, the queen has become a go-to choice because it offers ample space without making smaller rooms feel cramped.

    Introduced in the 1950s, the queen bed offered a welcome upgrade from the full size bed, which was the standard at the time. A queen mattress has a total surface area of 4,800 square inches. For couples, that provides about 30 inches of personal space for each person — a noticeable improvement over the 27 inches per person available on a full mattress.

    For those who need to see the numbers laid out, here's a quick reference table to make your bedroom planning a bit easier.

    Queen Bed Dimensions at a Glance

    This table breaks down the standard queen bed dimensions in both inches and centimeters, providing a clear reference for your planning.

    Measurement Inches Centimeters Total Surface Area
    Width 60 in. 152 cm
    Length 80 in. 203 cm
    Surface Area 4,800 sq. in. (3.09 sq. m.)

    With these exact numbers in hand, you can start measuring your space and determining how a new queen bed will fit with your other bedroom furniture.

    Comparing the Queen Bed to Other Mattress Sizes

    Knowing the exact dimensions of a queen bed is a great start, but those numbers can feel a bit abstract. To get a better feel for its scale, it helps to see how it compares to other common mattress sizes. This isn't about finding a "winner," but about helping you visualize the real-world trade-offs in space and comfort.

    This quick visual gives a clear breakdown of a standard queen bed’s width, length, and total sleeping surface.

    Infographic detailing queen bed dimensions, showing 60 inches width, 80 inches length, and 4800 square inches.

    Seeing the 60-inch width and 80-inch length helps put its 4,800 square inches of sleeping surface into perspective.

    Queen vs Full Bed

    One of the most common decisions shoppers face is choosing between a queen and a full size bed. A full mattress, also known as a double, measures 54 inches wide by 75 inches long. While a six-inch difference in width and five-inch difference in length might not sound like much, that extra space can be significant in practice.

    A full bed can feel comfortable for a single sleeper. For couples, however, those missing inches mean each person only gets 27 inches of personal space, which is the same width as a crib mattress. The queen’s slightly wider frame gives each person 30 inches, which can contribute to a more comfortable night's sleep without bumping elbows.

    A queen bed is 6 inches wider and 5 inches longer than a full bed. This extra space makes a considerable difference for couples or taller individuals seeking more room to stretch out without feeling cramped.

    Queen vs King Bed

    Going up in size, a standard king bed measures 76 inches wide by 80 inches long. It offers the same length as a queen but provides an additional 16 inches of width.

    A king is a suitable choice for couples who value personal space, often share their bed with children or pets, or simply prefer a more luxurious, sprawling feel. Each person gets 38 inches of width—the same as a twin mattress. The main trade-off is bedroom real estate. Choosing a king often means sacrificing floor space that could be used for a dresser, a chair, or walking room.

    Why the Queen Bed Became a Household Staple

    Have you ever wondered why the queen bed is so common in homes across America? The story behind it reflects major changes in how we live. Before the 1950s, the much smaller full bed was the primary choice for couples — a size that can feel quite snug by today’s standards.

    This began to change after World War II as American homes started getting larger. With more space available, people began to place a higher value on personal comfort and a good night's sleep. The queen bed emerged as an ideal solution, offering a significant upgrade in sleeping room without needing the massive footprint of a king mattress. It filled a gap in the market, giving couples more breathing room.

    A Shift in American Lifestyles

    This move toward more spacious living is a huge piece of the puzzle. It wasn't just about the dimensions; it was about the idea of a more comfortable life. Mattress marketers in the 1950s and 60s tapped into this by using regal names like "queen" and "king" to associate these larger beds with luxury and status.

    This marketing approach was effective. By 1999, the once-dominant full size bed saw its popularity decline, while the queen bed became the new standard for couples. Today, it remains the top-selling mattress size, making up a large portion of all mattress sales in North America. It’s a testament to its blend of comfort and practicality. You can get more information on the history of mattress sizes at The Bedding Mart.

    The queen bed solved a real problem for millions of people: it offered a more comfortable sleep experience for two without requiring an oversized master bedroom. Its rise in popularity mirrors the country's growing focus on personal wellness and comfort at home.

    Ultimately, understanding how big a queen size bed is goes beyond just its measurements. It’s about recognizing its role as a practical, comfortable centerpiece that fits the way many people live today.

    Planning Your Room Layout Around a Queen Bed

    Knowing the measurements of a queen bed is a good start, but the real test comes when you place it within your bedroom. A bed’s dimensions on paper can feel very different once it’s actually in the room. Thoughtful planning can help create a space that feels open and functional.

    Bedroom layout sketch with queen size bed, nightstands, dresser, wardrobe, and dimensions.

    Before committing to a bed frame or bedroom set, it’s always a good idea to use a tape measure. Once you have your queen bed’s dimensions, the next step is to figure out how to arrange your bedroom furniture for a space that feels both balanced and functional. This planning stage can help you avoid the common issue of buying furniture that is too large for your home.

    The Minimum Room Size for a Queen Bed

    So, how big of a room do you need? While every layout is different, a general guideline is that a queen bed fits most comfortably in a room that's at least 10 feet by 10 feet. This size provides enough space for the bed while leaving room for other essential pieces and for you to move around.

    For a room to feel comfortable, you need clear pathways. It is recommended to leave at least 24 to 30 inches of open space on two or three sides of the bed. This clearance allows you to walk around without difficulty, make the bed, and access your closet or dresser.

    Leaving at least two feet of clearance around your bed is more than just a design tip—it's a practical necessity. This space ensures you can navigate your room comfortably and prevents the layout from feeling crowded and stressful.

    Arranging Furniture for a Balanced Feel

    Smart furniture placement is key to a well-balanced bedroom. Placing the queen bed against the longest, uninterrupted wall usually creates a natural focal point and makes the entire room feel more spacious. This placement typically leaves enough room on either side for nightstands.

    When you start adding in other pieces, think about their function and footprint:

    • Nightstands: Try to find nightstands that are about the same height as the top of your mattress. This makes them easier and more comfortable to reach from bed.
    • Dressers: If you have the space, place your dresser on the wall opposite the bed. Be sure to account for the clearance needed to fully open all its drawers.
    • Walkways: Before you finalize the layout, do one last check. Is your main path—from the door to the bed and over to the closet—clear and easy to walk?

    By thinking through these layout details ahead of time, you can ensure your new queen bed not only fits but also enhances your bedroom’s overall comfort and style.

    Exploring Queen Bed Variations You Should Know

    While the standard 60-inch by 80-inch queen is the most common mattress size, it's not the only option. A few less-common variations were created to solve specific problems, such as needing more width or preventing feet from hanging off the end. Knowing about these alternatives can help you find the right mattress for your home.

    Illustration comparing standard, Olympic, and California queen bed sizes with their dimensions.

    The standard queen remains a versatile choice, fitting a wide range of accessories and accounting for a significant portion of mattress purchases in the U.S. You can learn more about how mattress sizes became standardized in this article on the evolution of mattress sizes on gottasleep.com. But if the standard queen doesn't quite meet your needs, one of these unique sizes might be a better fit.

    Olympic Queen

    The Olympic Queen mattress adds six inches of width to the standard queen, measuring 66 inches wide by 80 inches long. For couples who feel a bit cramped on a regular queen but don’t have space for a king, that extra space can be a useful alternative.

    It’s an interesting "in-between" solution, but be aware that finding sheets and bed frames that fit this non-standard size can be more challenging.

    California Queen

    If you or your partner are tall and find your feet dangling off the end of the bed, the California Queen might be a solution. It keeps the standard 60-inch width but adds four inches of length, making it 60 inches by 84 inches. For taller sleepers, those extra inches can make a significant difference.

    Much like its more famous counterpart, the California King, the California Queen is built with one thing in mind: extra length for a more comfortable night's sleep for taller individuals.

    Split Queen

    A Split Queen is a unique setup. Instead of one mattress, it consists of two separate mattresses, each measuring 30 inches by 80 inches. When placed side-by-side on a bed frame, they have the exact footprint of a standard queen.

    This design is often used with an adjustable bed base. It allows each person to raise or lower their head and feet independently, accommodating different sleeping preferences.

    Choosing the Right Frame for Your Queen Mattress

    The mattress is only half of the equation. The bed frame you choose sets the style and determines the final footprint of your bed in the room. While a queen mattress will always be 60 inches wide by 80 inches long, the frame can add anywhere from a couple of inches to over a foot in both directions.

    This is a detail that is often overlooked when planning a room layout. A simple metal frame or a sleek, modern platform bed will keep the overall size close to the mattress dimensions, making them a good fit for smaller spaces. On the other hand, a large sleigh bed or a frame with a thick, upholstered headboard can dramatically increase how much floor space the bed occupies.

    Measuring for Your New Bed Frame

    When browsing different styles, it's important to think beyond the mattress size. Always ask for the frame's total dimensions—including the headboard and footboard—to ensure it won’t overwhelm your bedroom or block walkways.

    Always measure the full dimensions of the bed frame—not just the mattress. A larger frame with a decorative headboard can easily add several inches to the length and width, impacting your room's available space and layout.

    Don't forget to consider vertical height. If you’re pairing a thick mattress with a new, taller frame, your bedding might suddenly look too short. For instance, a king-size comforter often drapes better and looks more balanced on a high-profile queen bed than a standard queen comforter would. Keeping these details in mind helps ensure your entire setup looks cohesive and functions well in your room.

    Common Questions About Queen Size Beds

    Choosing a new bed is a significant decision, and it’s natural to have questions. Here are answers to some of the most common questions we hear from shoppers.

    Can Two Adults Sleep Comfortably on a Queen Bed?

    Yes, a standard queen bed was designed to accommodate two adults. It provides each sleeper with 30 inches of personal space, which is enough room for most couples to sleep soundly without feeling cramped. This balance of individual space and a manageable footprint is why the queen is the most popular mattress size in America for couples.

    What Is the Real Difference Between a Full and Queen Bed?

    A queen bed is 6 inches wider and 5 inches longer than a full-size bed. A queen measures 60” x 80”, while a full is 54” x 75”. While those numbers might not seem like a huge jump, the difference is often noticeable. That extra room is beneficial for couples who want more personal space or for taller individuals who find their feet hang off the end of a full bed.

    Do I Need Special Sheets for a Thick Queen Mattress?

    It is very likely. If your new queen mattress is particularly thick—especially if it’s over 14 inches tall—you will likely need to buy deep-pocket sheets. Standard sheets may not have enough fabric to wrap all the way around and under, which can cause the corners to pop off during the night.

    Before shopping for new bedding, measure your mattress’s height. Then, check the sheet packaging for its "pocket depth" to ensure it can accommodate your mattress.

    Quick tip: Don't forget to include your mattress topper when you measure! A plush topper can easily add another 2 to 4 inches, making deep-pocket sheets a necessity for a snug, secure fit.

    Is an Olympic Queen the Same as a Standard Queen?

    No, they are two different sizes. An Olympic Queen is a non-standard mattress that measures 66" x 80", making it 6 inches wider than a standard queen. While that extra width can be nice, be prepared for a challenge when it comes to finding frames and bedding that fit correctly, as they may need to be special-ordered.


    Still have questions? The team at Woodstock Furniture & Mattress Outlet has extensive experience and is here to help you find the right mattress and bedroom furniture for your home. Visit us in person to explore our great selection and see these options for yourself!