Tag: furniture placement

  • 10 Practical Bedroom Furniture Arrangement Ideas

    10 Practical Bedroom Furniture Arrangement Ideas

    Arranging bedroom furniture is more than just deciding where the bed goes; it's about creating a space that feels balanced, functional, and genuinely restorative. A well-planned layout can transform a cluttered room into a peaceful sanctuary, improve traffic flow, and even contribute to better sleep. Many homeowners, however, face common challenges that generic advice fails to solve. How do you handle an awkward L-shaped room or a small bedroom where every square foot counts? How do you integrate a sitting area into a master suite without it feeling cramped?

    This guide provides actionable solutions to these real-world problems. We move beyond the basics to deliver ten distinct, problem-solving bedroom furniture arrangement ideas tailored to specific needs and room types. Each layout is designed to address a common pain point, from maximizing floor space in a kid's room to optimizing the flow in a bedroom with an ensuite bathroom.

    Inside, you will find practical rules, specific furniture sizing guidance, and clear traffic-flow tips to help you implement each concept effectively. We’ll explore proven layouts that work for various room shapes and sizes, helping you create a bedroom that not only looks thoughtfully designed but truly supports your daily lifestyle. Forget the guesswork and start building a functional, serene space today.

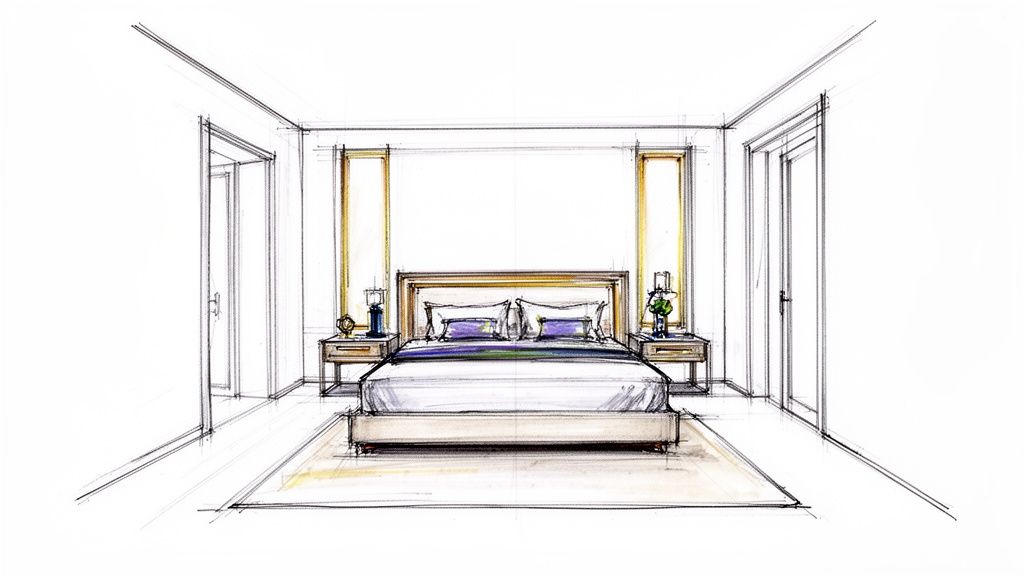
    1. The Centered Focal Point Layout

    The Centered Focal Point Layout is a timeless and popular approach to organizing a bedroom. This classic arrangement establishes the bed as the room's undisputed centerpiece by placing it against the longest, most prominent wall, usually the one you see first when entering. It's a foundational technique in interior design that creates a sense of order, calm, and deliberate composition, making it one of the most reliable bedroom furniture arrangement ideas.

    This layout is prized for its inherent symmetry and balance. By positioning the bed in the middle and framing it with matching nightstands, you create a visual anchor that the rest of the room revolves around. This approach not only looks intentional but also feels restorative, which is ideal for a space dedicated to rest. It is commonly seen in thoughtfully designed hotel rooms and master suites.

    A hand-drawn sketch of a contemporary bedroom layout featuring a bed, two nightstands, and two doors.

    How to Implement This Layout

    Successfully executing a centered layout depends on proportion and thoughtful placement. Your goal is to achieve harmony without making the space feel rigid or cluttered.

    • Establish the Anchor: Choose a substantial headboard to solidify the bed's role as the focal point. A well-chosen headboard can add texture, height, and style.
    • Balance with Nightstands: Select nightstands that are proportional to your bed. A large, king-sized bed looks well-balanced with wider nightstands, while a full or queen bed pairs well with more moderately sized tables. Ensure their height is level with or just slightly below the top of your mattress for easy access.
    • Maintain Clear Pathways: To ensure comfortable movement, leave at least 24 to 36 inches of clear walking space on both sides of the bed.
    • Create Symmetrical Storage: For complete visual balance, place a dresser or media console directly opposite the foot of the bed. This arrangement creates a satisfying sense of equilibrium.
    • Lighting and Finishing Touches: Mount matching wall sconces or place identical table lamps on each nightstand to reinforce the symmetry. To add softness and dimension, consider adding a bed skirt.

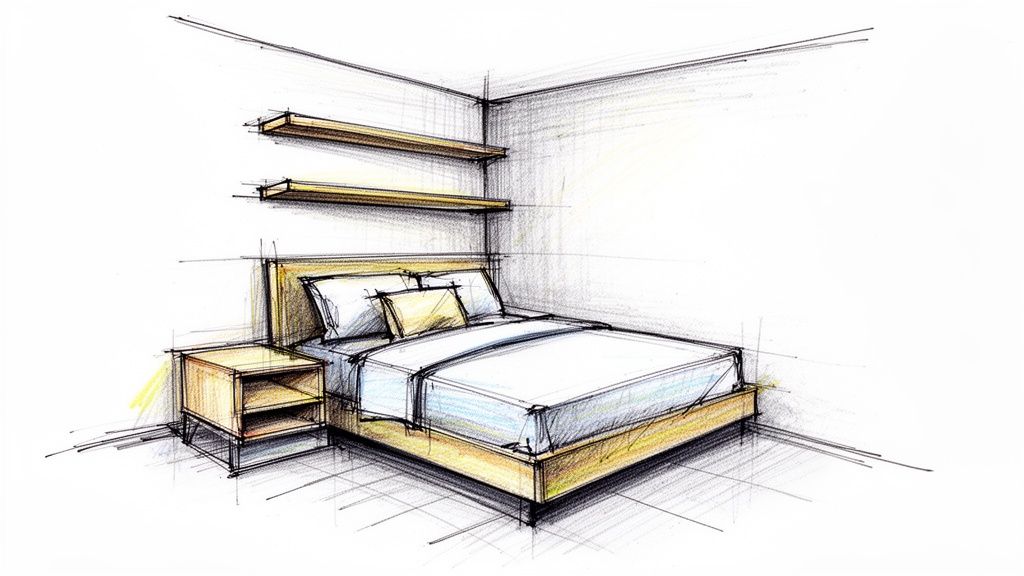
    2. The Corner Bed Placement Strategy

    The Corner Bed Placement Strategy is an innovative approach that tucks the bed into a corner, using two walls as an anchor. This arrangement creates a cozy, intimate sleeping nook and is one of the most effective bedroom furniture arrangement ideas for maximizing floor space. It is particularly useful in smaller bedrooms, studio apartments, or rooms with challenging layouts, like those often found in efficient Atlanta metro area homes or kids' bedrooms.

    This layout is a favorite in Scandinavian design because it challenges the traditional "bed against the center of a wall" rule. By pushing the bed into a corner, you open up a significant amount of central floor space, which can make a compact room feel surprisingly airy and spacious. This setup feels intentional and snug, transforming an underutilized corner into the room's most comfortable and functional zone. It's an ideal solution for guest rooms or multi-purpose spaces where flexibility is key.

    A hand-drawn sketch of a minimalist bedroom interior with a bed, nightstand, and floating shelves.

    How to Implement This Layout

    Successfully creating a corner bed layout is about smart furniture choices and space-saving techniques. Your goal is to make the corner feel like a deliberate design feature, not an afterthought.

    • Choose the Right Bed Frame: Opt for a low-profile headboard or no headboard at all to avoid a cramped look. A frame without a bulky footboard is essential to keep sightlines open and maintain a feeling of spaciousness.
    • Utilize Vertical Space: Install floating shelves above the bed in the corner. This provides a perfect spot for books, decor, and a small lamp without taking up any floor space.
    • Streamline Your Nightstand: Place a single, compact nightstand on the accessible side of the bed. This keeps essentials within reach while maintaining a clean, uncluttered look.
    • Think About Lighting: Since one side is against a wall, traditional lamps may not work. Consider mounting a wall sconce or a plug-in pendant light in the corner to provide focused task lighting for reading.
    • Keep Colors Light: Use light, neutral paint colors on the walls within the corner. This prevents the sleeping nook from feeling dark or enclosed and helps reflect light throughout the room.

    3. The Floating Bed Island Layout

    The Floating Bed Island Layout is a contemporary and dramatic approach that positions the bed away from the walls, turning it into a sculptural centerpiece. This sophisticated arrangement creates a "floating" effect, making a bold statement in larger bedrooms. It is one of the more daring bedroom furniture arrangement ideas, ideal for open-concept lofts or spacious master suites where you want to create distinct functional zones.

    This layout transforms the bed from a simple piece of furniture into a destination within the room itself. By pulling it away from the walls, you establish a dynamic and luxurious atmosphere often seen in boutique hotels and architectural magazine features. This approach requires ample square footage but rewards you with a unique, high-design aesthetic that redefines the entire space.

    How to Implement This Layout

    Executing this layout successfully is about creating a deliberate, well-anchored composition rather than just placing a bed in the middle of a room. The goal is to make the arrangement feel intentional and integrated.

    • Anchor the Space: Use a large area rug (at least 8×10 feet) to define the sleeping zone and visually ground the bed. The front legs of the bed and nightstands should sit comfortably on the rug.
    • Choose a Statement Headboard: Since the back of the bed is exposed, a headboard with a finished back or a compelling design is crucial. A substantial, well-crafted headboard can serve as a stunning focal point.
    • Maintain Ample Clearance: Ensure at least 30 to 36 inches of clear pathway on all sides of the bed. This generous spacing is essential for the layout to feel open and luxurious, not cramped.
    • Create a Functional Backdrop: Place a low console table, bench, or a pair of chairs behind the headboard to create a functional and stylish backdrop. This adds visual weight and utility to the arrangement.
    • Rethink Your Lighting: Traditional table lamps may not work if power outlets aren't in the floor. Instead, consider pendant lights hung from the ceiling over each nightstand or elegant floor lamps to provide balanced, ambient light.

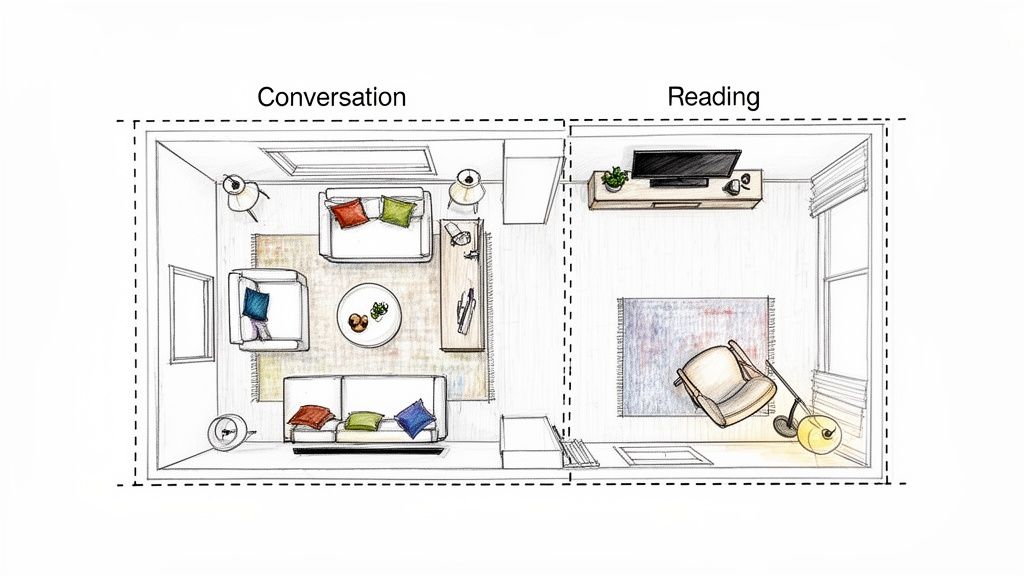
    4. The Dual-Purpose Master Suite Layout

    The Dual-Purpose Master Suite Layout transforms a large bedroom into a multifunctional sanctuary that accommodates both rest and daily activities. This sophisticated approach is ideal for modern living, where the primary bedroom often doubles as a home office, a reading nook, or a private lounge. It stands out among bedroom furniture arrangement ideas by thoughtfully zoning a single space to serve distinct purposes without feeling cluttered.

    This layout is perfect for spacious master bedrooms where homeowners want to maximize every square foot. By creating separate zones for sleeping and living, you craft a resort-style environment that feels both luxurious and highly functional. It’s a design seen in high-end properties, offering a practical solution for remote workers or anyone seeking a private retreat within their own home.

    How to Implement This Layout

    Successfully creating a dual-purpose layout hinges on clear visual separation and cohesive design. The goal is to define distinct areas while maintaining a harmonious flow throughout the room.

    • Define Zones with Rugs: Use area rugs to create visual boundaries. Place a large rug under your bed and a separate, complementary rug in your seating or work area to clearly delineate the two spaces.
    • Create Functional Areas: Position a seating area or workspace opposite or perpendicular to the bed. For a home office zone, ensure you have a comfortable desk chair and dedicated task lighting to prevent eye strain.
    • Balance Furniture and Storage: Choose furniture that works for both zones. A versatile dresser, for instance, can store clothing while also organizing office supplies. Maintain at least 30 to 36 inches of pathway between zones for easy movement.
    • Layer Your Lighting: Install different lighting for each function. Use soft, ambient lighting like table lamps near the bed and brighter, focused task lighting over a desk or reading chair.
    • Maintain Cohesion: Tie the zones together by using a consistent color palette and similar furniture finishes. A neutral backdrop allows you to add unique accents to each area, giving them personality while ensuring the entire room feels connected. Consider an open bookshelf as a gentle divider that adds storage without closing off the space.

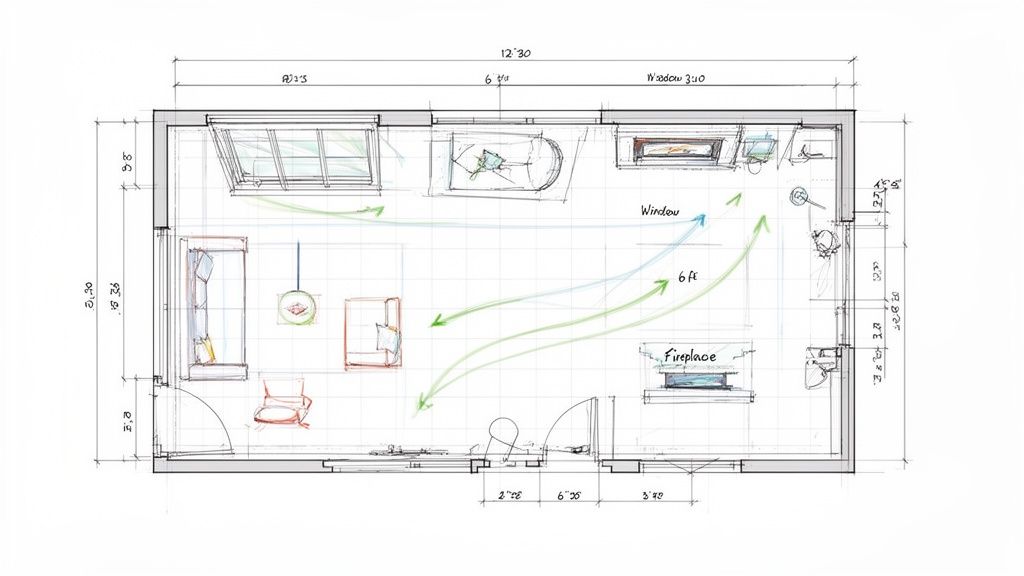
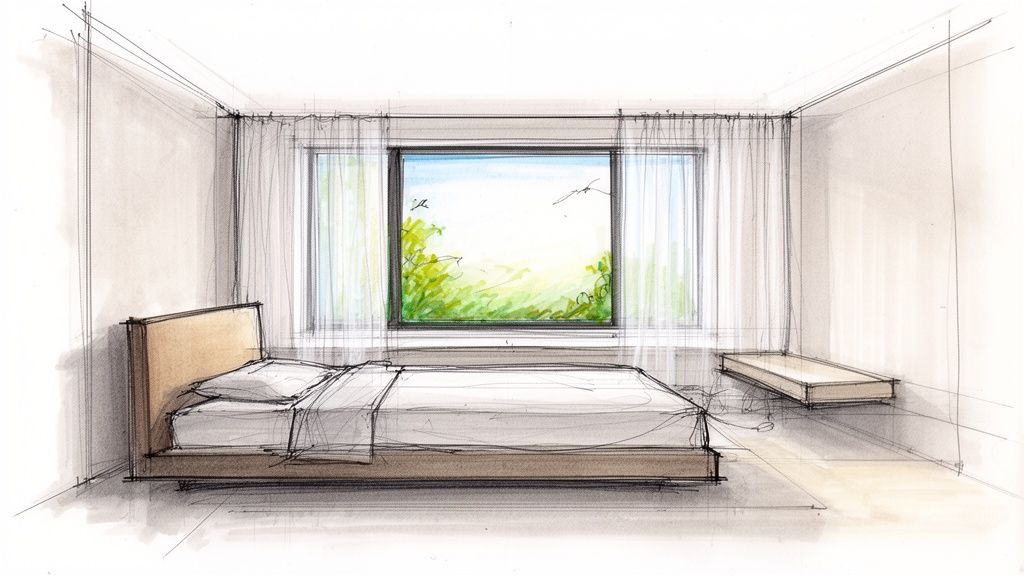
    5. The Window-View Priority Layout

    The Window-View Priority Layout is an arrangement that elevates your bedroom's best architectural feature: its window. This approach positions the bed to either face or frame the window, making natural light and the outdoor scenery the room's main attraction. It’s one of the most refreshing bedroom furniture arrangement ideas, especially for rooms with scenic views.

    This layout is deeply rooted in biophilic design principles, which emphasize a connection to nature to improve well-being. By prioritizing the view, you create a dynamic and calming environment that changes with the time of day and seasons. It's an ideal choice for transforming a master suite into a resort-like retreat, where waking up to sunlight and nature becomes part of your daily routine.

    Watercolor sketch of a serene bedroom with a bed, large window overlooking nature, and floating shelf.

    How to Implement This Layout

    Successfully creating a window-focused layout is about enhancing the view, not obstructing it, while maintaining functionality and comfort.

    • Orient the Bed: Place your bed directly facing the window for an immersive experience, or on the wall adjacent to it so the view is to your side. A bed with a low-profile headboard is an excellent choice to keep sightlines clear.
    • Control the Light: Invest in a layered window treatment. Combine sheer curtains for daytime privacy and light diffusion with blackout curtains to ensure you can control light levels for restful sleep.
    • Frame the Feature: Use decorative drapery panels on either side of the window to frame it like a piece of art. This adds softness and a touch of elegance to the focal point.
    • Create a Functional Zone: Enhance the window area by adding a comfortable armchair or a low bench beneath it. This creates a cozy reading nook and makes the space more intentional.
    • Balance the Room: Place a dresser or console table on the wall opposite the window. This provides necessary storage without competing for attention and helps balance the room's visual weight. Ensure pathways remain clear, with at least 24 to 30 inches for easy movement around the furniture.

    6. The L-Shaped Bedroom Configuration

    The L-Shaped Bedroom Configuration is a strategic approach designed to maximize the potential of rooms with unconventional layouts. This method embraces architectural quirks, such as alcoves or angled walls, by arranging furniture to create distinct, functional zones. It’s a smart solution for rooms that defy a simple, symmetrical setup, transforming awkward spaces into highly practical and organized bedrooms.

    This layout is particularly valuable in homes with unique architectural features. Instead of fighting against an irregular floor plan, this configuration works with the room's natural lines. By thoughtfully placing furniture within the two "legs" of the L-shape, you can establish separate areas for sleeping and other activities like dressing, working, or reading. This is one of the most effective bedroom furniture arrangement ideas for making an odd-shaped room feel intentional and cohesive.

    How to Implement This Layout

    Successfully arranging an L-shaped room depends on careful measurement and creating a sense of visual harmony across the different zones. The goal is to make the unconventional shape feel like a deliberate design choice rather than a limitation.

    • Anchor the Main Zone: Place the bed against the longest, most prominent wall in the main section of the L. This establishes a clear primary zone dedicated to rest and relaxation.
    • Utilize the Secondary Leg: Position secondary furniture, like a dresser, vanity, or small desk, in the shorter leg of the L. This creates a functional secondary zone that feels separate yet connected.
    • Choose Proportional Furniture: Select pieces that fit comfortably within each specific area. Avoid oversized furniture that can overwhelm one section and make the room feel unbalanced. Modular furniture can be an excellent choice for its adaptability.
    • Unify with a Rug: Use a large area rug to visually connect the two zones. Placing the rug so that it bridges both sections helps tie the entire room together and defines the space.
    • Create Visual Cohesion: Paint all walls the same color to minimize the irregularity of the room's shape and create a unified backdrop. You can also use mirrors strategically to reflect light and make the space feel larger and more open.
    • Plan Your Lighting: Install lighting that serves both zones effectively. Consider a central overhead fixture for general illumination, supplemented by task lighting like a desk lamp or reading sconce in the secondary area.

    7. The Bedroom with Ensuite Bathroom Flow Layout

    The Bedroom with Ensuite Bathroom Flow Layout is a modern approach that prioritizes a seamless connection between your sleeping area and a private bathroom. This arrangement strategically positions furniture to create an intuitive and unobstructed path to the ensuite, enhancing daily routines while preserving the bedroom's tranquil atmosphere. It's a crucial consideration in master suites where the integration of bedroom and spa-like bathroom is a key element of the home's design.

    This layout transforms a master bedroom into a cohesive personal retreat. By carefully planning the flow, you avoid creating an awkward or disjointed space, ensuring that frequent trips to the bathroom don't disrupt the room's primary purpose: rest. It is a hallmark of thoughtful residential architecture, commonly seen in new construction and luxury properties aiming for a resort-style living experience. This is one of the more functional bedroom furniture arrangement ideas for contemporary living.

    How to Implement This Layout

    Creating a successful ensuite flow is about balancing accessibility with privacy. The goal is to make the two spaces feel connected yet distinct, supporting both your morning and evening routines without compromise.

    • Prioritize Privacy: Position your bed so it is not in the direct line of sight from the bathroom door. This creates a sense of separation and comfort, especially in a shared space.
    • Define Zones with Rugs: Use area rugs to visually separate the main sleeping area from the path to the bathroom. A well-placed runner or a large rug under the bed can establish clear zones without physical barriers.
    • Coordinate Finishes: Create visual harmony by selecting a color palette and materials that complement both the bedroom and bathroom. This continuity makes the transition between spaces feel natural and intentional.
    • Create a Transition Area: Place a stylish bench at the foot of the bed or a small seating area with an accent chair just outside the bathroom. This creates a functional "buffer zone" for dressing or relaxing.
    • Choose Appropriate Furniture: If placing a dresser or chest near the bathroom entrance, consider materials with moisture-resistant finishes. Many brands feature durable options suitable for various home environments.
    • Manage Lighting: Ensure bathroom lighting doesn't spill into the bedroom and disturb a sleeping partner. Dimmers and targeted task lighting in the ensuite are essential for nighttime use.

    8. The Multi-Purpose Kids' Bedroom Layout

    The Multi-Purpose Kids' Bedroom Layout is a functional and adaptable approach designed to accommodate sleeping, studying, playing, and storage within a single room. This arrangement prioritizes durability, safety, and age-appropriate design, allowing the space to evolve with a child from toddler to teen. It’s an essential strategy for maximizing limited space and is one of the most practical bedroom furniture arrangement ideas for growing families.

    This layout excels at creating distinct "zones" for different activities, which helps maintain order and gives children a sense of ownership over their environment. By clearly defining areas for rest, work, and play, you can design a room that feels both organized and spacious, even when square footage is tight. This thoughtful approach helps select furniture that can serve multiple functions and support a child's development.

    How to Implement This Layout

    Creating a successful multi-purpose kids' room is about smart furniture choices and strategic zoning. The goal is to build a flexible environment that supports various needs without feeling chaotic.

    • Zone the Space: Use area rugs and furniture placement to create separate zones. For instance, place a desk and chair near a window for a dedicated study nook, and use a small rug and storage bins to define a play area.
    • Go Vertical: Maximize floor space with bunk beds or loft beds. This opens up valuable room below for a desk, a reading corner, or additional storage, making it ideal for shared sibling bedrooms.
    • Select Quality Bedding: Choose a durable twin or full mattress that provides proper support for growing bodies and ensures restorative sleep.
    • Prioritize Smart Storage: Incorporate modular furniture that can be reconfigured as your child grows. Use under-bed drawers, wall-mounted shelving, and storage ottomans to keep toys, clothes, and books organized and accessible.
    • Layer the Lighting: Use multiple light sources to suit different activities. A bright task lamp is essential for the desk, a soft, warm lamp works well for a reading corner, and an overhead light can illuminate the entire play space.
    • Plan for Durability: Choose furniture with resilient finishes and opt for washable paint on the walls. A child's room should be built to handle daily life, from homework sessions to creative messes.

    9. The Under-Window Bed Nook Layout

    The Under-Window Bed Nook Layout is a charming arrangement that positions the bed directly beneath a window or a series of windows. This design choice transforms the bed into a cozy, light-filled nook, creating an intimate and inviting sleeping environment. It’s an effective strategy for maximizing natural light and turning an architectural feature into the room's highlight, making it one of the most aesthetically pleasing bedroom furniture arrangement ideas.

    This layout is celebrated for its ability to make a room feel both airy and snug. Placing the bed under a window draws the eye upward, highlighting the room's height and the view outside. It is a hallmark of cottage, farmhouse, and Scandinavian design styles, which prioritize natural elements and a sense of warmth. This arrangement is particularly effective in smaller bedrooms, guest rooms, or historic homes with distinctive window frames, where it adds character and charm.

    How to Implement This Layout

    Creating a successful under-window nook requires balancing light control, functionality, and comfort. The goal is to craft a space that feels intentional, cozy, and practical for daily use.

    • Choose a Low-Profile Bed: Select a bed with a low headboard or no headboard at all to avoid obstructing the window and your view. This maintains clear sight lines and allows maximum sunlight to enter the room.
    • Prioritize Light Control: Install effective window treatments to manage light and privacy. Blackout curtains or cellular shades provide excellent control, allowing you to darken the room for sleep.
    • Create Functional Bedside Storage: Since traditional nightstands might block window access, consider using floating shelves on either side of the window. C-shaped tables that can slide over the mattress also work well as space-saving solutions.
    • Manage Thermal Comfort: Windows can be a source of drafts or heat. Invest in a mattress with temperature-regulating properties to ensure you stay comfortable regardless of the season.
    • Enhance the Nook Feeling: Add layers of texture with throw pillows and a plush blanket to make the space feel extra cozy. Wall-mounted reading lights on either side of the window frame can provide focused lighting for nighttime reading.

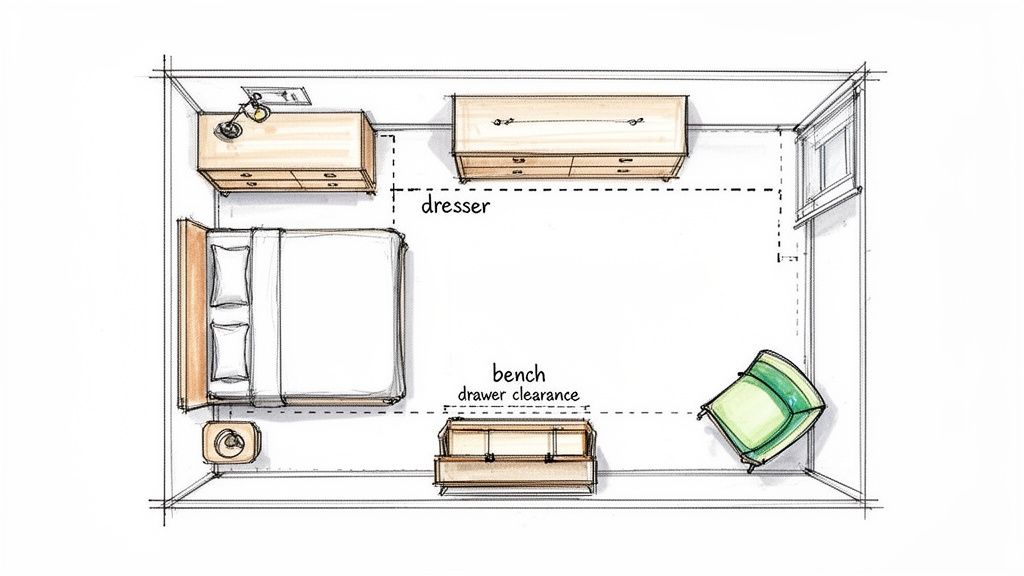
    10. The Adjacent Nightstand Storage Solution Layout

    The Adjacent Nightstand Storage Solution Layout is a highly functional approach that prioritizes organization and accessibility. This method treats storage furniture not as afterthoughts but as integral components of the bedroom's core design. By strategically placing dressers and nightstands adjacent to and around the bed, this layout creates an efficient, cohesive, and clutter-free environment perfect for modern living.

    This arrangement is particularly valuable for those who need to maximize every square inch for storage without sacrificing style. A thoughtful layout can showcase both aesthetic harmony and real-world functionality. It turns your bedroom into a well-organized sanctuary where everything has its place, making daily routines smoother and more peaceful.

    How to Implement This Layout

    Creating a storage-centric layout requires a focus on proportion and smart placement. The key is to integrate storage pieces seamlessly so they enhance the room's flow and feel intentional rather than crowded.

    • Select Smart Nightstands: Choose nightstands with multiple drawers or shelving. For optimal bedside convenience and storage, carefully consider the placement and style of nightstands to complement your bed arrangement. Many brands offer options with both style and ample storage.
    • Balance with a Dresser: Position a substantial dresser directly across from the foot of the bed or along an adjacent wall. This creates visual balance and consolidates clothing storage in one accessible zone.
    • Maintain Clear Pathways: To ensure the room remains easy to navigate, leave at least 24 to 36 inches of clearance around major furniture pieces like the bed and dresser.
    • Go Vertical with Storage: Install floating shelves above your dresser for displaying photos, books, or decorative items, freeing up the surface for daily-use items.
    • Coordinate for Cohesion: Opt for a matching bedroom set or pieces with coordinating finishes and hardware. This creates a unified look that makes the integrated storage feel deliberate and high-end. Use drawer dividers to maximize the efficiency of every inch of storage space.

    Top 10 Bedroom Layouts Comparison

    Layout Implementation complexity Resource requirements Expected outcomes Ideal use cases Key advantages
    The Centered Focal Point Layout Low — straightforward, symmetrical setup Moderate — bed, matching nightstands, clear wall space Balanced, organized visual focus Master bedrooms, hotels, most room sizes Strong symmetry, easy to style
    The Corner Bed Placement Strategy Low–Medium — simple placement, access trade-offs Low — compact frames, possible single nightstand Space-saving, cozy sleeping nook Small bedrooms, studios, rentals Maximizes floor area, intimate feel
    The Floating Bed Island Layout High — requires careful clearance and anchoring High — large room, area rug, bespoke lighting Dramatic, modern, clearly zoned space Large master suites, lofts, designer homes High-end aesthetic, 360° access
    The Dual-Purpose Master Suite Layout High — complex zoning and balance High — extra seating, desk, larger square footage Multifunctional, hotel-like retreat Remote workers, spacious master bedrooms Increases functionality and resale appeal
    The Window-View Priority Layout Medium — light and sightline management needed Moderate — quality window treatments, low headboard Enhanced natural light, outdoor connection Rooms with scenic windows, biophilic designs Better circadian alignment, strong views
    The L-Shaped Bedroom Configuration Medium–High — requires measurement and planning Moderate — scaled or custom/modular pieces Makes odd shapes functional; distinct zones L-shaped or angled rooms, attics, historic homes Turns awkward plans into usable space
    The Bedroom with Ensuite Bathroom Flow Layout Medium — traffic flow and visual coordination Moderate — coordinated finishes, humidity control Efficient routines, cohesive bedroom-bath flow Master suites with attached baths, luxury homes Convenience, improved daily workflow
    The Multi-Purpose Kids' Bedroom Layout Medium — flexible planning for multiple zones Moderate — durable furniture, storage solutions Organized, adaptable space for play/study/sleep Kids' and teen rooms, shared bedrooms Multi-functionality, grows with the child
    The Under-Window Bed Nook Layout Low–Medium — light control and headboard choices Low–Moderate — good window treatments, low bed Cozy, light-filled alcove Small to medium bedrooms, cottages, bay windows Charming aesthetic, preserves wall space
    The Adjacent Nightstand Storage Solution Layout Medium — balancing storage and circulation Moderate — coordinated nightstands, dressers Highly organized, accessible storage Families, practical master bedrooms, staged homes Maximizes storage and daily convenience

    Bringing Your Ideal Bedroom Layout to Life

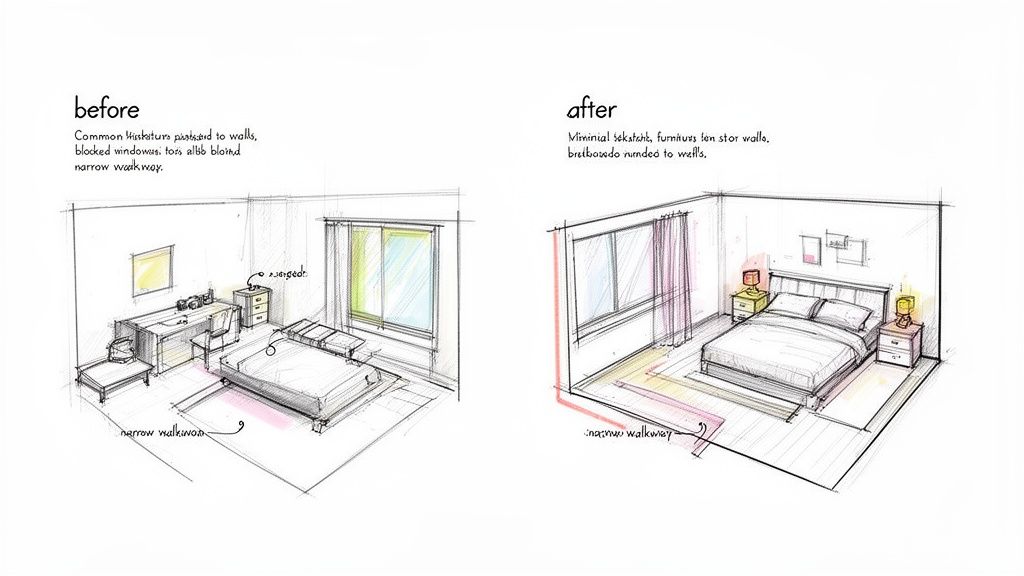
    Choosing the right bedroom furniture arrangement is about more than just fitting pieces into a room; it’s about crafting an environment that supports your lifestyle, promotes tranquility, and reflects your personal taste. Throughout this guide, we've explored ten distinct layout strategies, from the classic Centered Focal Point that creates immediate balance to the clever Corner Bed Placement designed to maximize every square inch of a compact room. We’ve seen how a Floating Bed Island can add a touch of luxury to a spacious master suite and how a Dual-Purpose Layout can seamlessly integrate a home office or a relaxing reading nook into your personal sanctuary.

    Each of these bedroom furniture arrangement ideas serves as a blueprint, not a rigid rule. The true magic happens when you adapt these concepts to your unique space and needs. Remember the core principles we've discussed: establishing a clear focal point (usually the bed), ensuring unobstructed traffic flow with at least 30-36 inches for main pathways, and layering lighting to create both function and ambiance. Whether you're tackling an L-shaped room or optimizing flow around an ensuite bathroom, the goal remains the same: to build a cohesive, comfortable, and highly functional space.

    Key Takeaways for Your Design Journey

    As you move from planning to placement, keep these essential takeaways in mind:

    • Measure Everything: Before you move a single piece of furniture or make a new purchase, measure your room, your doorways, and your existing furniture. A detailed floor plan, even a simple sketch, is your most powerful tool for avoiding costly and frustrating mistakes.
    • Function First, Form Second: Ask yourself what you need your bedroom to do. Is it purely for sleep? Does it need to accommodate a workspace, a vanity area, or extensive storage? Prioritizing your functional needs will guide your layout decisions and ensure the final arrangement serves you well day in and day out.
    • Embrace Iteration: Your first attempt at a new layout might not be perfect, and that's okay. Live with an arrangement for a few days. Walk through the space at different times, notice any pinch points or awkward transitions, and don't be afraid to tweak the placement of a chair, a rug, or a lamp until it feels just right. Sometimes, the most effective solutions are discovered through trial and error.

    Expert Insight: The most successful bedroom designs are those that feel personal and intentional. Don't be afraid to break from convention if it means creating a layout that genuinely works for you. To move beyond traditional designs and truly personalize your space, explore some uncommon furniture arrangements that can work wonders in any room, including your bedroom.

    Ultimately, mastering these bedroom furniture arrangement ideas empowers you to transform your most personal space into a true haven. It's a skill that allows you to adapt to new homes, evolving needs, and changing tastes with confidence. By applying these principles, you can create a bedroom that is not only beautiful and organized but also a powerful tool for enhancing your daily well-being and ensuring restorative rest. Your perfect bedroom is waiting to be discovered, one well-placed piece of furniture at a time.


    Ready to find the perfect pieces for your new layout? Visiting a showroom allows you to see, touch, and experience furniture firsthand, making it easier to visualize how it will work in your space. At Woodstock Furniture & Mattress Outlet, our friendly, knowledgeable team can help you navigate our great selection and provide expert guidance to bring your ideal bedroom furniture arrangement ideas to life.

  • How to Arrange Bedroom Furniture for a Functional Layout

    How to Arrange Bedroom Furniture for a Functional Layout

    Arranging your bedroom furniture is about more than just making it look nice. It’s about creating a space that actually works—a place that feels functional, promotes restful sleep, and serves as your personal sanctuary. A good approach is to start with your bed as the focal point, make sure you can walk around easily, and then logically place everything else around it.

    Your Blueprint for a Better Bedroom Starts Here

    Ever feel like your bedroom is just a little bit… off? Maybe it’s cluttered, awkward to move around in, or just doesn't feel relaxing. A simple plan can change all that. The way you arrange your furniture has a huge impact on how a room feels, and can make it seem larger, more organized, and more calming. We're going to walk through the practical steps to rethink your layout, focusing on function and flow first.

    This isn’t about chasing the latest design trend; it's about making your room work for your real, everyday life. A well-arranged bedroom just makes things easier, from getting ready in the morning to winding down at night.

    The Impact of a Thoughtful Layout

    Getting your furniture placement right can solve a bunch of common frustrations you might not even realize are layout-related. Here’s what you stand to gain:

    • Better Traffic Flow: Creating clear, open paths from the door to the closet and around the bed means no more awkward shuffling or bumping into things.
    • A Bigger Feel: Even a small room can feel surprisingly open and airy when furniture isn't blocking walkways or crammed against every wall.
    • Improved Functionality: This is key. A good layout ensures drawers can open all the way, your nightstand is actually within reach, and every piece of furniture can do its job without getting in the way.
    • A More Relaxing Vibe: Cutting down on both physical and visual clutter is a game-changer for creating a peaceful atmosphere where you can actually relax and get better sleep.

    A well-planned bedroom layout is foundational. It’s much easier to move furniture on paper or in a digital planner than to physically shuffle heavy dressers and bed frames multiple times.

    Before we dive into the nitty-gritty of placement, let's nail down the core concepts. Think of these as the fundamental principles for any bedroom layout.

    | Core Principles of Bedroom Furniture Arrangement |
    | :— | :— | :— |
    | Arrangement Principle | Key Action | Why It Matters |
    | Bed as the Anchor | Position the bed first, ideally on the main wall opposite the door. | This establishes a clear focal point and naturally organizes the rest of the room's flow. |
    | Clear the Pathways | Leave at least 30-36 inches for main walkways. | Ensures you can move freely without feeling cramped or bumping into furniture. |
    | Scale and Proportion | Choose furniture that fits the room's size—avoid oversized pieces in small rooms. | Properly scaled furniture prevents a room from feeling cluttered and overwhelming. |
    | Functional Placement | Place items like dressers and nightstands where they are most useful. | Easy access to daily essentials simplifies routines and reduces clutter. |
    | Create Zones | If space allows, group furniture to create distinct areas (e.g., a sleeping zone, a reading nook). | This adds function and makes the room feel more intentional and organized. |

    Getting these basics right will set you up for success as you start placing individual pieces.

    Why Getting This Right Matters

    The push for functional, beautiful bedrooms isn't just a trend; it's a reflection of how much we're all investing in our home comfort these days. The global bedroom furniture market is large for a reason—people want smart arrangements. Industry experts often recommend treating the bed as the room's anchor. Placing it against the longest wall or opposite the entrance is a classic strategy that makes any room feel more spacious.

    Once the bed is set, you can bring in the supporting cast. Nightstands should be roughly the same height as your mattress for easy access. After that, position your dresser to create balance, but be sure to leave at least 36 inches for your main walkways. This single rule is crucial for avoiding that cramped, hard-to-navigate feeling. If you're curious about the bigger picture, you can find more on furniture industry trends in reports from sources like Custom Market Insights.

    Laying the Groundwork by Measuring Your Space

    I know it’s tempting to just start shoving furniture around to see what fits. But trust me, that approach almost always ends in frustration—scuffed walls, a bed that won’t quite clear the doorway, or a dresser that unexpectedly blocks an outlet you desperately need.

    The single most important step in arranging your bedroom furniture is to start with a solid plan. Before you even think about lifting anything heavy, grab your tape measure. Creating a simple floor plan saves you a ton of time, a sore back, and prevents those layout mistakes that drive you crazy later. It turns guesswork into intentional design.

    Taking Accurate Bedroom Measurements

    First things first, let's get the raw numbers. Don't just eyeball it; being precise here will pay off big time. Jot these down on a piece of paper or in a notes app on your phone.

    • Wall-to-Wall Length and Width: Get the main dimensions of the room to figure out your total square footage. This is your canvas.
    • Window and Door Placements: Measure the width of every window and door. Here's a pro tip: also measure the distance from the corners of the room to the edges of their frames. This tells you exactly how much solid wall space you have to work with.
    • Architectural Features: Don’t forget to account for any fixed elements. This means radiators, built-in shelving, fireplaces, or any odd bump-outs that eat into your usable floor space.
    • Ceiling Height: While this doesn't directly impact your floor plan, knowing your ceiling height is critical when you're looking at furniture with any kind of vertical presence, like a tall headboard or a statement armoire.

    Once you have these numbers, you can sketch out a quick, to-scale drawing on graph paper. A good rule of thumb is to let each square represent six inches or one foot. Suddenly, you can see your space in a whole new way.

    Translating Measurements into a Functional Plan

    With your room’s blueprint in hand, it's time to measure your furniture. Get the length, width, and height of every single piece you plan to use—your bed, dresser, nightstands, and any seating or desks.

    Now for the fun part. Grab another piece of paper and create small cutouts for each piece of furniture using the same scale as your room sketch. You can now move your "furniture" all over your floor plan without breaking a sweat.

    This simple exercise helps you answer critical questions ahead of time:

    • Will my dresser drawers actually be able to open all the way without banging into the bed?
    • Is there enough room to comfortably walk between the foot of the bed and the wall? You should really aim for at least 30 inches for main pathways.
    • Does that perfect spot for the nightstand end up blocking the closet door?

    Planning isn't just about making furniture fit; it's about designing a room that truly works for you. By mapping everything out first, you ensure the final layout is both practical and peaceful.

    Ultimately, a solid plan is about more than just measurements. For instance, if you want to learn how to decorate a baby room, mapping out the design is a key step to a stress-free project. The same principle applies to any room refresh, guaranteeing a better outcome when you think about function from the very beginning.

    Placing Your Bed as the Anchor of the Room

    Now that you've got your room’s measurements, it's time to tackle the most important piece of furniture you own: your bed. Make no mistake, the bed is the anchor of the bedroom. Its position dictates not just the flow and feel of your space, but where every other item will logically fit. Getting this one decision right sets the stage for a layout that feels intentional and effortless.

    The most common advice you'll hear—and for good reason—is to place your bed against the longest, uninterrupted wall. Ideally, this is the wall you see first when you walk into the room, creating an immediate and calming focal point. Designers call this the "commanding position," and it establishes a sense of order that makes the room feel balanced from the moment you enter.

    Finding the Best Wall for Your Bed

    While putting the bed opposite the door is a classic rule, not every room cooperates. You might be dealing with windows, closets, or awkwardly placed doors that make this setup feel impossible. Don't worry, there are plenty of excellent alternatives that work just as well.

    Consider these options when you're figuring out where the bed should go:

    • Under a Window: This can look beautiful, especially with an attractive headboard that complements the window frame. The trick is to choose a headboard that's lower than the windowsill so you don't block that precious natural light. You'll also want to invest in good window treatments for privacy and to keep the morning sun from waking you up too early.
    • On a Diagonal: If you want a more dynamic, unconventional feel in a square-shaped room, angling your bed out from a corner can be a great move. It really breaks up the boxy feel, but it does take up more floor space. This is best suited for larger bedrooms where you won't feel cramped.
    • Between Two Windows: Got a wall with two windows? Placing the bed between them creates a gorgeous, symmetrical look. It frames the bed perfectly and turns that entire wall into an impressive feature.

    The goal is to find a spot that feels natural and gives you a clear view of the doorway from your bed. There's an instinctual comfort in being able to see who is entering the room without being directly in the line of sight from the hallway.

    Matching Bed Size to Room Scale

    The size of your bed plays a huge role in how the room feels. A massive king bed can completely overwhelm a small room, while a twin might feel lost in a large primary suite. Scale is everything.

    • For King & California King Beds: These require a substantial wall to anchor them properly. In a primary suite, placing a king bed on the main wall opposite the entrance creates that grand, hotel-like feel and leaves plenty of space on either side for sizable nightstands.
    • For Queen & Full Beds: These are the versatile workhorses of the bedroom world and fit well in most average-sized rooms. A queen bed still has enough presence to be a focal point without eating up all the floor space, leaving room for a dresser or even a small seating area.
    • For Twin Beds: In a smaller guest room or a child's room, pushing a twin bed against a wall or into a corner is a classic space-saving trick. This opens up the center of the room, making it feel larger and providing more floor area for play or other furniture.

    Believe it or not, studies show that a poor furniture arrangement can waste up to 40% of a room's usable space. One simple principle to reclaim that space is creating "traffic triangles" by arranging the bed, dresser, and closet so paths between them are 36 to 42 inches wide. This rule alone can significantly cut down on frustrating navigation issues. And for the growing number of people with a home office nook in the bedroom, tucking a desk beside the bed at a 90-degree angle maintains function without wrecking the room's flow. You can learn more about the trends shaping how we furnish our homes in this bedroom furniture market research.

    This simple infographic breaks down the foundational process of measuring and planning your room's layout.

    Infographic illustrating a three-step room measurement process: measure, sketch, and plan for furniture.

    Following these steps—Measure, Sketch, Plan—ensures that your furniture arrangement is based on accurate dimensions, preventing common layout mistakes before they happen.

    Arranging Other Essential Bedroom Furniture

    Once your bed is in the right spot, everything else starts to click into place. Now we can figure out where to put the other key pieces—nightstands, dressers, and maybe some seating—to build a layout that’s balanced and works for you. These pieces are the supporting cast; they complement the bed and make the whole room feel complete.

    The idea isn’t just to cram furniture into empty corners. It’s about being intentional with each piece so your daily flow feels natural, from grabbing your phone in the morning to putting away clean laundry.

    A top-down sketch of a bedroom layout with a bed, nightstand, dresser, bench, and armchair, including clearance lines.

    Positioning Your Nightstands and Dresser

    Nightstands do more than just hold a lamp; they frame the bed and give you that crucial bedside storage. Here’s a simple but solid guideline: pick nightstands that are about the same height as the top of your mattress. This makes it easy to reach for a glass of water or hit snooze without fumbling around.

    For your dresser or chest of drawers, you’ve got a couple of go-to options:

    • Opposite the Bed: Sticking a long dresser on the wall facing the bed is a classic move that creates a really pleasing sense of symmetry.
    • On the Longest Wall: If the wall opposite your bed has a window or door in the way, your next best bet is the longest uninterrupted wall. This gives you plenty of space without throwing off the room's balance.

    Before you settle on a spot for any storage piece, do this one crucial check: can you open all the drawers and cabinet doors completely? Make sure they don't smack into the bed frame or anything else. Trust me, there’s nothing more annoying than a drawer that only opens halfway.

    Incorporating Seating and Creating Zones

    If you’ve got the room for it, adding a spot to sit can transform your bedroom from just a sleeping space into a real personal retreat. It also helps to create different "zones" for different activities.

    • A Bench at the Foot of the Bed: A bench adds a nice visual finish to the bed, gives you a place to sit while putting on shoes, and is perfect for laying out your outfit for the next day.
    • An Accent Chair in a Corner: An empty corner is the perfect home for a comfy armchair and a small side table. Add a floor lamp, and you’ve instantly carved out a cozy reading nook for when you need to unwind.
    • A Small Loveseat or Settee: For larger primary bedrooms, a small loveseat can anchor a whole separate seating area. It’s the perfect spot for sipping your morning coffee or chatting before turning in for the night.

    No matter what seating you add, the key is making sure it doesn’t block your main walkways. You should always have a clear, easy path from the door to your bed and from the bed to your closet.

    As the North American bedroom furniture market grows, homeowners are getting smarter about layouts that look good and function well. It really boils down to symmetry and scale. For instance, in about 65% of standard 12×14-foot rooms, centering the bed creates that visual harmony we all crave. Just be sure to leave at least two to three feet of clearance around it. One clever trick we've seen is putting wardrobes or dressers on the shorter walls—it can actually make the floor space feel bigger. For a deeper dive into these trends, check out the latest industry analysis from Grand View Research.

    Avoiding Common Bedroom Layout Mistakes

    Even with the best intentions, a bedroom layout plan can go sideways. But learning how to arrange bedroom furniture is often about knowing what not to do. By understanding the most common slip-ups, you can dodge them entirely and create a space that feels like it was put together by a professional.

    The good news? Most of these mistakes are incredibly easy to fix. They usually come down to issues with scale, flow, and lighting. Sometimes, a few small tweaks can take a room from feeling awkward to absolutely perfect.

    Sketches illustrating 'before' and 'after' bedroom furniture arrangements for improved space.

    We see homeowners make the same few mistakes over and over again. Here’s a quick troubleshooting guide to help you spot them—and fix them—in your own space.

    | Common Bedroom Layout Problems and Solutions |
    | :— | :— | :— |
    | Common Mistake | Why It's a Problem | How to Fix It |
    | Pushing Everything Against the Walls | It creates a "racetrack" effect with a dead zone in the middle, making the room feel static and less inviting. | Pull furniture, especially the bed and seating, a few inches away from the walls to create depth and let the room breathe. |
    | Ignoring Scale and Proportion | Tiny furniture gets lost in a big room, and oversized pieces make a small room feel cramped and claustrophobic. | Match furniture size to the room. Use your measurements to ensure pieces fit with adequate clearance before buying. |
    | Blocking Natural Light | Placing tall furniture in front of windows casts shadows and makes the room feel smaller, darker, and less welcoming. | Keep windows as unobstructed as possible. Position tall pieces like armoires or bookcases on solid walls away from windows. |
    | Obstructing Traffic Flow | A blocked path from the door to the closet or bathroom creates daily frustration and makes the room feel poorly planned. | Ensure major walkways are at least 30-36 inches wide. Walk the paths yourself—if you have to shuffle, rearrange. |
    | Forgetting a Focal Point | Without a clear focal point, the room can feel chaotic and unfocused, with no clear place for the eye to rest. | Make the bed the star of the show. Center it on the main wall and use a beautiful headboard or artwork to draw attention. |

    By keeping these common issues in mind, you can design a layout that's not just beautiful but also functional for your daily life. A well-arranged room just feels better, and avoiding these simple mistakes is the key to getting there.

    Bringing Your Vision to Life with Planning Tools

    Okay, this is where the magic happens. After you've measured your space and have a good idea of where the bed should go, it's time to put your plan to the test. This is one of the most rewarding parts of the process, because you finally get to see your vision start to take shape.

    Thankfully, you don’t have to start shoving heavy furniture around just to see if something works. Instead of guessing how a layout will feel, you can use a few handy digital tools to experiment without breaking a sweat. This approach saves you a ton of physical effort and helps you spot potential problems before you’ve lugged that heavy dresser up the stairs.

    The Value of a Virtual Walkthrough

    Digital room planners are a game-changer for visualizing how furniture will actually fit and function in your room. You just plug in your dimensions, then drag and drop furniture pieces to see how everything plays together.

    This lets you confirm all the critical details right from your couch:

    • Check Your Clearances: Can you actually walk around the bed? See if you have the recommended 30 to 36 inches for your main pathways.
    • Test Drawer & Door Swing: This is a big one. You can place a dresser and instantly see if the drawers will smack into your bed frame when you open them.
    • Experiment with Scale: Wondering if a king bed will overwhelm the space? Drop one in your virtual room and see how much floor space you have left compared to a queen.

    A good planning tool is like a blueprint for your bedroom. It takes the guesswork out of the equation, making sure the layout that looks great on paper will actually work in real life. The result is a more functional, harmonious space.

    To get started, you can check out some of the useful online interior design tools that let you play with different layouts and styles. They’re a fantastic way to explore the possibilities and lock in your plan.

    From Digital Plan to Real-World Feel

    As great as these digital tools are for logistics and floor plans, nothing beats seeing and touching the furniture in person. Once you’ve mapped out a layout that you're happy with, the final piece of the puzzle is visiting a showroom. It’s the only way to get a true sense of a piece’s scale, quality, and texture—things a screen just can't fully capture.

    At our Woodstock Furniture & Mattress Outlet showrooms, you can see firsthand how different pieces look and feel. This helps you find options to fit the plan you’ve so carefully crafted. Our team is always here to offer guidance and help you bring that vision to life, making sure the final result is a bedroom you’ll love coming home to.

    Frequently Asked Questions About Arranging Bedroom Furniture

    Even with the best-laid plans, questions always seem to pop up once you start moving the heavy stuff around. Arranging bedroom furniture can bring up some tricky challenges that feel totally unique to your own space. We get it. Here are some straightforward answers to the questions we hear most often from homeowners just like you.

    What Is the First Piece of Furniture I Should Place in a Bedroom?

    Always, always start with the bed. No exceptions. It's the biggest, most important piece in the room, and everything else will revolve around it. Placing the bed first acts as an anchor for your entire layout.

    From there, you can arrange your nightstands, dressers, and everything else in relation to it. This approach keeps things logical and balanced, and you won't risk boxing yourself in with smaller items only to realize you have to start all over again.

    How Much Space Should I Leave for Walkways in My Bedroom?

    You'll want to aim for at least 30 to 36 inches of clear space for your main traffic paths. Think about the route from your doorway to the bed, and from the bed to the closet. These are the paths you'll walk every single day.

    For secondary paths, like the space between the side of your bed and a wall, you can get away with as little as 24 inches. But honestly, more is always better if you want to avoid that cramped, claustrophobic feeling.

    Here's a helpful trick from our designers: After you think you've placed your furniture, actually walk the paths. If you have to turn sideways or do a little shuffle to get through, it’s too narrow for comfortable, everyday use.

    Can I Put My Bed in Front of a Window?

    Yes, you absolutely can! Placing a bed in front of a window can create a stunning focal point, but you have to be thoughtful about it.

    First, make sure your headboard is low enough that it sits nicely beneath the windowsill. This way, you're not blocking out all that wonderful natural light. Second, invest in some quality curtains or blinds. This is non-negotiable for light control and privacy, but it also helps insulate against any drafts that could mess with your sleep.

    How Do I Arrange Furniture in a Very Small Bedroom?

    When you're working with a small bedroom, the name of the game is maximizing every single square inch. The secret is to think vertically and be strategic with your choices.

    • Bed Placement: The best move is usually to push the bed into a corner or up against the longest wall. This opens up as much floor space in the center of the room as possible.
    • Vertical Storage: Go for tall, narrow dressers instead of the wide, low ones. This simple switch draws the eye upward and saves precious floor real estate.
    • Smart Furniture: Look for pieces that do double duty. A bed with built-in drawers underneath or a storage bench at the foot of the bed can be a lifesaver.
    • Off-the-Floor Solutions: Wall-mounted shelves and floating nightstands are your best friends in a small room. They free up the floor and make the space feel much larger and less cluttered.

    At Woodstock Furniture & Mattress Outlet, our team has seen just about every layout challenge you can imagine. We can offer practical advice to help you figure out what works for your unique space. Come on down and let's find the right furniture for your vision.

    Find a Woodstock Furniture & Mattress Outlet location near you

  • A Guide to Designing a Living Room Layout That Works

    A Guide to Designing a Living Room Layout That Works

    Before you think about pinning living room ideas or shopping for a new sofa, there's a critical first step that separates a functional space from a frustrating one: creating a floor plan.

    This isn't just for architects or designers. Think of it as your personal blueprint, a practical map that ensures every piece you choose will not only fit but will also contribute to a room that feels comfortable, intentional, and easy to live in. Skipping this part is a common challenge, often leading to that sinking feeling when a new sofa arrives and it overwhelms the space or blocks a natural walkway.

    Your Blueprint For A Better Living Room

    Detailed architectural floor plan illustrating a living room layout with furniture, dimensions, and movement paths.

    The goal here is simple: to create a detailed map of your living room before you move a single thing. This process takes the guesswork out of the equation. It empowers you to make thoughtful, confident decisions about furniture scale and placement, turning an abstract idea into a concrete, workable plan.

    Start with Accurate Measurements

    First, grab a tape measure, a notepad, and a pencil. Precision is helpful here—eyeballing it now can lead to headaches later.

    Start with the basics: the length and width of the room. Jot those down. Next, measure the ceiling height. This might seem minor, but it has a significant impact on the scale of everything from tall bookcases to pendant lights.

    Now, let’s get into the details. You need to account for all the fixed architectural features you’ll have to work around.

    • Doors and Windows: Measure the width and height of each one, and also measure their distance from the nearest corner.
    • Fireplace or Built-Ins: Note the full dimensions of the hearth, mantel, and any shelving that's part of the structure.
    • Outlets and Switches: Walk the room and mark the location of every electrical outlet, light switch, and connection point. Knowing this now is a game-changer for planning where your lamps, TV, and sound system will go.

    Identify Natural Traffic Patterns

    Every room has invisible lanes—the paths people naturally take to move from the doorway to the sofa, or from the living area to an adjoining room. Defining these "traffic patterns" is the secret to a layout that flows instead of feeling like an obstacle course.

    Think about how you actually use the space. Where do you enter? Where do you exit? Is there a direct line to the back door or the hallway?

    A useful rule of thumb is to keep these main walkways clear. As a benchmark, you’ll want to allow for at least 30 to 36 inches of clear space for major traffic routes. This ensures movement feels effortless and the room doesn't feel cramped.

    Placing a chair or an oversized coffee table right in the middle of a natural pathway is a common layout blunder. It can instantly make a room feel poorly planned and difficult to navigate.

    Sketch Your Floor Plan

    Alright, you have your measurements and you know where people walk. Now it’s time to bring it all together and create your blueprint. You don’t need any specialized software or drafting skills.

    A simple sheet of graph paper works well. You can let each square represent 6 inches or a foot, which helps you keep everything to scale. If you're more comfortable working digitally, there are many free, easy-to-use room planner tools online that let you drag and drop elements.

    Start by drawing the outline of your room. Carefully add in the windows, doors, fireplace, and all those other fixed elements you measured. Then, use dotted lines to mark out the main traffic lanes you identified. This visual map is now a powerful tool for arranging and rearranging furniture without the heavy lifting.

    Whether you're planning a complete overhaul or just staging your space to sell, getting the layout right is fundamental. For more on creating that picture-perfect look, you can find helpful information in guides like these Top 10 Staging Tips for Selling Your Home. Your floor plan is the essential first step to achieving a professional, polished result.

    Carve Out Functional Zones in Your Space

    Top-down sketch of two living room layouts: a conversation area and a reading nook.

    Modern living rooms are often multitasking spaces. One minute they're hosting a family movie night, the next they're a quiet spot for reading, a conversation area for guests, or a play space for kids. A helpful way to bring a sense of order to this activity is to think in terms of functional zones—creating distinct areas for different activities within the same room.

    This technique, which designers call "zoning," is about giving your layout purpose. Instead of a single, sprawling space, you’re creating smaller, intentional environments that support the way your family lives. The trick isn't to put up walls, but to use your furniture, rugs, and lighting as visual cues to gently separate one area from another.

    Figure Out Your Primary Zones

    Before you start shifting furniture, take a minute to think about what happens in your living room. What are the most common activities? Your daily and weekly routines will tell you exactly which zones you need to create.

    For most people, it boils down to a few core functions:

    • The Conversation Zone: This is often the social heart of the home. It’s usually built around your main sofa and a couple of chairs, arranged to make conversation easy. The goal is to create a setup where people can chat comfortably.
    • The Media/Entertainment Zone: This area is focused on the screen—be it a TV or a projector. Here, furniture placement is focused on clear sightlines and comfortable seating.
    • The Reading Nook: This can be a personal escape. It's often a smaller zone tucked into a quiet corner, featuring a single chair, a small side table, and a dedicated task light.
    • The Play Area: This can be a great addition for families with young children. This space can be as simple as a soft rug and some low, easy-to-access toy storage to help contain the fun.

    Use Furniture to Create Smart Separation

    An easy way to carve out your zones is by strategically placing your furniture. By grouping pieces together, you naturally create visual boundaries. A common technique is to float a sofa in the middle of a large room; its back acts like a low-slung wall, clearly dividing the main seating area from a walkway or dining space.

    To enhance this, an open-backed bookcase or a sleek console table behind a floating sofa reinforces that division. It defines the zone while adding surface and storage space—all without blocking the view.

    This isn't just for big pieces, either. An armchair angled just right in a corner, paired with an ottoman and a floor lamp, instantly suggests a "cozy reading spot." You're essentially creating little "rooms within a room" that tell people how to use the space without saying a word.

    The Defining Power of Rugs and Lighting

    Furniture does the heavy lifting, but rugs and lighting are effective tools for defining your zones. An area rug works like a visual anchor, grounding a cluster of furniture and clearly marking its territory. A common designer approach is to place at least the front legs of your sofa and chairs on the rug—it instantly pulls the conversation area together, making it feel deliberate and cohesive.

    Lighting is just as powerful for sculpting your space. Think in layers:

    1. Ambient Lighting: A central chandelier or ceiling fixture can define the primary conversation hub.
    2. Task Lighting: A focused floor lamp or wall sconce can put a spotlight on your reading nook, making it feel distinct and inviting.
    3. Accent Lighting: Putting the lights in your media zone on a dimmer switch can create a theater-like vibe for movie night.

    By layering different light sources, you can highlight each zone on its own, changing the mood and function of the entire room with the flip of a switch. This combination of furniture, rugs, and lighting transforms a single room into a truly versatile space.

    Choosing Your Anchor Piece and Getting the Scale Just Right

    Now that you’ve mapped out your zones, it's time to talk about the most influential player in a living room layout: the anchor furniture. In many cases, this is your sofa or sectional. It’s often the largest piece in the room, the one that sets the tone for everything else. When you get this choice right, the rest of the puzzle pieces can fall into place more easily.

    This foundational piece does more than just offer a place to sit. It establishes the scale, the style, and the function of your living space. A large, deep-seated sectional can suggest "casual comfort and movie nights." A more upright, tailored sofa, on the other hand, might suggest a space geared more toward conversation. The trick is to pick something that not only physically fits but also aligns with what you do in that room.

    Your Sofa Is the North Star of Your Layout

    Think of your sofa as the sun, and other furniture—chairs, tables, lamps—are planets orbiting around it. Its placement dictates where accent chairs will live, where the coffee table will land, and how people will move through the space. In many layouts, the sofa's position can determine a significant portion of the room's functional flow.

    It’s no wonder sofas and sectionals are a large part of the home furnishings world. Their central role in our homes is a major driver of market trends. If you're interested in the data behind this, you can explore insights on the household furniture market here.

    Before you settle on a sofa, think about where it will go. Will you face it toward the fireplace to create a cozy, traditional focal point? Or will its back create a soft "wall," dividing the living and dining areas in an open-concept home? Each decision creates a completely different experience.

    Getting the Scale Just Right

    One of the most common problems people encounter is getting the scale wrong. A sofa can look perfectly normal in a large showroom but feel too large in a smaller living room. The flip side is also true—a small loveseat can feel lost in a huge room with vaulted ceilings.

    What you're aiming for is visual balance. Your main piece needs to be substantial enough to ground the room, but not so big that it suffocates it.

    A Helpful Tip: Before you decide, grab some painter's tape and mark the exact dimensions of the sofa or sectional on your floor. Live with this "ghost" furniture for a day or two. Can you walk around it easily? Is there still room for a side table? This simple trick gives you a real-world feel for the piece's footprint and can help you avoid a costly mistake.

    Also, consider visual weight, not just physical size. A sofa on tall, skinny legs will feel much lighter and less imposing than a blocky one sitting right on the floor, even if they have the same length and depth.

    Sectional Configurations for Different Spaces

    Sectionals are popular because they offer a lot of seating, but their specific shape means you have to choose wisely. Not every sectional works in every room.

    Here’s a quick rundown of common options:

    • L-Shaped Sectionals: A classic choice. These are great for tucking into a corner to save floor space in small or medium-sized rooms. You can also "float" one in a larger room to neatly define your main conversation area.
    • U-Shaped Sectionals: These are often used for large family rooms or dedicated media rooms. A U-shaped sectional creates an instant, cozy conversation pit that’s very social, but you need the square footage to pull it off without feeling boxed in.
    • Sectionals with a Chaise: This can be a good compromise for smaller spaces where a full L-shape is too much. The chaise gives you that spot to stretch out and relax, but without the visual bulk of a whole other corner piece. It helps keep the room feeling more open.

    Ultimately, picking your anchor piece is a balancing act between what you need and what your room can handle. By taking the time to nail the scale and placement, you're setting the stage for a living room that not only looks great but feels comfortable.

    Mastering Furniture Placement And Traffic Flow

    Once your anchor pieces are roughly in place, it’s time to bring in the rest of the furniture. This is a game of inches that separates a room that feels effortless from one that feels like an obstacle course. Getting the placement right is all about creating a natural flow that makes the room easy to move through and live in.

    The goal is simple: let people walk around without bumping into corners or squeezing past chairs. To do this, you have to think as much about the empty areas between your furniture as the furniture itself. When you nail it, the layout just works. Conversations are easier, and the whole space feels balanced.

    This little graphic breaks down the core process. Know your space, pick your main piece, then test the flow. It’s a simple but effective way to think.

    A three-step infographic outlining the sofa selection process: measuring space, picking a sofa, and checking room flow.

    Following this keeps you focused on how everything works together, helping you sidestep common layout mistakes from the get-go.

    Key Spacing And Clearance Rules

    Think of these as reliable guidelines, not rigid laws. They’re based on how people actually move and use a space, making your living room comfortable and functional.

    To make things easier, here's a quick cheat sheet for the most common clearances you'll need to think about.

    Living Room Clearance And Spacing Guide

    Placement Area Recommended Distance Why It Matters
    Sofa to Coffee Table 16 to 18 inches Close enough to reach your drink, but far enough to walk through easily. This is the sweet spot for functionality.
    Main Walkways 30 to 36 inches This is your main artery. Keeping it this wide prevents bottlenecks and makes the room feel open and accessible.
    Seating Apart 3.5 to 10 feet Keeps people close enough for a natural conversation without shouting, but still gives everyone their personal space.
    Side Table to Seat 2 to 3 inches Just enough space so it doesn't look crammed, but still close enough to be a convenient landing spot for a book or lamp.

    These measurements aren't arbitrary; they’re tried-and-true distances that help create a space that feels considered and is a breeze to use every day.

    Navigating Traffic And Focal Points

    A well-designed living room respects the natural pathways people take. The routes from the door to the sofa, or from one room to the next, need to stay clear. This is where your floor plan sketch becomes your friend.

    The most important rule? Keep your main walkways at least 30 to 36 inches wide. For smaller paths, like the space between your coffee table and TV stand, you can get away with about 24 inches.

    If your room has a built-in focal point like a fireplace or a large window, lean into it. Arrange your main seating to face it. This gives the room an immediate sense of purpose. No obvious focal point? You can create one with a large piece of art or even the TV.

    Speaking of the TV, a question people often ask is how far away the sofa should be. A good rule of thumb is to start at about 7 feet from the screen. This usually provides a comfortable viewing angle without straining your eyes or neck.

    Getting your traffic flow right is one of the biggest upgrades you can make to your room. It's not just about looks; a well-planned layout can genuinely reduce daily frustration. As our living spaces become more fluid and less formal, these principles are more important than ever.

    Putting It All Together: A Practical Example

    Let’s walk through a common scenario. Imagine a rectangular living room. You have a fireplace on one of the short walls and the main doorway on the wall opposite it.

    • Place the Anchor: The sofa goes down first, facing the fireplace to establish that focal point. Pulling it 4 inches or so off the back wall gives it a little breathing room—it makes a surprising difference.

    • Create the Zone: Two accent chairs are placed across from the sofa, forming a U-shaped conversation area centered on the fireplace. This setup feels intimate and keeps the view of the fire open.

    • Ground the Space: A coffee table sits in the middle, about 18 inches from the sofa and chairs. It ties the whole seating group together.

    • Define the Flow: This is crucial. A clear 36-inch walkway is left open from the entryway, running behind the accent chairs to the rest of the house. Now, nobody has to cut through the middle of a conversation just to get by.

    By applying these spacing and placement ideas, you’ve taken a collection of furniture and turned it into a cohesive, comfortable, and livable space.

    Now that your main furniture pieces are in place and you can walk through the room without tripping, the foundation is solid. But right now, it’s just a functional space. Let's add the layers that make it feel like home.

    These finishing touches—the right rug, a smart lighting plan, and well-chosen decor—are what will bring your living room to life. They aren't just afterthoughts; they’re the essential elements that pull everything together, creating a space that’s cozy, complete, and full of personality.

    Ground Your Space with the Right Area Rug

    Think of an area rug as the visual anchor for a seating area. It’s one of the most effective tools you have for defining a specific zone and making it feel cohesive. A common mistake is choosing a rug that’s too small for the space.

    When a small rug is just floating in the middle of the room, it can make all the furniture around it feel disconnected and can even shrink the room visually. The fix is simple, though.

    Your area rug should be large enough for at least the front legs of your sofa and accent chairs to sit on it. This one rule instantly ties all the pieces together, creating a unified and grounded conversation area.

    If you’re working with a larger living room, you might even be able to get all the furniture legs onto the rug. Just make sure to leave some of the floor showing around the edges—aim for about 18 to 24 inches of bare floor between the rug and the walls. This keeps it from looking like wall-to-wall carpet that doesn't quite fit.

    Illuminate with a Layered Lighting Plan

    Good lighting can completely transform the vibe of a room. The key is to think in layers. If you're only relying on one overhead light, you're likely casting harsh shadows and creating a flat, uninviting atmosphere. A better approach is to combine three different types of light.

    • Ambient Light: This is your room's general illumination. It usually comes from a central ceiling fixture, like a chandelier or flush-mount light, or recessed lighting. Its job is to provide a comfortable, even level of brightness.
    • Task Light: This is all about function. It’s the focused light you need for specific activities. Think of a floor lamp next to your reading chair or a table lamp on an end table. It makes things like reading or doing a puzzle easier on the eyes.
    • Accent Light: This is where you can add flair. Accent lighting is used to highlight features you love, whether it’s a piece of art, an architectural detail, or a plant. Wall sconces and picture lights are perfect examples.

    When you combine these three layers, you get a lighting scheme that’s both dynamic and flexible. You can adjust the mood for any occasion, from a bright family game night to a softly lit, relaxing evening.

    Accessorize with Intention

    Now for the final, personal touches. This is where you bring in things like side tables, plants, artwork, and throw pillows. The goal here is curation, not clutter. Every accessory should complement the layout you've worked so hard on, not compete with it.

    Side tables need to be practical. Place them within easy reach of a sofa or chair—just 2 to 3 inches away is a good guideline. Try to match the height of the table to the height of the chair’s armrest.

    Plants are fantastic for adding life, color, and texture to a room. If you love the look of greenery but don't have a lot of time for care, there are many beautiful low maintenance indoor plants that can add vibrancy.

    Finally, when it’s time to hang artwork, a good rule of thumb is to place it at a comfortable eye level. The center of the piece should be about 57 to 60 inches from the floor. This ensures it feels integrated into the room's design instead of floating too high or sitting too low.

    Common Questions About Living Room Layouts

    Even with well-laid plans, things can get a little tricky when real furniture starts entering the room. It’s normal to hit a snag or two. Let's walk through some of the most common layout challenges people ask about.

    How Do I Handle an L-Shaped Room?

    An L-shape can feel like a puzzle, but it’s actually an advantage. A common mistake is trying to treat it as one single, continuous space. Instead, lean into the architecture. The shape gives you a natural, built-in way to create different zones.

    Think of the larger, longer part of the "L" as your main event. This is an ideal spot for your primary seating area, where you’ll put your sofa, coffee table, and maybe a couple of chairs for conversation or watching TV.

    The shorter leg of the "L" then becomes your secondary space. It's the perfect corner for something more specific. Some ideas include:

    • A quiet reading nook with a comfy armchair, an ottoman, and a good floor lamp.
    • A small, dedicated workspace with a slim desk and a chair that can be tucked away.
    • A designated play area for kids, defined with a soft rug and some low-profile toy storage.

    To make this work, using an area rug in each zone can be helpful. It’s a simple trick that visually separates the two functions and makes the whole room feel more intentional and pulled-together.

    Can I Mix Different Furniture Styles?

    Absolutely. A room where every piece matches perfectly can sometimes feel a bit impersonal. Mixing styles is what can give a space soul, personality, and a collected-over-time vibe. That said, there's a fine line between "eclectic" and "chaotic."

    The secret to making different styles work together is to find a common thread that connects them. This unifying element creates a sense of harmony, even if the pieces themselves are from different eras or aesthetics.

    So, what kind of common thread are we talking about?

    • A Consistent Color Palette: If your color scheme is tight, a traditional rolled-arm sofa and a sleek, modern accent chair can live in harmony.
    • Repeating Materials: Using the same wood tone or metal finish across several different pieces helps tie everything together. Think a walnut coffee table, walnut legs on a chair, and a walnut-framed mirror.
    • Similar Scale: Make sure your furniture has a similar visual weight. A huge, overstuffed traditional armchair might overpower a delicate, minimalist side table. Balance is key.

    Our advice is to start with your biggest, most important piece—usually the sofa. Once that's in place, you can slowly bring in other items, always asking yourself if they complement the main piece or compete with it.

    Should I Get a Sectional or a Sofa and Loveseat?

    This is one of the top questions we hear, and there's no single right answer. It comes down to your room's size, your lifestyle, and what you’re trying to achieve with the space.

    A sectional might be a good fit if:

    • You have a large, open-concept family room and you want to carve out a cozy, defined zone for lounging.
    • Your main goal is to maximize casual seating for movie nights and family get-togethers.
    • You need to create a visual divider in a large room. The back of a sectional can work like a low "wall" to separate the living area from a dining area.

    A separate sofa and loveseat (or a pair of chairs) is often a better option if:

    • You're working with a smaller or more formal living room. Separate pieces give you more flexibility in how you arrange them.
    • You like to switch things up. A traditional layout is much easier to rearrange when you want a change.
    • Your room has a lot of doorways or awkward traffic paths that a large, immovable sectional might block.

    Here’s a helpful tip: Before you commit, grab some painter's tape and outline the footprint of each option on your floor. Seeing it in your actual space will give you a much better feel for how it impacts traffic flow and the overall scale of the room.


    Working through these details is part of the process. If you'd rather see these options in person and get some hands-on advice from knowledgeable staff, we invite you to visit one of our showrooms. Here at Woodstock Furniture & Mattress Outlet, we’re ready to help you find pieces to make your vision a reality. Come see what we have to offer at https://woodstockoutlet.com.