Tag: woodworking plans

  • Outdoor Patio Table Plans Built for Real Patios

    Outdoor Patio Table Plans Built for Real Patios

    You've found a patio table that looks right online, measured the open area, and still can't tell whether six chairs will fit without blocking the grill. That uncertainty causes most outdoor table mistakes. A table can be attractive, sturdy in the showroom, and completely wrong for the usable space outside your door.

    Good outdoor patio table plans start with circulation, seating, and weather exposure. In North Georgia, that means accounting for door swings, steps, grill access, humid summers, strong sun, leaf buildup, and the seasonal movement of solid wood. The plan below focuses on those decisions before cutting lumber, then walks through a practical rectangular table build with materials, cut dimensions, assembly guidance, and finishing checks.

    Before You Build What Your Patio Really Needs

    A homeowner recently described a familiar problem. The patio had enough open floor area for a large dining table, at least on paper, but the table sat directly in the path between the back door and the grill. Chairs pushed against the railing, one leg landed on an uneven section of pavers, and the tabletop developed movement after repeated exposure to damp weather. The table didn't fail because the design was unattractive. It failed because the plan treated the patio like an empty rectangle.

    Start by identifying the usable dining zone, not the total patio footprint. Door swings, stairs, grill doors, storage bins, railings, and the route people use to carry food all reduce the area available for furniture. A table that fits only when every chair is pushed in isn't a workable dining table.

    Practical rule: Measure the patio while imagining people using it, not while looking at an empty floor.

    A reliable plan also separates appearance from performance. A farmhouse tabletop may suit the house, but its wide boards need room to move as moisture changes. A lightweight aluminum table may be easier to reposition, while a dense hardwood table may feel more substantial but require more effort to move. Neither choice is automatically right for every household.

    For visual planning, an AI backyard patio design tool can help you test furniture arrangements before committing to lumber or a purchased table. Treat any digital layout as a starting point, then verify the dimensions with tape on the actual patio.

    The market context is encouraging for anyone planning an outdoor dining area. The global outdoor tables market was valued at USD 19.64 billion in 2025 and is projected to reach USD 32.66 billion by 2034, about 66% growth over nine years at a 5.84% CAGR, according to Fortune Business Insights' outdoor tables market report. That scale doesn't tell you which table belongs on your patio, but it does show that patio dining is part of a mature, expanding category with many construction and material approaches.

    The decisions ahead are straightforward:

    • Space first: establish the usable dining zone and circulation paths.
    • Shape second: choose round, square, or rectangular based on the patio's geometry.
    • Material third: match wood or metal to humidity, sun, weight, and maintenance expectations.
    • Construction last: build the frame, attach the top for seasonal movement, and inspect the finished table as a complete unit.

    How to Size and Shape Your Table for Real Life Use

    Start with the usable dining zone, not the tabletop. Mark the patio boundary, then identify anything that must stay accessible, including the door swing, grill lid and doors, stairs, gates, and the normal route to the yard. What remains is the area available for dining. Reserve chair space and walking routes inside that area before selecting table dimensions.

    Plan on 36 inches of clearance around the table for pulling out chairs and general circulation, as outlined in outdoor dining table sizing guidance. Selected edges can tighten to 24 to 30 inches when nobody needs to pass behind a seated guest. Routes behind diners need 42 to 48 inches, while wheelchair passage or two-way traffic may require up to 60 inches, according to patio clearance guidance for table layouts.
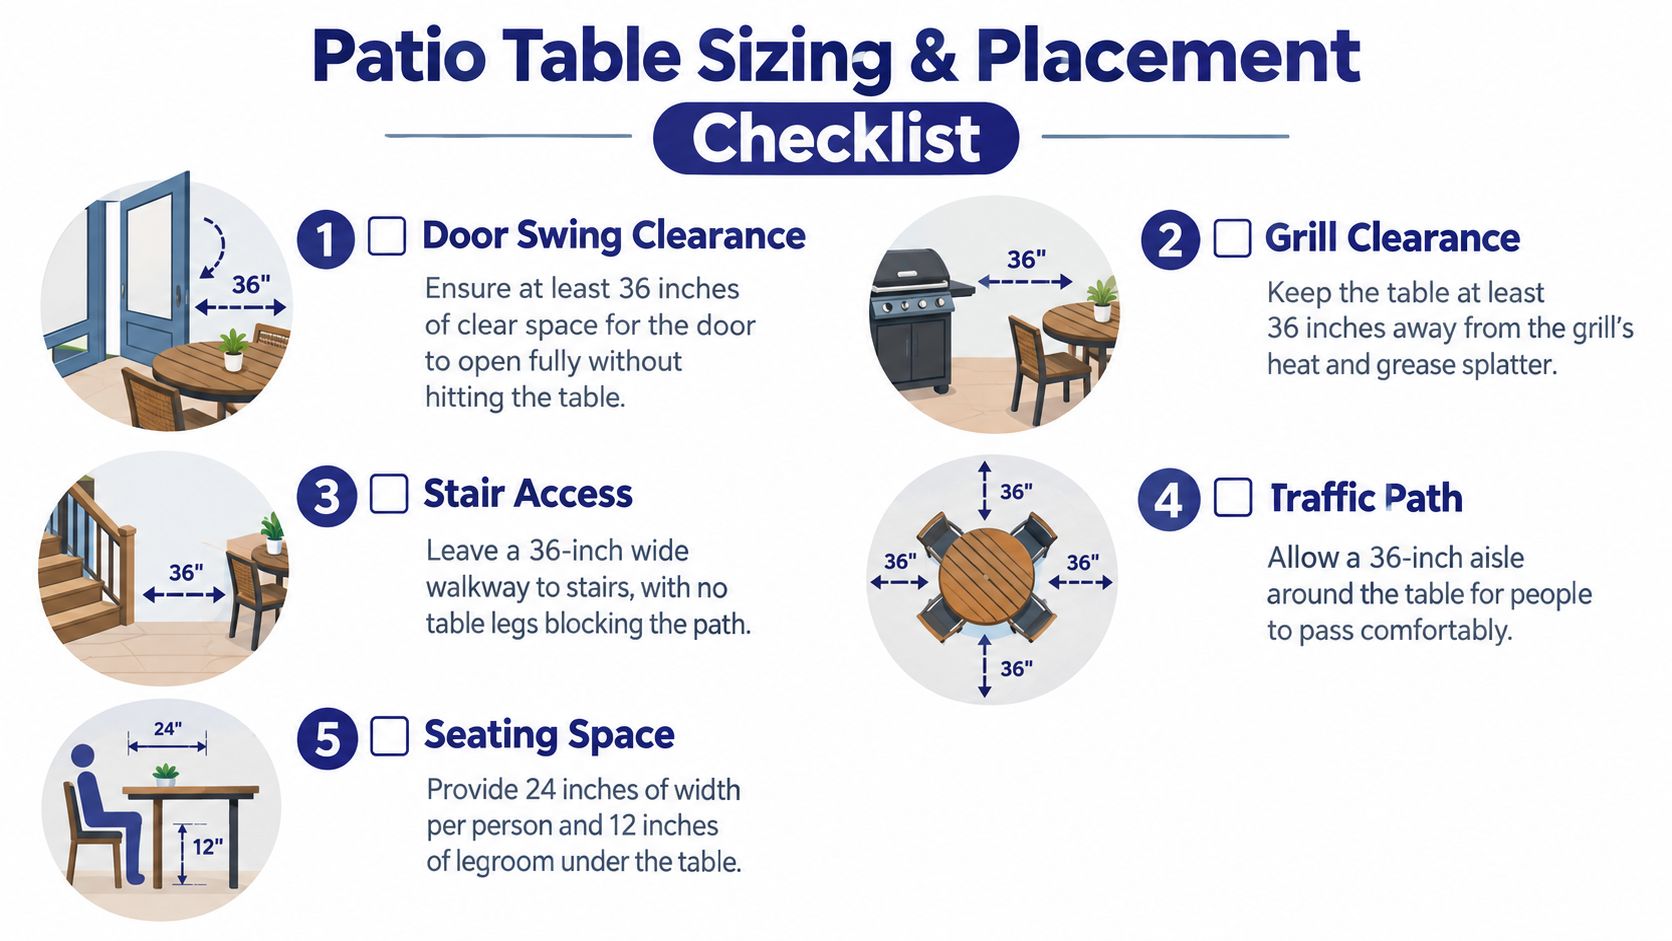
    An infographic checklist showing five essential measurements for proper patio table placement and sizing in outdoor spaces.

    Choose dimensions from the open zone

    Use painter's tape to mark the tabletop, then add a second outline for the required clearance. Set out chairs or pull them back from the tape and walk the routes people will use. If the layout blocks the grill, crowds a doorway, or forces people to turn sideways, reduce the top or rotate its position.

    A standard outdoor dining table is generally 28 to 30 inches high. A bar-height table is typically 40 to 42 inches high. Leave approximately 8 to 12 inches between the seat and tabletop. Standard dining chairs pair with tables in the 28 to 30-inch range, while counter-height tables commonly use 24 to 26-inch stools.

    Patio Situation Recommended Table Shape and Size Clearance to Leave
    Compact square patio Round or square table sized to preserve chair movement Keep the broadest routes near 36 inches, tightening only where passage isn't needed
    Long, narrow patio Rectangular table aligned with the patio's long edge Preserve a clear aisle along the open side
    Patio beside a grill Rectangular or compact round table placed outside the grill work zone Keep grill access and heat exposure separate from seating
    Patio with stair access Shape and dimensions that leave a direct walkway to the stairs Maintain a clear path without table legs in the route
    Mixed dining and circulation area Smaller round or square top, or a narrow rectangle Expand circulation where people pass behind seated guests

    Round and square tables suit compact patios because their footprints can reduce awkward corner movement. Round tops support conversation and avoid sharp corners in tight routes. Rectangular tables make better use of long, narrow patios, especially when one side can serve as the main aisle. Oval tables soften a larger arrangement, but their curved ends still require the same chair and walkway clearance as other dining shapes. Choose the plan that protects circulation first, then adjust the shape and material to the patio's sun, humidity, and maintenance demands.

    Choosing Materials That Hold Up in North Georgia

    North Georgia weather puts outdoor furniture through repeated moisture and drying cycles, bright sun, pollen, leaves, and humid air. The right material depends less on a universal durability ranking and more on how much weight you're willing to move, how often you'll clean or reseal, and whether you prefer natural aging or a more consistent appearance.

    Common outdoor woods include teak, acacia, eucalyptus, cedar, ipe, cypress, and mahogany. These species are repeatedly selected for outdoor use because they tolerate sun, rain, and humidity more effectively than untreated softwoods, as summarized by this solid wood outdoor furniture material guide.

    A comparison chart of various outdoor wood and composite materials used for patio furniture in North Georgia.

    Compare the tradeoffs before buying stock

    Teak contains natural oils and is often chosen when the builder wants strong weather resistance with a relatively manageable maintenance routine. Ipe is very dense and can provide a substantial, long-wearing surface, but that density affects cutting, drilling, and overall table weight. Acacia and eucalyptus can offer a natural wood appearance with useful moisture resistance, though their finish still needs attention.

    Cedar is lighter and easier to work with, which helps when building a table that may need to move. It's also softer, so dents, scratches, and surface wear are more noticeable. Cypress and mahogany can suit outdoor construction, but availability, grain, weight, and finish requirements vary by supplier.

    Aluminum is a practical alternative when low maintenance and easier repositioning matter more than a solid-wood feel. Rope details and tactile finishes fit the current preference for natural-looking outdoor spaces without requiring the entire table to be made from hardwood. Composite surfaces can provide a uniform appearance and reduced routine upkeep, although they don't reproduce the grain and repairability of solid wood.

    Before choosing boards, check moisture content. Furniture guidance commonly targets 10% to 12% for higher-stability outdoor hardwood stock, 12% to 15% for mid-grade stock, and 15% to 18% for lower-grade stock, with an acceptance band of about plus or minus 2% within a lot, according to this outdoor wood furniture grading guidance. Use a pin-type meter at multiple points on each board and allow the lumber to acclimate before assembly.

    For a broader view of outdoor construction stock, compare species and grades in a resource covering lumber for decks. The same principle applies to a patio table. Don't build a precision frame from boards that are still carrying excess moisture.

    A Complete Rectangular Patio Table Plan You Can Build

    This plan uses a 72-by-36-inch rectangular top with a farmhouse-style base intended for six diners. It suits a patio that can accommodate the tabletop, chairs, and circulation without sacrificing the route to the door or grill.
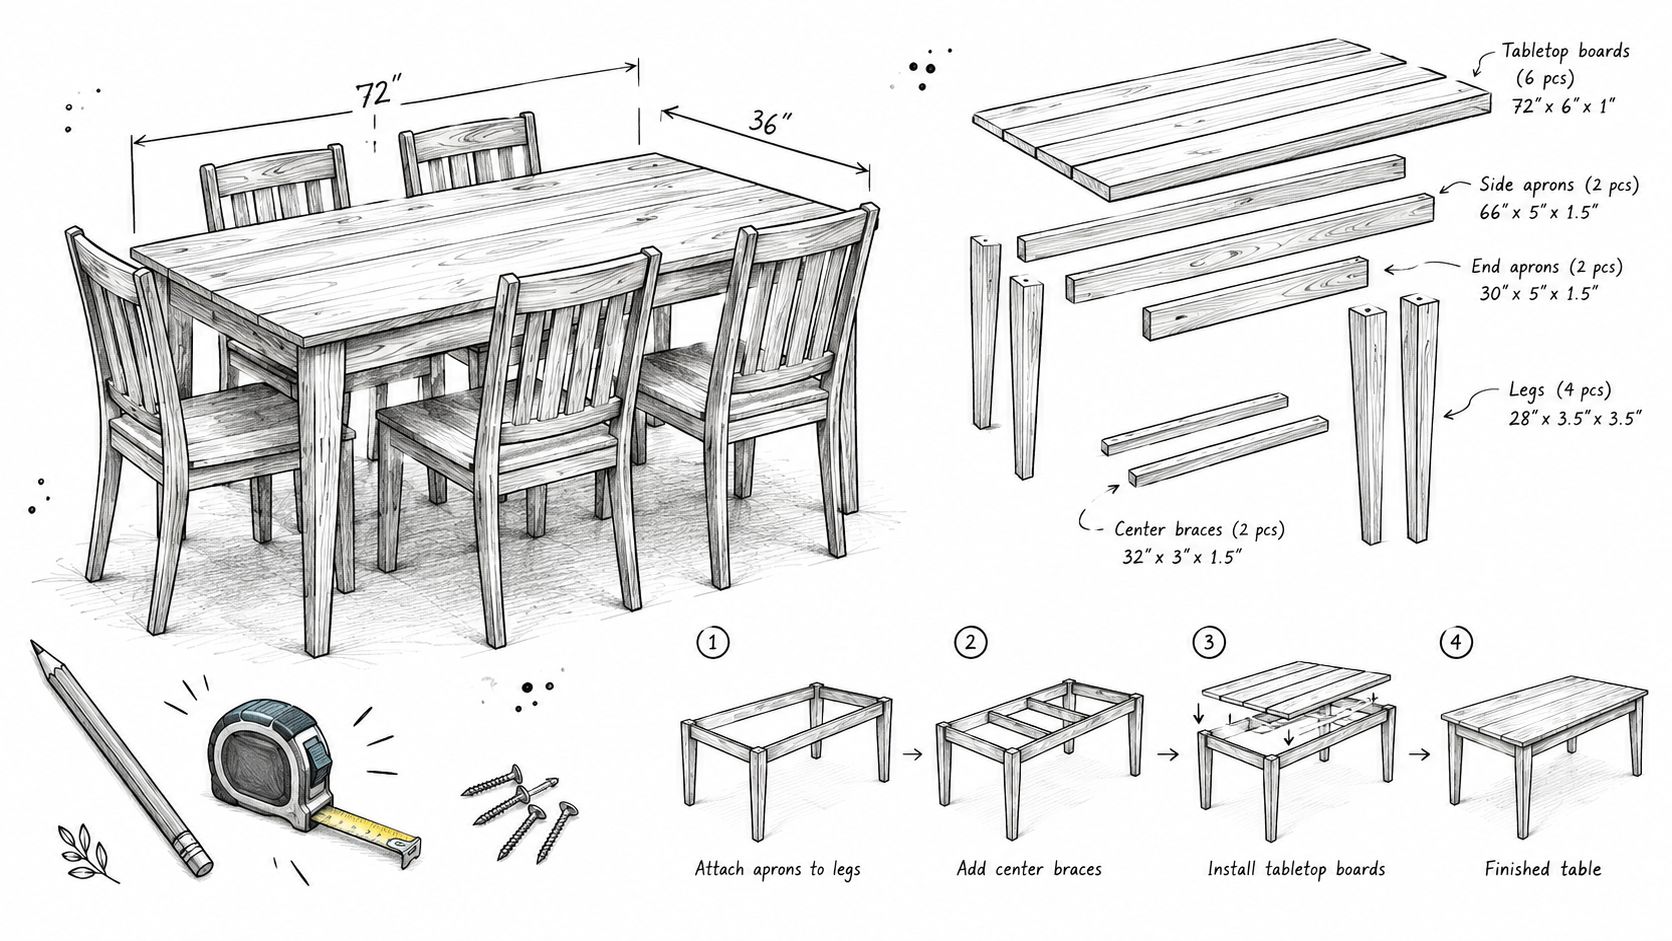
    A detailed technical drawing and guide for assembling a DIY wooden dining table with parts list.

    Materials and cut list

    Choose an exterior-suitable hardwood or a durable outdoor softwood, and buy straight, sound boards with limited end checking. Avoid untreated interior screws and ordinary steel hardware. Use exterior-rated screws, corrosion-resistant bolts, washers, and nuts suited to outdoor exposure.

    Cut list for the 72-by-36-inch version:

    • Tabletop boards: six boards at 72 inches, sized to create a finished width of 36 inches. The exact board width depends on the stock you select.
    • Long aprons: two boards at 66 inches.
    • End aprons: two boards at 30 inches.
    • Legs: four posts cut to establish a finished table height of approximately 29 inches after accounting for the top thickness.
    • Lower stretchers: two long stretchers and two end stretchers, sized to fit between the legs without interfering with diners' knees.
    • Optional center support: one lengthwise support beneath the top if the selected boards need additional stiffness.

    You'll need a tape measure, combination square, circular saw or miter saw, drill, exterior-rated drill bits, countersink bit, clamps, sander, moisture meter, and safety glasses. A pocket-hole jig can speed assembly, but it isn't essential if you're comfortable using bolts and direct exterior screws.

    Build the frame without trapping the top

    Begin by checking each board's moisture content at several points. Reject or set aside boards that show large variation, obvious twist, or active checking. Mark the best face of each tabletop board, then arrange the boards so the grain direction and color look intentional.

    Build the apron rectangle around the legs, keeping the frame square by measuring both diagonals. If the diagonal measurements don't match, correct the frame before tightening every fastener. A table that starts out of square tends to magnify small errors when the top is installed.

    Attach the legs to the aprons with exterior-rated bolts or structural screws. Add stretchers low enough to improve side-to-side stability without creating a shin hazard. Test the frame on a flat surface. If it rocks, correct the base now rather than trying to hide the problem with adjustable feet later.

    Do not glue the tabletop into a rigid slab-and-frame connection. Outdoor wood changes dimension across its width. Use elongated attachment holes, tabletop clips, figure-eight fasteners, or another method that lets the boards move slightly while keeping them secure. Leave small, consistent drainage gaps between boards rather than forcing every seam tight.

    The following video can help visualize the general sequence for a wooden outdoor dining table build. Use it as a technique reference, then adapt dimensions and hardware to your selected material.

    Round and square versions are adaptations, not entirely different projects. For a four-seat square table, shorten the top and frame while preserving leg stability and circulation. A round top requires a different cutting and support approach, but the same rules apply: keep the base rigid, allow the top to move, and test the taped footprint before cutting.

    As you assemble, soften exposed corners and remove every burr from cut hardware and drilled openings. Check the underside for accessible gaps that could catch fingers, clothing, or chair components. The finished table should sit level, resist diagonal racking, and remain stable when someone applies ordinary hand pressure to each corner.

    Finishing Sealing and Safety Checks That Prevent Early Failure

    A finish can slow moisture entry and reduce damage from sun and rain, but it can't stop wood from moving forever. Outdoor finishes eventually wear, especially on tabletops, exposed end grain, and edges that collect water. Plan for inspection and touch-up instead of treating the first coating as permanent protection.

    Start with a clean sanding sequence. The required progression is 80 grit, then 120 grit, then 220 grit, as shown in the finishing checklist below. The coarse pass removes mill marks and sharp transitions, the middle pass refines the surface, and the final pass makes the tabletop comfortable to touch without polishing it so heavily that a finish struggles to bond.
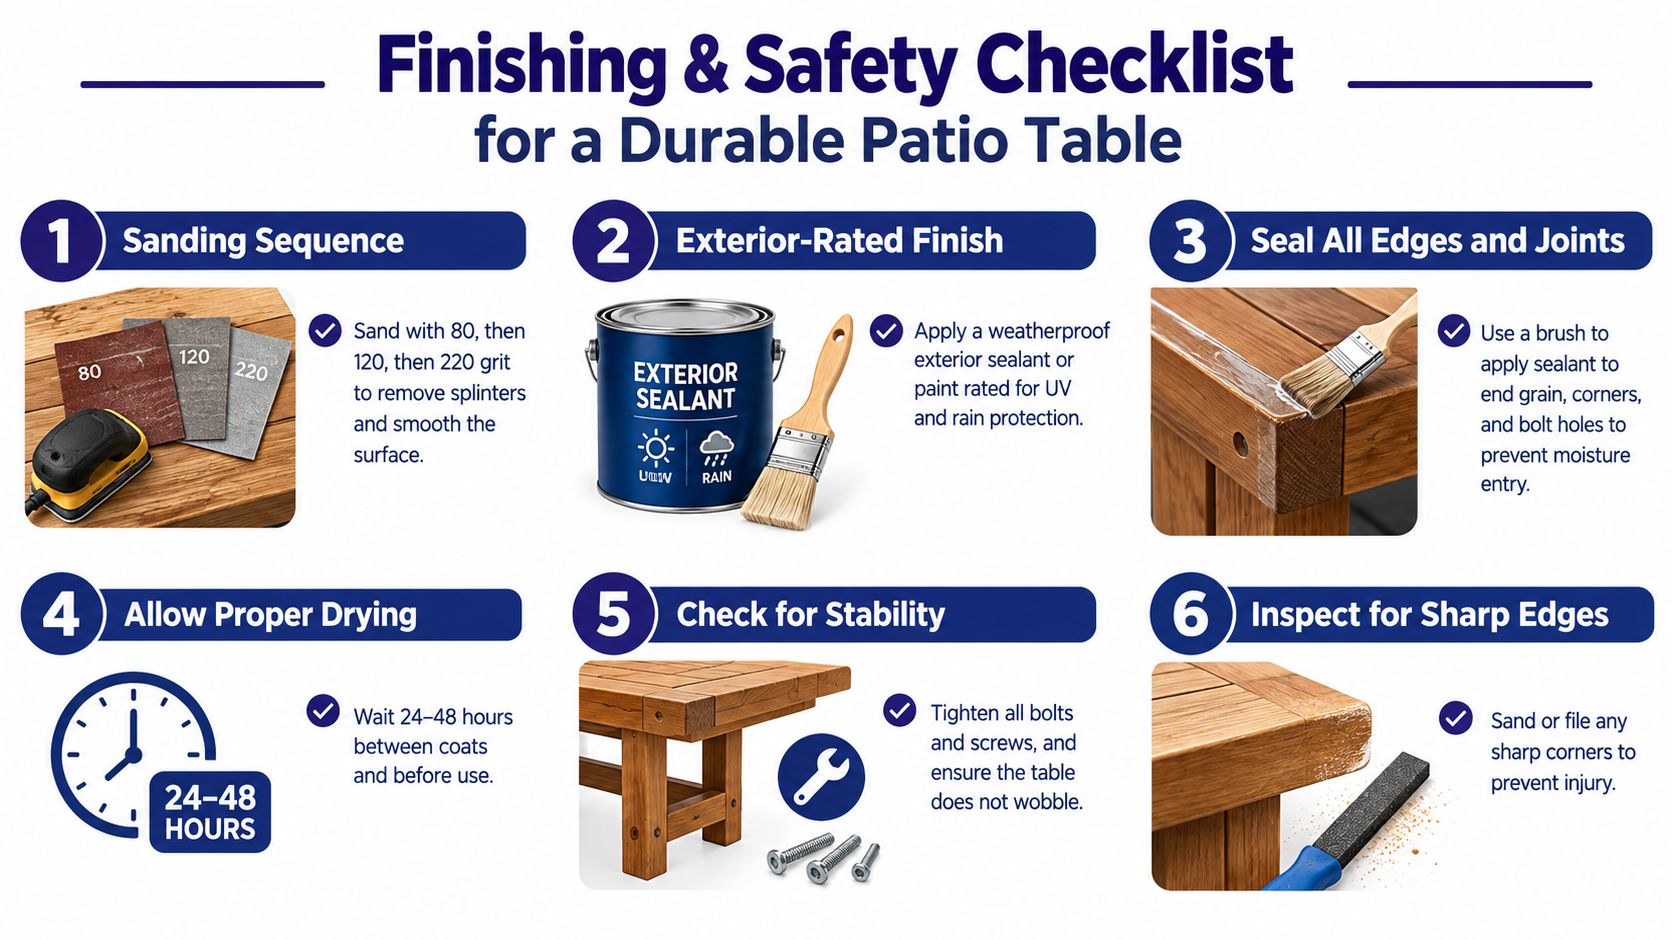
    A six-step instructional infographic detailing the finishing and safety steps for building a durable patio table.

    Apply an exterior-rated sealant, stain, or paint designed for UV and rain exposure. Coat end grain, corners, bolt holes, apron joints, and the underside of the tabletop. Those areas absorb moisture quickly and often show finish failure before the broad, visible faces do.

    Allow 24 to 48 hours between coats and before use, following the finish manufacturer's instructions and accounting for local humidity. A surface that feels dry may still be soft beneath the skin of the coating. Rushing assembly or placing the table in service too soon can trap moisture and mark the finish.

    Inspect the completed table as a whole

    Outdoor furniture standards focus on more than appearance. EN 581-3:2017 addresses mechanical safety requirements for outdoor tables used in camping, domestic, and contract settings, while EN 581-4 addresses durability testing for furniture exposed to climatic conditions, as detailed in this outdoor furniture quality and inspection reference. UL's outdoor furniture testing framework also considers corrosion, stability, strength, shear and pinch points, endurance, and durability. In that framework, testing of more than 300 outdoor furniture products found 30% to 40% failed durability requirements, which illustrates why structural and weather checks belong in the plan rather than at the end as an afterthought.

    Run your hands over every edge and corner. Remove splinters, sharp points, exposed screw tips, burrs, and rough openings. If the table includes adjustable feet, folding parts, hinges, or hardware that moves, operate those parts in the intended-use position and check for accessible squeeze or shear points.

    European safety guidance identifies accessible gaps between moving parts in the critical range of 7 to 18 millimeters, and tubular end openings from 7 to 12 millimeters with depths of at least 10 millimeters as potential hazard conditions, according to EN 581 general safety guidance. You don't need to turn a home project into a laboratory test, but you should prototype questionable joints and inspect the completed table, not just individual components.

    Keeping Your Table Looking Great Season After Season

    North Georgia's humid summers and leaf-heavy falls reward simple routines. Wipe spills before they sit in the grain, clear leaves from joints and undersides, and clean the tabletop with a product appropriate for its finish. Keep water from pooling against the legs, and inspect fasteners when the table begins to feel less rigid.

    A cover can reduce direct sun and debris, but it needs ventilation. A tightly sealed cover can hold humid air against the finish and encourage surface problems. If the table sits under a roof, it may need less frequent refinishing than a table exposed to open sky, but shaded areas still collect pollen and moisture.

    DIY makes sense when you enjoy accurate measuring, have the tools, and want a particular size that standard furniture doesn't provide. A ready-made table may make more sense when the patio needs a coordinated dining set, when moving heavy lumber is difficult, or when you'd rather spend time using the space than building it.

    For related decisions, treat outdoor seating and storage as separate planning topics rather than forcing them into one table project. The key answer remains simple: measure the usable dining zone first, preserve circulation, then select a shape and material that fit your maintenance reality.


    Woodstock Furniture & Mattress Outlet offers outdoor dining options, including rectangular and counter-height tables, for shoppers who want to compare ready-made dimensions with a DIY plan. Visit Woodstock Furniture & Mattress Outlet to see outdoor pieces in person and speak with knowledgeable staff about fit, seating, and patio use.
  • Toddler Bunk Bed Plans: Your DIY Safety Guide

    Toddler Bunk Bed Plans: Your DIY Safety Guide

    A lot of parents get to the same point at about the same time. The room still holds a crib mattress or a toddler bed, but the child has more toys, more books, more movement, and somehow less usable floor space than ever. You start looking up toddler bunk bed plans because stacking sleep space seems like the cleanest way to give some of that room back.

    That instinct makes sense. So does the hesitation.

    Bunk beds aren't a casual build when a very young child is involved. According to injury research published in the National Library of Medicine archive, an average of 36,000 bunk-bed-related injuries occur each year among children, and a separate analysis found that 83.9% of injuries in children ages 0 to 9 were fall-related. Those numbers don't mean every bunk bed is unsafe. They do mean a toddler project has to start with safety rules, not style ideas.

    A young boy sits on the floor dreaming of a bunk bed in a room full of toys.

    For most families, the primary question isn't whether a bunk bed looks fun. It's whether the design matches a toddler's actual abilities. A child who can climb your sofa in three seconds still may not have the judgment to handle height safely at night, half asleep, in the dark. That's why the smart version of this project usually looks more like a low, heavily guarded stacked bed than the classic bunk beds made for older kids.

    If your child is still in that transition stage, it's also worth reading how to transition from cot to bed. It covers the emotional and routine side of the move, which matters just as much as the woodworking when you're planning a first "big kid" sleep setup.

    Why Build a Bunk Bed for a Toddler

    The good reason to build one is simple. You need the floor back.

    In a small shared room, even one extra strip of open space can change how the room works. A low stacked bed can free up enough room for toy bins, a reading corner, or just a place where your child can play without tripping over furniture. Store-bought options don't always solve that problem well, because many are designed around older kids, standard ladders, and higher sleeping surfaces.

    Custom sizing solves real room problems

    A DIY build lets you fit the bed to your actual room instead of rearranging the whole room around the bed. That matters when you're working around a window, a vent, a low ceiling, or a narrow wall. It also lets you build around the mattress first, which is the safer way to control rail height and side gaps.

    The biggest advantage isn't saving space, though. It's control.

    You decide how low the upper sleep surface sits. You decide whether the access point is a staircase instead of a ladder. You decide how enclosed the rails are, how sturdy the legs are, and whether the entire project should really function as a low loft with one sleeping surface below and one heavily protected one above.

    Practical rule: If a standard bunk bed plan feels like something you need to "tone down" for a toddler, start over with a lower and more enclosed design.

    The project only makes sense if safety drives it

    This isn't the kind of build where a few cosmetic tweaks make an older-kid design suitable for a much younger child. A toddler-safe setup usually calls for slower access, smaller openings, higher rails, tighter mattress fit, and lower overall height. Those aren't upgrades. They're the whole point.

    That's also why some families should skip the upper bunk idea entirely for now. If your child is impulsive, climbs everything, or still struggles with sleep transitions, a floor-adjacent bed or separate low beds may be the better answer. Good toddler bunk bed plans don't force the concept. They adapt to the child.

    Planning Your Toddler Safe Bunk Bed Design

    Before you buy lumber, lock down the essential requirements.

    The main one comes from the federal safety rule. The U.S. Consumer Product Safety Commission standard, issued in the CPSC bunk bed safety release, says children under 6 years old should not use the top bunk. It also requires guardrails on both sides of the upper bunk if the underside of the foundation is more than 30 inches from the floor, and upper-bunk openings must be smaller than 3.5 inches.

    An infographic titled Planning Your Toddler Safe Bunk Bed Design, showing pros, cons, and safety tips.

    Start with the age rule, not the layout

    That age recommendation changes the whole design approach. If the child who'll sleep in this bed is under six, don't think in terms of a normal upper bunk. Think in terms of a low stacked system that may visually resemble a bunk bed but is built with much tighter guard protection and much lower climbing demand.

    For many parents, that means one of these paths makes more sense:

    • Lower bed for the toddler: Put the younger child on the bottom and reserve the upper level for an older sibling.
    • Very low loft concept: Keep the upper platform low enough that the entire bed feels controlled and compact, not tower-like.
    • Delay the second sleeping surface: Build the frame to allow a future upper use, but don't treat it as active toddler sleep space yet.

    Design around these safety decisions first

    A clean sketch should answer these questions before you cut wood:

    Decision point Safer toddler-focused choice
    Upper access Stairs with a handhold, not a ladder
    Bed height Keep the sleeping surface as low as practical
    Rail layout Full-length rails, both sides where required
    Openings Keep all upper-bunk openings under 3.5 inches
    Mattress fit Build to the actual mattress, not nominal mattress size
    Night movement Leave no tempting "launch points" or climb-over edges

    A lot of failed DIY bed projects start with the look of the bed and then try to add safety onto it later. That approach usually creates awkward gaps, weak rail attachments, or a climb path that was never really thought through.

    A toddler doesn't use a bed the way an adult imagines. They sit on rails, crawl half asleep, climb from the wrong end, and test every edge.

    Size the mattress opening before the frame

    Careful planning is particularly important. Don't assume all crib or toddler mattresses are identical in real-world dimensions. Measure the exact mattress you plan to use, then build the platform and rail spacing around it. A snug fit matters because unsafe perimeter gaps often come from small measuring errors that get multiplied across the frame.

    The sleep surface height also needs attention. If your upper foundation ends up more than 30 inches off the floor, the rail rule isn't optional. But even below that mark, a toddler-focused build still benefits from strong side protection, because the practical risk is the child's behavior, not just the legal threshold.

    Keep the design simple enough to build well

    Complex built-ins can look beautiful, but they also introduce more places to get out of square. For a first major kid-furniture project, a simple four-leg frame with stout rails, a low profile, and a boxed staircase is usually safer than a complicated decorative concept with cutouts, curves, and floating sections.

    If a detail makes the bed harder to square, harder to inspect, or easier to climb where it shouldn't be climbed, leave it out.

    Gathering Your Materials and Tools

    A toddler bunk bed is one project where material choices directly affect safety. Minor warp, soft fasteners, and rough edges that might be tolerable on garage shelving have no place here. Toddlers climb sideways, bounce at the rail, and drag blankets and pajamas across every corner, so the parts need to stay tight and smooth.

    Lumber that stays straight and takes abuse

    Use 2x4s and 2x6s for the frame, legs, and other load-bearing parts. That gives you enough meat for strong screw purchase and better stiffness at the rails and stair structure. I avoid building toddler bunks out of lighter stock dressed up with trim. It can look finished, but it gives you less margin where the bed takes repeated side loads.

    Pick boards in person if you can. Sight down the length of each one and reject pieces with twist, bow, end splits, or loose knots near joint locations. A slightly crooked board does more than make assembly annoying. It can pull a frame out of square, open gaps at the mattress platform, or leave guard components fighting each other during installation.

    For slats, use stock with consistent thickness and width, then cut every piece to match. If slats vary, the mattress support ends up uneven and the frame can rack while you fasten it.

    Hardware that stays tight

    Use wood glue and screws for the main joinery. Save nails for temporary positioning, if you use them at all. A toddler bed gets shaken every day in ways adult furniture often does not. The bed gets climbed, kicked, sat on, and used as a fort. Fasteners need to hold through that kind of abuse without backing out.

    Through-bolts are a smart choice at high-stress connections such as stair assemblies or any removable rail section. Screws work well for most fixed joints, but bolts give you a more secure mechanical connection where a child will put body weight again and again.

    If you're comparing fasteners, something like these Contractor's Den Fastgrip options can help you evaluate screw styles and lengths for wood-to-wood fastening. The exact product isn't the point. What matters is choosing hardware meant for structural furniture work and skipping the coffee can of leftover mixed screws.

    Tools that help you build safely and accurately

    A basic shop setup is enough, but a few tools make a clear difference in the quality of the finished bed:

    • Miter saw or circular saw with a guide: Clean, repeatable cuts keep the frame square.
    • Drill and impact driver: One for pre-drilling, one for driving fasteners without constantly changing bits.
    • Clamps: Long clamps hold rails and leg assemblies in position while glue sets and screws go in.
    • Square: A framing square or speed square catches small layout errors before they become big fit problems.
    • Orbital sander: Sand every touch point well, and break edges so little hands and shins do not meet sharp corners.
    • Countersink bit: Lets screw heads sit flush so clothing and skin do not catch.
    • Socket or wrench set: Needed for through-bolted joints.
    • Stud finder and level: Useful if you plan to anchor the bed to the wall for extra anti-tip protection.

    Buy a little more lumber than the cut list calls for. Having one extra straight board on hand is cheaper than forcing a bad piece into a safety-critical part because the store is already closed.

    Constructing the Bunk Bed Frame

    The strongest toddler bunk bed plans follow one rule from the start. Build around the mattress, then dry-fit everything before final fastening. A guide focused on this type of build notes in Slone Brothers' toddler bunk bed plans that sizing the frame around the mattress first, dry-fitting all components, and using glue-plus-screw joints with rigid leg assemblies helps prevent the looseness that develops in nailed-only construction.

    Start with your cut list, but don't commit every final dimension until the mattress opening is confirmed with the mattress in hand. Nominal dimensions on paper don't protect a child. Actual fit does.

    Build the leg assemblies first

    The legs do more than hold the bed up. They set the geometry for the whole project.

    Cut the leg parts and pair them carefully so each assembly matches. If one leg unit ends up even slightly out of square, that error travels through every rail, slat, and guard connection that follows. Clamp each leg assembly on a flat surface, check diagonals, then fasten it.

    A leg assembly for a toddler-focused bunk should feel overbuilt rather than clever. Broad bearing surfaces and tight joints are what you want. Decorative notches and unnecessary cutouts weaken key areas without helping the child.

    An instructional infographic detailing eight essential steps to assemble a wooden bunk bed frame.

    Assemble the head and foot structures

    Once the legs are built, connect them into headboard and footboard units. These assemblies establish the width of the bed and give you the first real chance to verify that your frame remains square under load.

    Pre-drill near board ends. Add glue to mating surfaces. Then drive screws while the assembly is clamped. If the clamps shift the unit slightly out of square, stop and correct it before moving on. For kid furniture, "close enough" tends to become wobble later.

    If a panel rocks on the floor during dry assembly, the finished bed will usually tell on you later.

    Dry-fit the side rails before final screws

    Set the head and foot structures upright, add the long side rails, and dry-fit the frame without fully committing every fastener. This is the point where a small cut error shows up. Maybe the mattress opening is too loose. Maybe one rail is crowned the wrong way. Maybe one shoulder line is just off enough to twist the entire structure.

    That is exactly why dry-fitting matters.

    Push the frame into square with clamps, check your diagonals, and only then start fastening. Keep checking as you go. Screws can pull a frame out of alignment if one side seats before the other.

    Use the right joint strategy

    For this kind of project, simple and repeatable beats fancy. Glue-plus-screw construction works because it gives you both immediate mechanical holding and a bonded joint surface. Nails can work in some furniture, but repeated movement from children is hard on nailed-only assemblies.

    A good sequence looks like this:

    • Test every part first: Put the assembly together without glue where practical.
    • Mark registration lines: A pencil line on the mating faces saves time during final assembly.
    • Glue lightly but fully: You want coverage, not squeeze-out everywhere.
    • Clamp before driving screws: Let the clamps establish alignment.
    • Re-check square after fastening: Don't assume the first side stayed put.

    Install mattress cleats and slat supports carefully

    The support system under the mattress often gets rushed because it isn't the part anyone sees. Don't rush it.

    Keep cleats level from end to end, and make sure both sides land at the same height. If one side sits low, the slats can rock or the mattress can carry uneven load. That can also reduce effective guardrail height once the mattress is installed, which is a safety issue, not just a finish issue.

    A low loft bunk plan documented by The Design Confidential's toddler-sized low loft bunk build used slats spaced about 4 inches apart and ladder rungs around 8 inches apart, with tighter rung spacing for younger children. The same build stressed clamping assemblies square before drilling bolt holes and fastening with 3-inch screws for rigidity. Those details are useful because they show where consistency matters. Support spacing, access spacing, and square assembly all affect how stable the bed feels in daily use.

    Here's the embedded walkthrough for visual reference on general assembly flow:

    Keep the lower platform simple and robust

    On a toddler build, the lower sleeping area should be the easiest part of the bed to access and inspect. Avoid boxing it in with unnecessary trim or decorative panels that make it harder to clean under or check fasteners later.

    A practical lower setup usually includes:

    • Clear mattress support: Slats that are evenly spaced and fully supported.
    • Accessible hardware: Screws and bolts you can retighten without partial disassembly.
    • No hidden voids: Don't create awkward cavities that collect toys or tempt climbing.
    • Rounded exposed edges: Especially around corners at shin and hand height.

    Expect to adjust during assembly

    Even with a careful plan, real wood moves and real boards vary. That's normal. What matters is where you allow adjustment. Trim a slat if needed. Re-make a short spacer if it cleans up a gap. Don't "solve" problems by forcing a frame together under tension and hoping the hardware holds it.

    The bed should feel square before the child ever touches it. If it only feels rigid because the screws are fighting warped lumber, it won't stay that way.

    Building and Installing Essential Safety Features

    This is the part that determines whether the project is suitable for a toddler at all.

    A documented DIY build highlighted in the previous section made two choices that matter here. It switched from nails to screws for peace of mind, and it chose stairs over a ladder, reasoning that a stumble on stairs is far less hazardous than a fall from height. That same build also extended the guardrails much higher than a minimal barrier for added security.

    A safety checklist infographic titled Building and Installing Essential Safety Features for a safer home.

    Build guardrails like they matter, because they do

    On a toddler bed, a short anti-roll lip isn't enough. The rail should function as a real enclosure, not a symbolic edge reminder. Run it the full needed length, anchor it directly to the structural frame, and avoid leaving casual climb-through spaces at the ends.

    Use through-bolts where that connection benefits from extra security. Screws alone may be fine in some locations, but rails take repeated side loads from a child leaning, pushing, or bouncing against them. Build for that.

    When you're laying out rail parts, pay close attention to spacing. Any opening on the upper section needs to stay tighter than the safety threshold covered earlier. Don't create decorative cutouts, wide spindle spacing, or offsets that accidentally enlarge the opening at one end.

    Build choice that pays off: High, continuous rails are less convenient to make the bed. They're much more forgiving when a child rolls, sits up suddenly, or shifts toward the edge.

    Choose stairs, not a ladder

    Most ladder designs assume a level of coordination, grip strength, and sleepy-time judgment that toddlers don't have. Stairs slow the child down. That is a good thing.

    A boxed staircase with broad treads gives a child a more natural climb pattern. It also gives you room to add a handhold and makes nighttime descent less abrupt. If the staircase can be integrated into the side of the frame rather than hanging off it, even better. It becomes part of the structure instead of an accessory bolted on later.

    A few rules help here:

    • Keep tread surfaces predictable: No narrow or uneven steps.
    • Add a secure hand contact point: A child should have something consistent to hold.
    • Close off risky side gaps: Don't leave open triangular spaces beside the stair run.
    • Anchor stairs as structure: They shouldn't shift independently from the bed.

    If your current setup involves a crib conversion and you're comparing protection styles, looking at products like a secure crib rail for toddlers can help you think through rail height, containment, and how children move against barriers. It isn't a substitute for proper bunk-bed guard construction, but it does sharpen your eye for what "secure enough" really looks like.

    Remove temptation points

    Some of the most dangerous details aren't obvious until a child uses the bed. A horizontal trim strip can become a foothold. A short rail gap can become an invitation. A decorative end panel can become a climbing wall.

    Walk around the bed from a toddler's height. Ask a blunt question at every side: where would a determined child put a foot?

    Then redesign that spot before the finish goes on.

    Finishing Touches and Your Final Safety Check

    The bed usually feels done once the frame is standing and the rails are in. For a toddler bed, that is the point where careful builders slow down. A rough edge on a guardrail, a finish that has not cured, or a little sway in the stairs can turn a solid build into a problem the first week it gets used.

    Sand every exposed surface that a child can touch, grab, bump, or mouth. Focus on rail tops, stair nosings, post corners, and the edges around openings. I round these over instead of leaving them crisp. Sharp corners photograph well and feel terrible at 2 a.m. when a sleepy child rolls into them.

    Use a child-appropriate low- or zero-VOC paint or clear coat, and let it cure fully before the mattress goes in. Dry and cured are not the same thing. Toddlers sleep inches from the surface, and they put hands on everything.

    Do a hands-on shake test

    Test the bed before you dress it up. Push hard from the long side. Pull and press on every rail. Put weight on the stairs from different angles. If the frame racks, a rail shifts, or the stair assembly moves on its fasteners, stop and fix that now.

    Pay close attention to the top bunk setup. The installed mattress must sit low enough that the guardrail still contains a child who rolls in sleep. The mattress also needs to fit snugly without side gaps that can trap an arm, leg, or bedding. If your mattress height works against safe rail coverage, change the mattress or change the plan. For some families, the safer answer is a lower bed or separate beds, not forcing a bunk layout that does not suit a toddler.

    Use a short final checklist

    A written check keeps you honest, especially after a long build.

    • Hardware tightness: Recheck every screw, bolt, bracket, and connector after the frame has sat overnight.
    • Mattress fit: The mattress sits flat, fills the platform properly, and does not slide or rock.
    • Rail height: The guardrail still stands well above the installed mattress, not the mattress you planned around earlier.
    • Surface quality: No splinters, rough sanding scratches, drips, or chipping finish.
    • Climb path: Stairs feel planted, hand contact is consistent, and there are no trim pieces or openings that invite side climbing.

    A child's bed should feel boringly solid.

    Plan for maintenance

    Toddler furniture gets climbed on, kicked, jumped against, and used hard. Recheck the hardware during the first few weeks, then make it part of the room-cleaning routine. Listen for new squeaks. Watch for rails loosening, stair movement, finish wear on handhold areas, and rub marks that suggest the bed is shifting against the wall or floor.

    If you want a real-world size check before calling the project finished, visiting a furniture store to look at kids' bedroom pieces in person can help. Full-scale comparison makes bed height, rail depth, and room clearance easier to judge than sketches do.

    If you'd like to compare DIY ideas against finished room setups, Woodstock Furniture & Mattress Outlet is one place where North Georgia families can look at kids' bedroom furniture in person and get a clearer sense of proportions, layout, and what fits their space. Even if you build your own, that kind of hands-on reference can make the final setup safer and more practical.