You've found a patio table that looks right online, measured the open area, and still can't tell whether six chairs will fit without blocking the grill. That uncertainty causes most outdoor table mistakes. A table can be attractive, sturdy in the showroom, and completely wrong for the usable space outside your door.
Good outdoor patio table plans start with circulation, seating, and weather exposure. In North Georgia, that means accounting for door swings, steps, grill access, humid summers, strong sun, leaf buildup, and the seasonal movement of solid wood. The plan below focuses on those decisions before cutting lumber, then walks through a practical rectangular table build with materials, cut dimensions, assembly guidance, and finishing checks.
Before You Build What Your Patio Really Needs
A homeowner recently described a familiar problem. The patio had enough open floor area for a large dining table, at least on paper, but the table sat directly in the path between the back door and the grill. Chairs pushed against the railing, one leg landed on an uneven section of pavers, and the tabletop developed movement after repeated exposure to damp weather. The table didn't fail because the design was unattractive. It failed because the plan treated the patio like an empty rectangle.
Start by identifying the usable dining zone, not the total patio footprint. Door swings, stairs, grill doors, storage bins, railings, and the route people use to carry food all reduce the area available for furniture. A table that fits only when every chair is pushed in isn't a workable dining table.
Practical rule: Measure the patio while imagining people using it, not while looking at an empty floor.
A reliable plan also separates appearance from performance. A farmhouse tabletop may suit the house, but its wide boards need room to move as moisture changes. A lightweight aluminum table may be easier to reposition, while a dense hardwood table may feel more substantial but require more effort to move. Neither choice is automatically right for every household.
For visual planning, an AI backyard patio design tool can help you test furniture arrangements before committing to lumber or a purchased table. Treat any digital layout as a starting point, then verify the dimensions with tape on the actual patio.
The market context is encouraging for anyone planning an outdoor dining area. The global outdoor tables market was valued at USD 19.64 billion in 2025 and is projected to reach USD 32.66 billion by 2034, about 66% growth over nine years at a 5.84% CAGR, according to Fortune Business Insights' outdoor tables market report. That scale doesn't tell you which table belongs on your patio, but it does show that patio dining is part of a mature, expanding category with many construction and material approaches.
The decisions ahead are straightforward:
- Space first: establish the usable dining zone and circulation paths.
- Shape second: choose round, square, or rectangular based on the patio's geometry.
- Material third: match wood or metal to humidity, sun, weight, and maintenance expectations.
- Construction last: build the frame, attach the top for seasonal movement, and inspect the finished table as a complete unit.
How to Size and Shape Your Table for Real Life Use
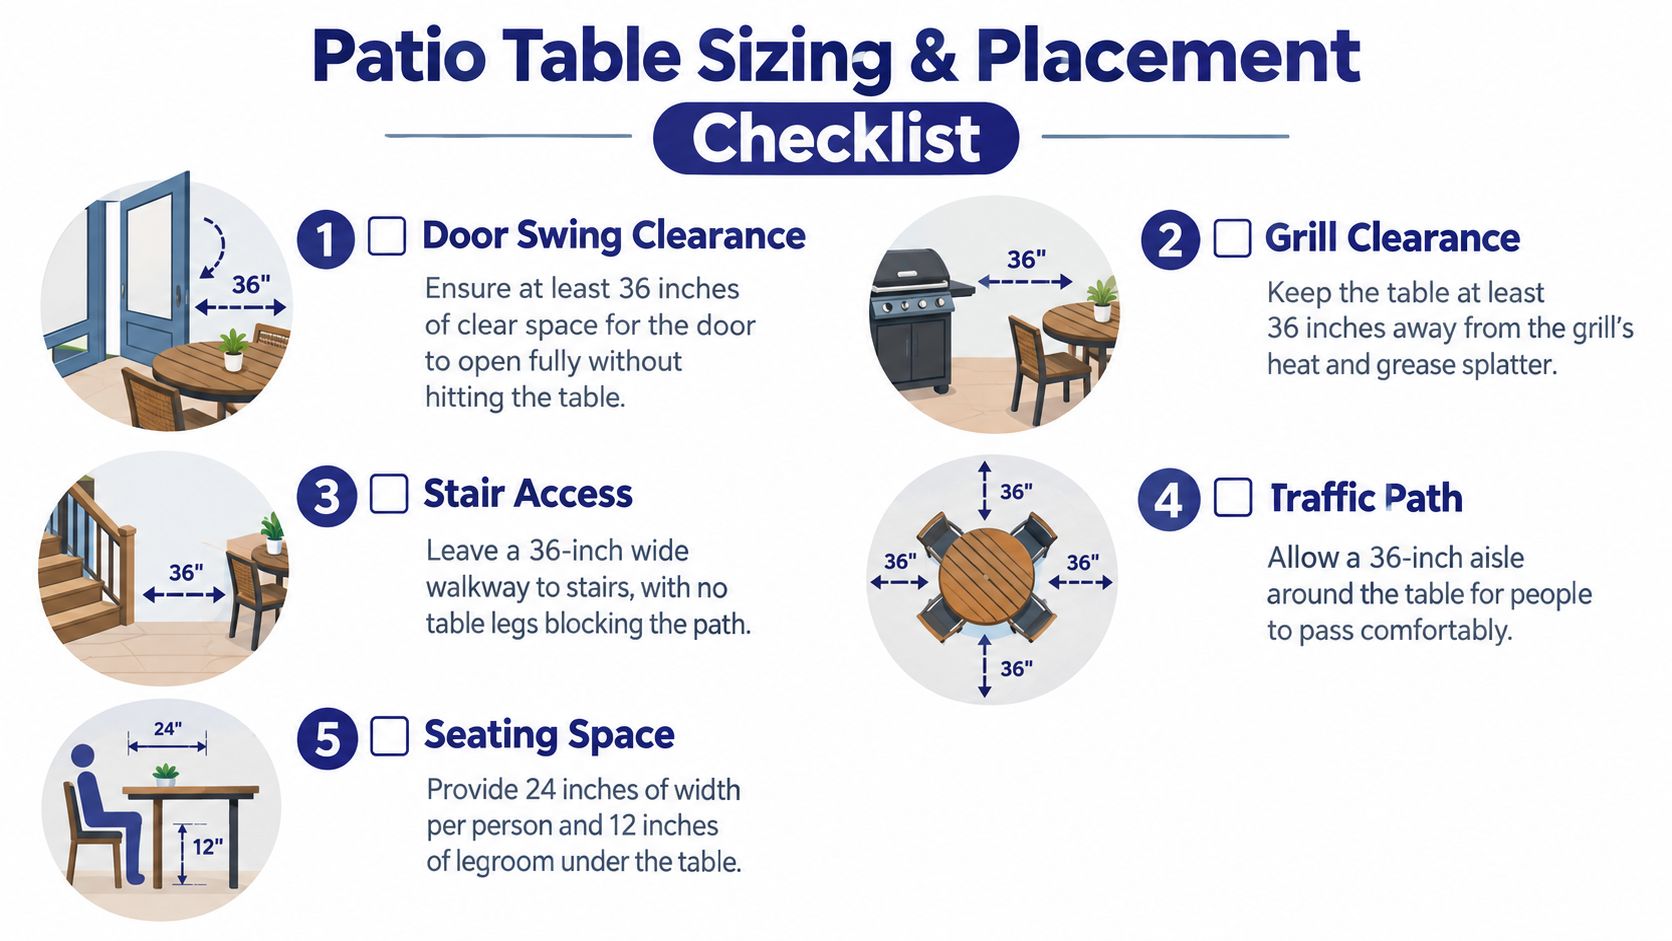
Start with the usable dining zone, not the tabletop. Mark the patio boundary, then identify anything that must stay accessible, including the door swing, grill lid and doors, stairs, gates, and the normal route to the yard. What remains is the area available for dining. Reserve chair space and walking routes inside that area before selecting table dimensions.
Plan on 36 inches of clearance around the table for pulling out chairs and general circulation, as outlined in outdoor dining table sizing guidance. Selected edges can tighten to 24 to 30 inches when nobody needs to pass behind a seated guest. Routes behind diners need 42 to 48 inches, while wheelchair passage or two-way traffic may require up to 60 inches, according to patio clearance guidance for table layouts.
Choose dimensions from the open zone
Use painter's tape to mark the tabletop, then add a second outline for the required clearance. Set out chairs or pull them back from the tape and walk the routes people will use. If the layout blocks the grill, crowds a doorway, or forces people to turn sideways, reduce the top or rotate its position.
A standard outdoor dining table is generally 28 to 30 inches high. A bar-height table is typically 40 to 42 inches high. Leave approximately 8 to 12 inches between the seat and tabletop. Standard dining chairs pair with tables in the 28 to 30-inch range, while counter-height tables commonly use 24 to 26-inch stools.
| Patio Situation | Recommended Table Shape and Size | Clearance to Leave |
|---|---|---|
| Compact square patio | Round or square table sized to preserve chair movement | Keep the broadest routes near 36 inches, tightening only where passage isn't needed |
| Long, narrow patio | Rectangular table aligned with the patio's long edge | Preserve a clear aisle along the open side |
| Patio beside a grill | Rectangular or compact round table placed outside the grill work zone | Keep grill access and heat exposure separate from seating |
| Patio with stair access | Shape and dimensions that leave a direct walkway to the stairs | Maintain a clear path without table legs in the route |
| Mixed dining and circulation area | Smaller round or square top, or a narrow rectangle | Expand circulation where people pass behind seated guests |
Round and square tables suit compact patios because their footprints can reduce awkward corner movement. Round tops support conversation and avoid sharp corners in tight routes. Rectangular tables make better use of long, narrow patios, especially when one side can serve as the main aisle. Oval tables soften a larger arrangement, but their curved ends still require the same chair and walkway clearance as other dining shapes. Choose the plan that protects circulation first, then adjust the shape and material to the patio's sun, humidity, and maintenance demands.
Choosing Materials That Hold Up in North Georgia
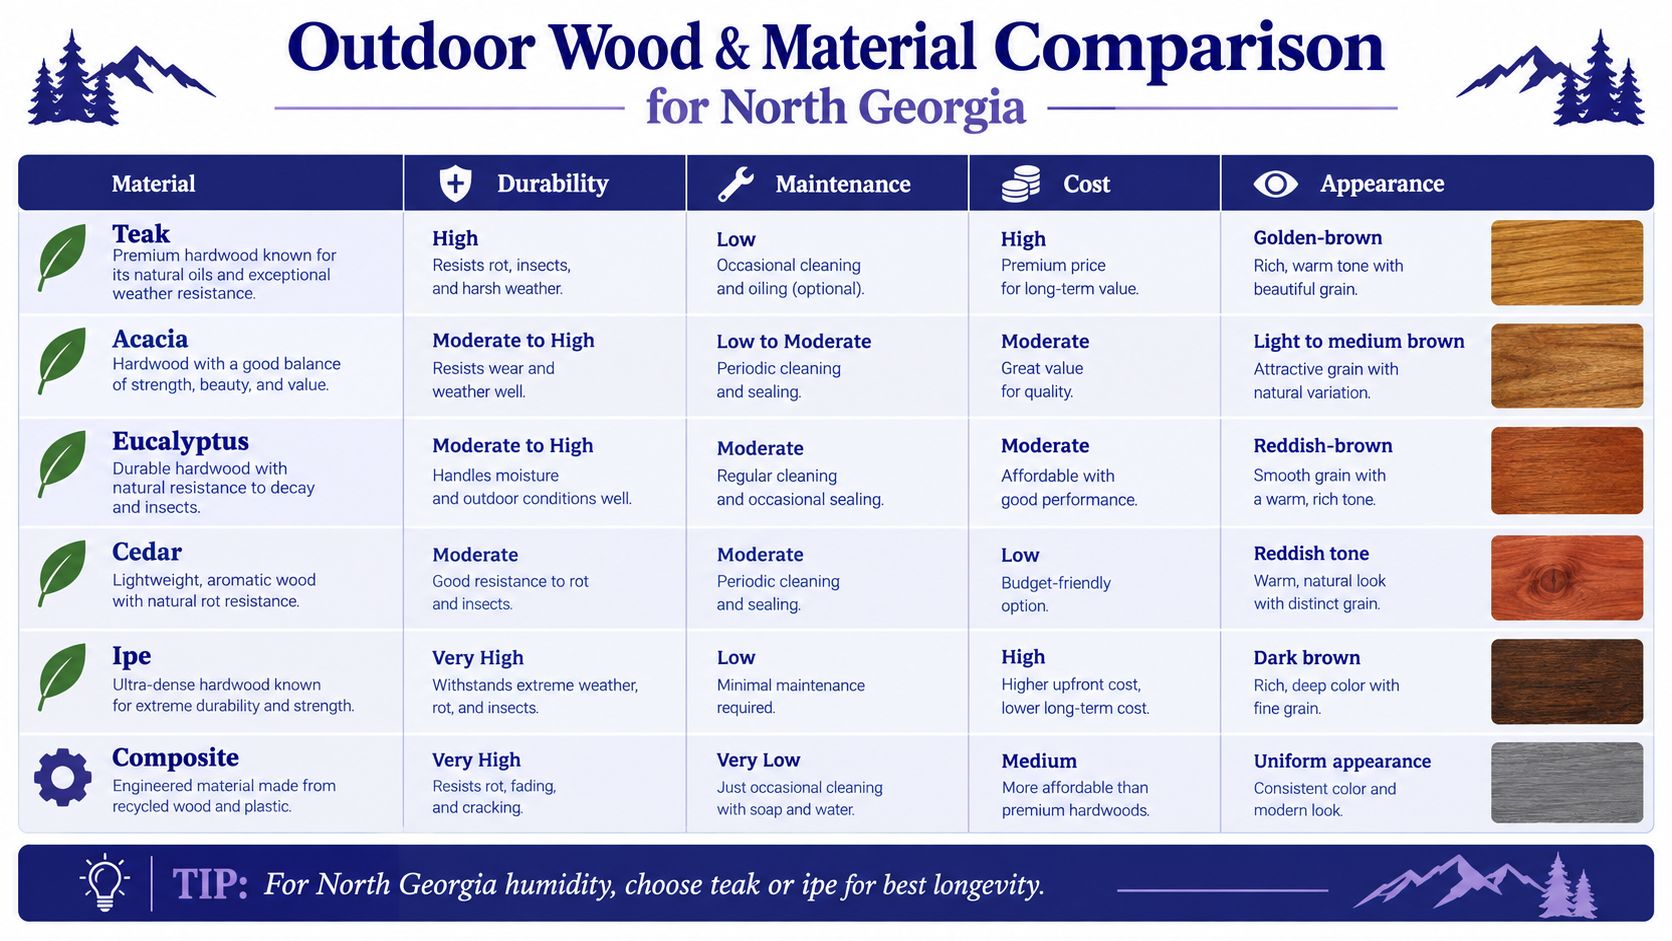
North Georgia weather puts outdoor furniture through repeated moisture and drying cycles, bright sun, pollen, leaves, and humid air. The right material depends less on a universal durability ranking and more on how much weight you're willing to move, how often you'll clean or reseal, and whether you prefer natural aging or a more consistent appearance.
Common outdoor woods include teak, acacia, eucalyptus, cedar, ipe, cypress, and mahogany. These species are repeatedly selected for outdoor use because they tolerate sun, rain, and humidity more effectively than untreated softwoods, as summarized by this solid wood outdoor furniture material guide.
Compare the tradeoffs before buying stock
Teak contains natural oils and is often chosen when the builder wants strong weather resistance with a relatively manageable maintenance routine. Ipe is very dense and can provide a substantial, long-wearing surface, but that density affects cutting, drilling, and overall table weight. Acacia and eucalyptus can offer a natural wood appearance with useful moisture resistance, though their finish still needs attention.
Cedar is lighter and easier to work with, which helps when building a table that may need to move. It's also softer, so dents, scratches, and surface wear are more noticeable. Cypress and mahogany can suit outdoor construction, but availability, grain, weight, and finish requirements vary by supplier.
Aluminum is a practical alternative when low maintenance and easier repositioning matter more than a solid-wood feel. Rope details and tactile finishes fit the current preference for natural-looking outdoor spaces without requiring the entire table to be made from hardwood. Composite surfaces can provide a uniform appearance and reduced routine upkeep, although they don't reproduce the grain and repairability of solid wood.
Before choosing boards, check moisture content. Furniture guidance commonly targets 10% to 12% for higher-stability outdoor hardwood stock, 12% to 15% for mid-grade stock, and 15% to 18% for lower-grade stock, with an acceptance band of about plus or minus 2% within a lot, according to this outdoor wood furniture grading guidance. Use a pin-type meter at multiple points on each board and allow the lumber to acclimate before assembly.
For a broader view of outdoor construction stock, compare species and grades in a resource covering lumber for decks. The same principle applies to a patio table. Don't build a precision frame from boards that are still carrying excess moisture.
A Complete Rectangular Patio Table Plan You Can Build
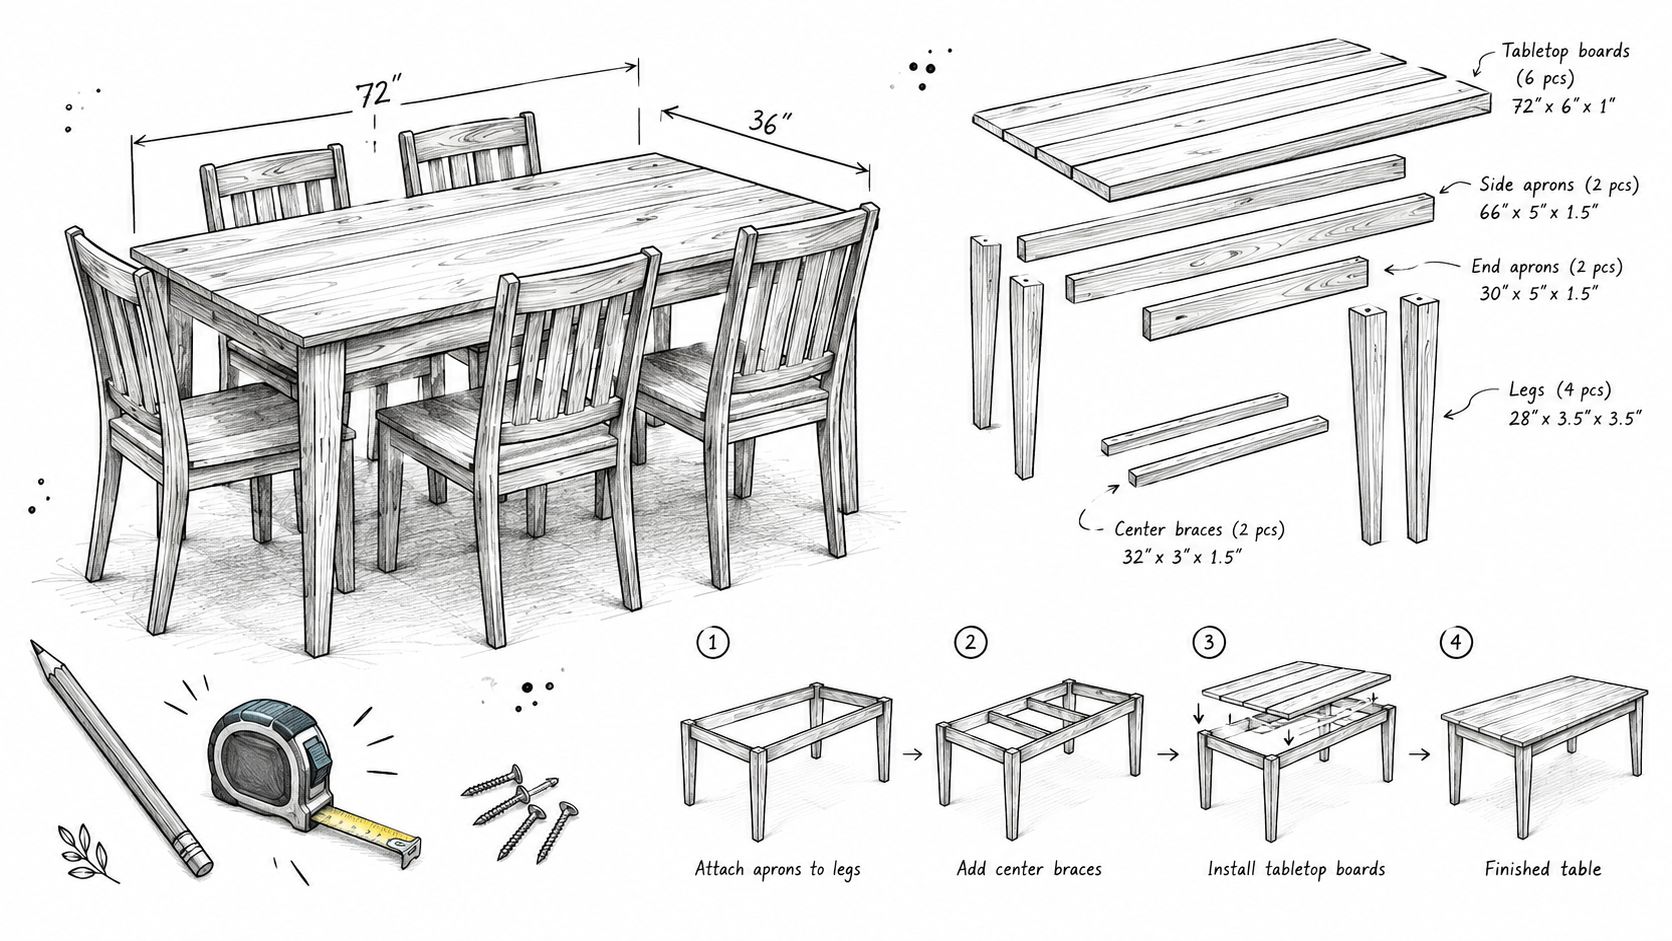
This plan uses a 72-by-36-inch rectangular top with a farmhouse-style base intended for six diners. It suits a patio that can accommodate the tabletop, chairs, and circulation without sacrificing the route to the door or grill.
Materials and cut list
Choose an exterior-suitable hardwood or a durable outdoor softwood, and buy straight, sound boards with limited end checking. Avoid untreated interior screws and ordinary steel hardware. Use exterior-rated screws, corrosion-resistant bolts, washers, and nuts suited to outdoor exposure.
Cut list for the 72-by-36-inch version:
- Tabletop boards: six boards at 72 inches, sized to create a finished width of 36 inches. The exact board width depends on the stock you select.
- Long aprons: two boards at 66 inches.
- End aprons: two boards at 30 inches.
- Legs: four posts cut to establish a finished table height of approximately 29 inches after accounting for the top thickness.
- Lower stretchers: two long stretchers and two end stretchers, sized to fit between the legs without interfering with diners' knees.
- Optional center support: one lengthwise support beneath the top if the selected boards need additional stiffness.
You'll need a tape measure, combination square, circular saw or miter saw, drill, exterior-rated drill bits, countersink bit, clamps, sander, moisture meter, and safety glasses. A pocket-hole jig can speed assembly, but it isn't essential if you're comfortable using bolts and direct exterior screws.
Build the frame without trapping the top
Begin by checking each board's moisture content at several points. Reject or set aside boards that show large variation, obvious twist, or active checking. Mark the best face of each tabletop board, then arrange the boards so the grain direction and color look intentional.
Build the apron rectangle around the legs, keeping the frame square by measuring both diagonals. If the diagonal measurements don't match, correct the frame before tightening every fastener. A table that starts out of square tends to magnify small errors when the top is installed.
Attach the legs to the aprons with exterior-rated bolts or structural screws. Add stretchers low enough to improve side-to-side stability without creating a shin hazard. Test the frame on a flat surface. If it rocks, correct the base now rather than trying to hide the problem with adjustable feet later.
Do not glue the tabletop into a rigid slab-and-frame connection. Outdoor wood changes dimension across its width. Use elongated attachment holes, tabletop clips, figure-eight fasteners, or another method that lets the boards move slightly while keeping them secure. Leave small, consistent drainage gaps between boards rather than forcing every seam tight.
The following video can help visualize the general sequence for a wooden outdoor dining table build. Use it as a technique reference, then adapt dimensions and hardware to your selected material.
Round and square versions are adaptations, not entirely different projects. For a four-seat square table, shorten the top and frame while preserving leg stability and circulation. A round top requires a different cutting and support approach, but the same rules apply: keep the base rigid, allow the top to move, and test the taped footprint before cutting.
As you assemble, soften exposed corners and remove every burr from cut hardware and drilled openings. Check the underside for accessible gaps that could catch fingers, clothing, or chair components. The finished table should sit level, resist diagonal racking, and remain stable when someone applies ordinary hand pressure to each corner.
Finishing Sealing and Safety Checks That Prevent Early Failure
A finish can slow moisture entry and reduce damage from sun and rain, but it can't stop wood from moving forever. Outdoor finishes eventually wear, especially on tabletops, exposed end grain, and edges that collect water. Plan for inspection and touch-up instead of treating the first coating as permanent protection.
Start with a clean sanding sequence. The required progression is 80 grit, then 120 grit, then 220 grit, as shown in the finishing checklist below. The coarse pass removes mill marks and sharp transitions, the middle pass refines the surface, and the final pass makes the tabletop comfortable to touch without polishing it so heavily that a finish struggles to bond.
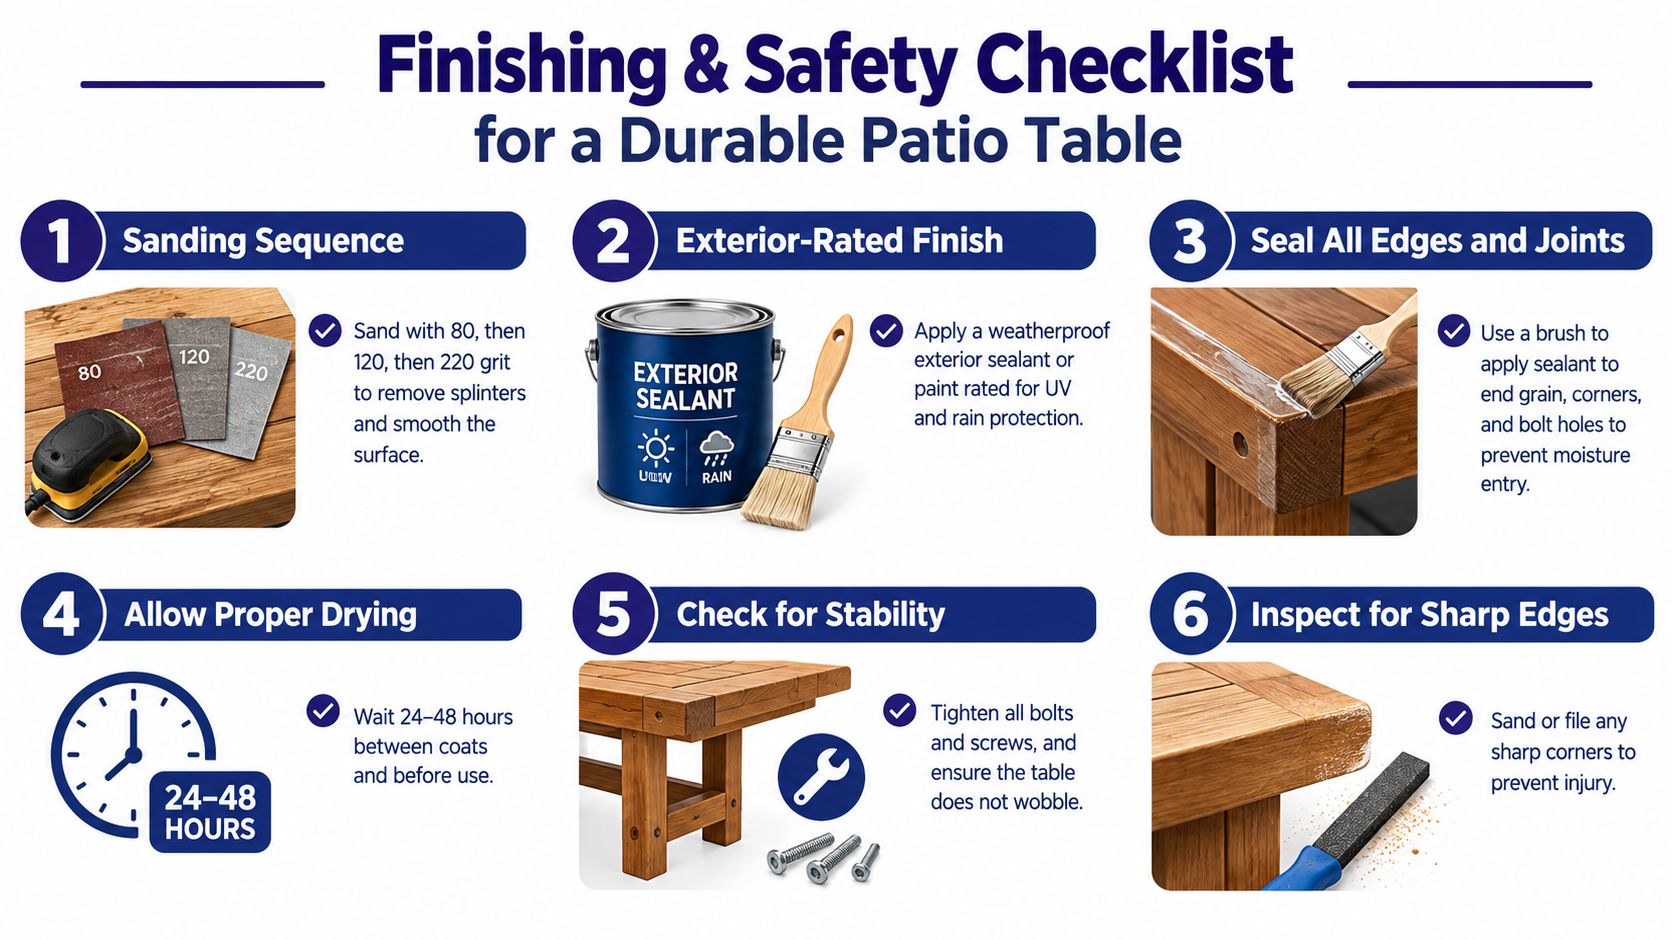
Apply an exterior-rated sealant, stain, or paint designed for UV and rain exposure. Coat end grain, corners, bolt holes, apron joints, and the underside of the tabletop. Those areas absorb moisture quickly and often show finish failure before the broad, visible faces do.
Allow 24 to 48 hours between coats and before use, following the finish manufacturer's instructions and accounting for local humidity. A surface that feels dry may still be soft beneath the skin of the coating. Rushing assembly or placing the table in service too soon can trap moisture and mark the finish.
Inspect the completed table as a whole
Outdoor furniture standards focus on more than appearance. EN 581-3:2017 addresses mechanical safety requirements for outdoor tables used in camping, domestic, and contract settings, while EN 581-4 addresses durability testing for furniture exposed to climatic conditions, as detailed in this outdoor furniture quality and inspection reference. UL's outdoor furniture testing framework also considers corrosion, stability, strength, shear and pinch points, endurance, and durability. In that framework, testing of more than 300 outdoor furniture products found 30% to 40% failed durability requirements, which illustrates why structural and weather checks belong in the plan rather than at the end as an afterthought.
Run your hands over every edge and corner. Remove splinters, sharp points, exposed screw tips, burrs, and rough openings. If the table includes adjustable feet, folding parts, hinges, or hardware that moves, operate those parts in the intended-use position and check for accessible squeeze or shear points.
European safety guidance identifies accessible gaps between moving parts in the critical range of 7 to 18 millimeters, and tubular end openings from 7 to 12 millimeters with depths of at least 10 millimeters as potential hazard conditions, according to EN 581 general safety guidance. You don't need to turn a home project into a laboratory test, but you should prototype questionable joints and inspect the completed table, not just individual components.
Keeping Your Table Looking Great Season After Season
North Georgia's humid summers and leaf-heavy falls reward simple routines. Wipe spills before they sit in the grain, clear leaves from joints and undersides, and clean the tabletop with a product appropriate for its finish. Keep water from pooling against the legs, and inspect fasteners when the table begins to feel less rigid.
A cover can reduce direct sun and debris, but it needs ventilation. A tightly sealed cover can hold humid air against the finish and encourage surface problems. If the table sits under a roof, it may need less frequent refinishing than a table exposed to open sky, but shaded areas still collect pollen and moisture.
DIY makes sense when you enjoy accurate measuring, have the tools, and want a particular size that standard furniture doesn't provide. A ready-made table may make more sense when the patio needs a coordinated dining set, when moving heavy lumber is difficult, or when you'd rather spend time using the space than building it.
For related decisions, treat outdoor seating and storage as separate planning topics rather than forcing them into one table project. The key answer remains simple: measure the usable dining zone first, preserve circulation, then select a shape and material that fit your maintenance reality.
Woodstock Furniture & Mattress Outlet offers outdoor dining options, including rectangular and counter-height tables, for shoppers who want to compare ready-made dimensions with a DIY plan. Visit Woodstock Furniture & Mattress Outlet to see outdoor pieces in person and speak with knowledgeable staff about fit, seating, and patio use.