Category: Uncategorized

  • How to Choose a Coffee table for Your Living Room

    How to Choose a Coffee table for Your Living Room

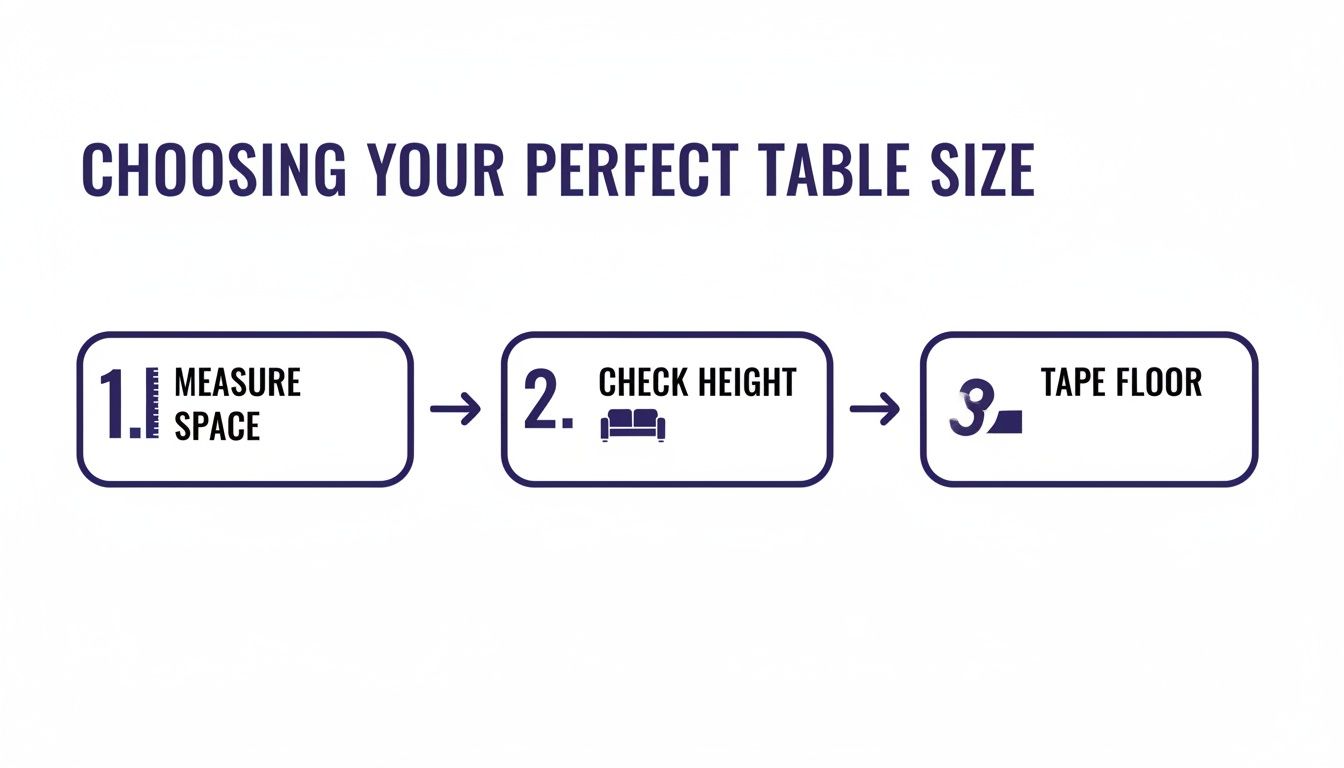
    Choosing the right coffee table starts with understanding your living space and how you use it every day. The key is to grab a tape measure long before you start browsing a showroom. You’ll want to measure your seating area, make sure the table’s height works with your sofa, and leave plenty of room to walk around.

    A well-chosen coffee table should feel like a natural part of the room, not an obstacle.

    Start With Your Space, Not the Showroom

    It's a common experience: you fall in love with a piece of furniture on its own, without thinking about how it’s going to fit—literally and stylistically—into your home. This is one of the most frequent challenges we see shoppers face.

    A table that looks great in a large, open showroom can completely overwhelm a cozy living room. On the flip side, a smaller table can get lost in a large, open-concept space. The most helpful tool here is a simple tape measure, not a glossy catalog.

    Doing this bit of prep work takes the guesswork out of the equation. Before you even start thinking about interesting designs or rustic finishes, you need to nail down the ideal dimensions for your new centerpiece. This approach helps ensure your final choice will look great and function well in your room.

    Define Your Table's Footprint

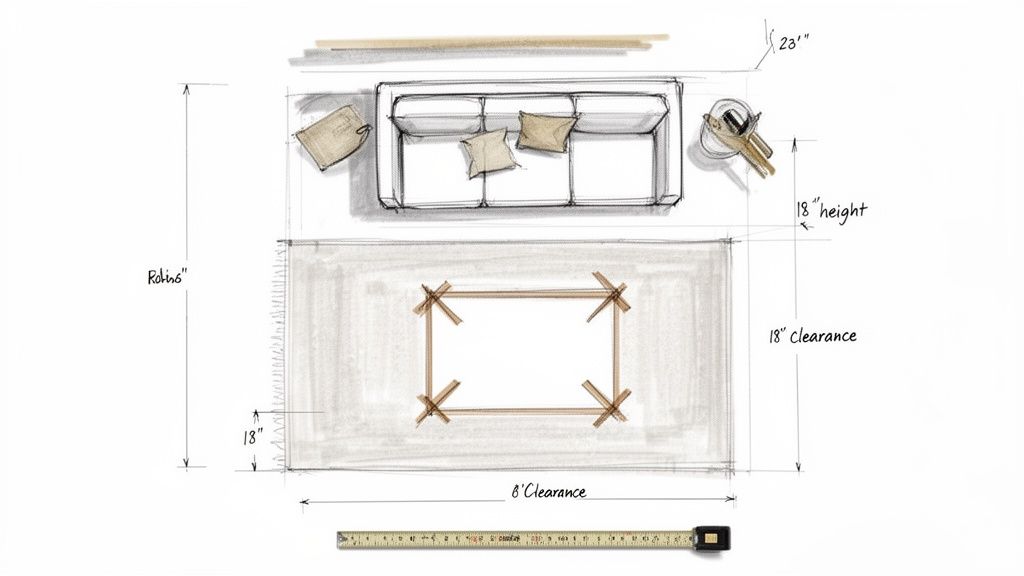
    First, let’s talk scale. A reliable rule of thumb is that your coffee table should be about two-thirds the length of your sofa. This simple ratio creates a satisfying visual balance. If the table is much longer, it can start to dominate the conversation area; if it's much shorter, it can feel like an afterthought.

    Next up is height. For a comfortable setup, find a table that is either the same height as your sofa cushions or just one to two inches lower. This keeps the sightlines across your room open, and more importantly, it makes it easy to reach for your drink or the remote without straining. A table that’s too high or too low can feel awkward to use.

    A diagram outlining three steps to choosing the perfect table size: measure space, check height, and tape floor.

    These core measurement rules are your foundation. To make it even easier, here’s a quick-glance table to keep handy.

    Essential Coffee Table Measurements at a Glance

    This quick reference guide breaks down the standard rules for sizing and placing a coffee table to ensure it fits your living room well.

    Measurement Rule Recommended Distance/Height Why It Matters
    Clearance From Sofa 14 to 18 inches Provides enough legroom while keeping items within easy reach.
    Table Length vs. Sofa Two-thirds the length of your sofa Creates visual balance and prevents the table from overpowering or underwhelming the seating area.
    Table Height vs. Sofa Same height as sofa cushions or 1-2 inches lower Ensures a comfortable reach from a seated position and maintains an open, uncluttered sightline.
    Clearance From Other Furniture At least 30 inches Allows for clear, comfortable walkways and keeps the room from feeling cramped.

    Following these guidelines will help you find a coffee table that not only looks great but also works seamlessly with your lifestyle and existing furniture.

    Visualize It in Your Room

    Got your ideal measurements? Great. Now, go grab a roll of painter’s tape. Mark out the length and width of your potential coffee table right there on the floor. Don’t just look at it—live with that taped-off rectangle for a day or two. It’s a simple trick, but it gives you a real-world feel for the table’s footprint.

    Pro Tip: Walk around the taped area just like you normally would. Do you find yourself having to squeeze by to get to the couch? Does it block a main path through the room? This is a useful way to test your layout and make sure your new table enhances your space instead of getting in the way.

    The global coffee table market is growing—expected to hit $4.85 billion in 2025—which means homeowners have more choices than ever. For shoppers here in North Georgia, that translates to a wide variety of sizes, styles, and materials to fit any home. You can read more about this market growth on Archive Market Research. With so many options available, taking the time to measure your own space first is the most important step you can take to narrow the field and find a good fit.

    Finding the Right Shape for Your Room's Layout

    Top-down sketch of a living room layout showing sofa, rug, coffee table, and furniture dimensions.

    Once you've nailed down the ideal size for your coffee table, the next big question is shape. This is about more than just looks—it’s about how your family and guests move through the room. The right shape guides traffic and works with your seating, making the space feel intuitive. The wrong one can turn your living room into an obstacle course.

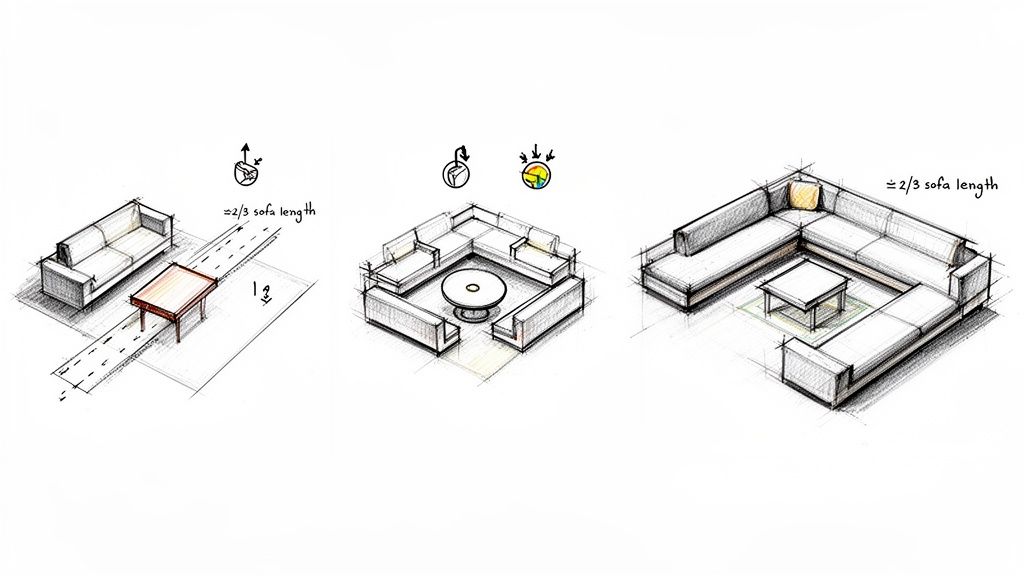
    Think about a common living room setup: a standard sofa facing a TV or fireplace. For this kind of straight, linear arrangement, a rectangular or oval coffee table is almost always a good fit. It echoes the long lines of the sofa and gives everyone sitting on it a place to set their drink. An elongated shape also keeps the pathways on either side clear, so nobody's tripping on their way out of the room.

    Matching Shape to Seating

    Your seating arrangement is your best clue for choosing the right table shape. Different layouts just feel better with certain shapes anchoring them.

    • For Traditional Sofas: Stick with a rectangular or oval table. It keeps the proportions right and ensures the surface area is useful for everyone.
    • For Sectionals and U-Shaped Seating: This is where a square or round coffee table really shines. It nestles nicely into the L-shape of a sectional, creating a central hub that’s easy to reach from any seat.
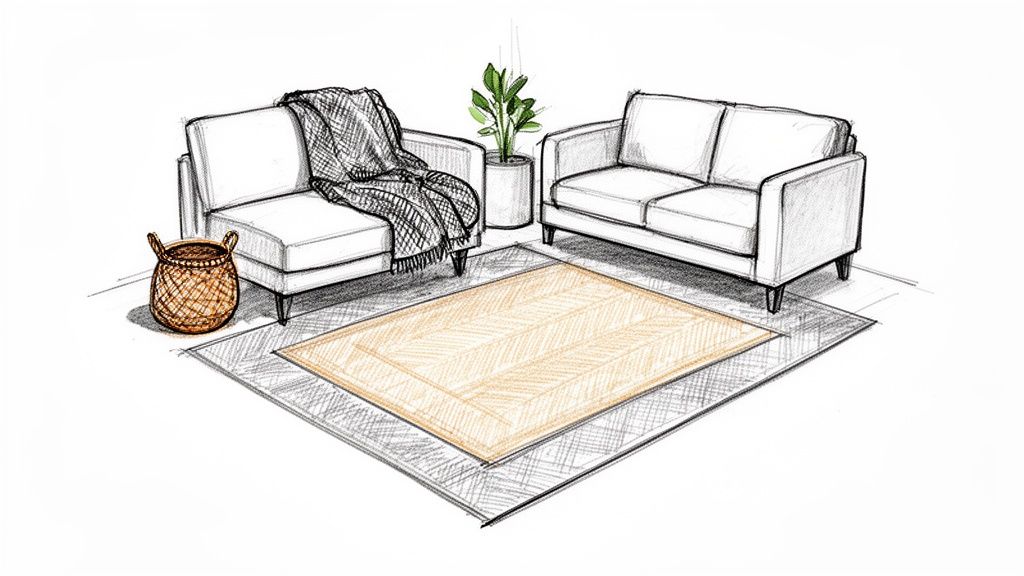
    • For Conversational Layouts: If you have two sofas facing each other or a sofa with a pair of chairs, a large round or square table can be a great choice. It fills that central space and visually ties all the separate pieces together into one cozy gathering spot.

    A quick but important tip for those with little ones: safety and flow are huge. Round and oval tables don't have sharp corners, making them a more forgiving choice for homes with toddlers running around.

    You're really looking to create a nice visual conversation between your sofa and your coffee table. A structured rectangular sofa, for instance, can be beautifully softened by the gentle curves of an oval table. On the other hand, a big, cozy sectional often feels more grounded and complete with a solid square table at its center.

    Creating Visual Balance and Flow

    Take a minute to think about how people actually walk through your living room. Is there a main path that cuts right through the middle of everything? If so, a table with softer edges, like a round or oval one, can make a huge difference. These shapes encourage movement around them instead of creating a hard stop.

    For example, in a long, narrow room where people are always walking past the sofa to get to another part of the house, an oval table gives you the surface area you need but with rounded ends that are much easier to navigate around. It’s a subtle detail, but one that makes the room feel less cramped day in and day out.

    At the end of the day, the shape you pick helps set the tone for the whole room. The sharp, clean lines of a square or rectangular table tend to give off a more formal, structured vibe. In contrast, the soft curves of a round or oval table almost always create a more relaxed, casual, and inviting atmosphere. There's no substitute for seeing it in person, which is why a trip to a showroom can be so helpful to really get a feel for how different shapes and styles interact.

    Choosing Materials That Match Your Lifestyle

    Diagrams showing optimal coffee table placement and sofa arrangements for living spaces.

    A coffee table's material is really its personality. It sets the tone for the room's look and feel, but maybe more importantly, it dictates how much you'll have to fuss over it. The goal is to find a material that fits your real life, not one that just adds another chore to your list.

    Let's be honest for a second. Is your living room a strict "no-drinks-without-a-coaster" zone, or is it more of a relaxed, kick-your-feet-up kind of space? Answering that question will point you toward the right choice faster than any design trend.

    Wood: The Classic for a Reason

    Solid wood is a timeless choice, and for good reason. It brings a natural warmth and texture to a room, grounding the space with an organic feel you just can't fake. Woods like oak, walnut, and maple are incredibly durable and can stick around for decades with a little TLC.

    But, you do have to be mindful. Wood is vulnerable to those dreaded water rings from a sweating glass of iced tea and can get scratched by keys or laptops. While most modern wood tables have protective finishes, they’ll still thank you for using coasters and wiping them down gently. If you're open to pre-loved pieces, knowing how to choose second-hand furniture can open up a world of unique, character-rich wood tables.

    Here's a Pro Tip: If you have an active household with kids or pets, a rustic or reclaimed wood table is your friend. The existing imperfections and distressed finish are brilliant at hiding new dings and scratches. In fact, a little extra wear and tear often just adds to its character.

    Metal and Glass for a Lighter Touch

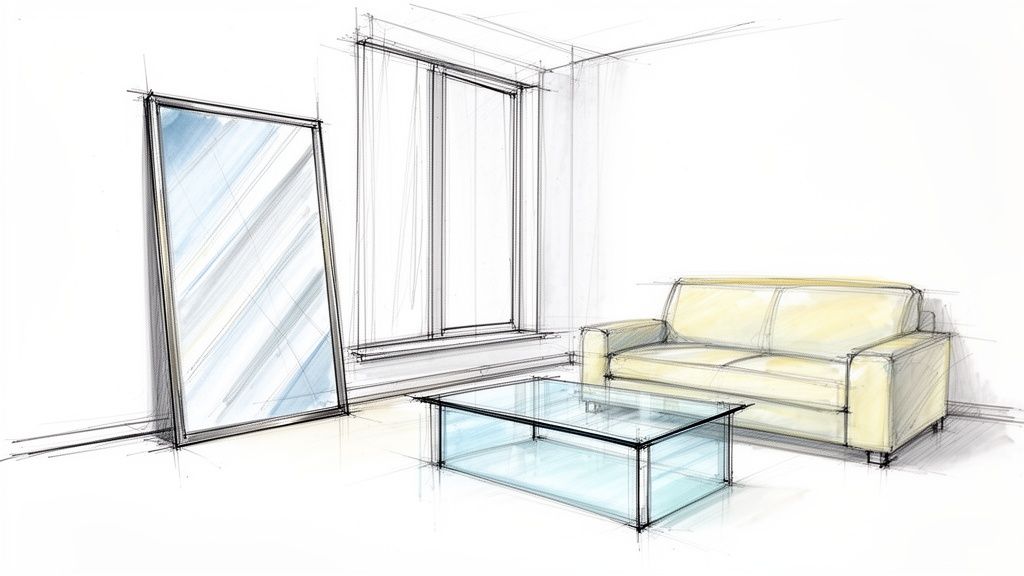
    If your style leans more modern or industrial, metal and glass are great options. They help create a sense of openness and light, which is a huge plus in smaller living rooms. A glass top lets you see the beautiful rug underneath, making the whole room feel bigger.

    The trade-off, of course, is the upkeep. Glass shows every single fingerprint, smudge, and speck of dust, so it needs frequent cleaning to look its best. Metal frames are tough but can be scratched, and some finishes might show wear over time.

    Upholstered Ottomans and Statement Stone

    Upholstered ottomans are an amazing, family-friendly alternative to a hard-surfaced table. They're soft, have no sharp corners (a win for homes with little ones), and can easily double as extra seating or a comfy footrest. We always recommend looking for one in a performance fabric to make clean-up a breeze.

    For a truly bold and sophisticated look, you can't beat stone. Materials like marble, travertine, or concrete make a powerful statement. They're incredibly durable when it comes to scratches, but they can be porous and stain easily from spills like red wine or coffee. You'll likely need to seal the surface regularly to protect your investment.

    Lately, sustainability has also become a huge factor for shoppers. Data shows that over 70% of consumers are making sustainability a priority when buying home furnishings. This shift means that here in North Georgia, we're seeing a wonderful variety of tables made from reclaimed wood, recycled metals, and other eco-friendly materials. To learn more about this trend, you can discover more insights about coffee table trends on JMDI Furniture's blog.

    Thinking Beyond the Surface With Smart Features

    While it’s easy to get caught up in style, shape, and material, the real magic of a modern coffee table is how it solves everyday problems. These days, a coffee table can be one of the hardest-working pieces in your living room, going way beyond just a spot to set your drink.

    To find the right one, you have to get honest about how you really use your space. Is it command central for family game nights? Your quiet corner for morning coffee and the newspaper? Does it have to double as a home office a few days a week? The answers to those questions will point you toward features that genuinely make your life easier.

    Do You Need a Place for Everything?

    Let's face it, clutter happens. Remote controls, magazines, charging cables, and the kids' latest favorite toys can stage a takeover of any living room. If that sounds painfully familiar, a coffee table with built-in storage is less of a want and more of a need.

    • Tables with Drawers: These are perfect for hiding away all those small odds and ends you need close by but don't want to look at—think remotes, coasters, pens, and charging cords.
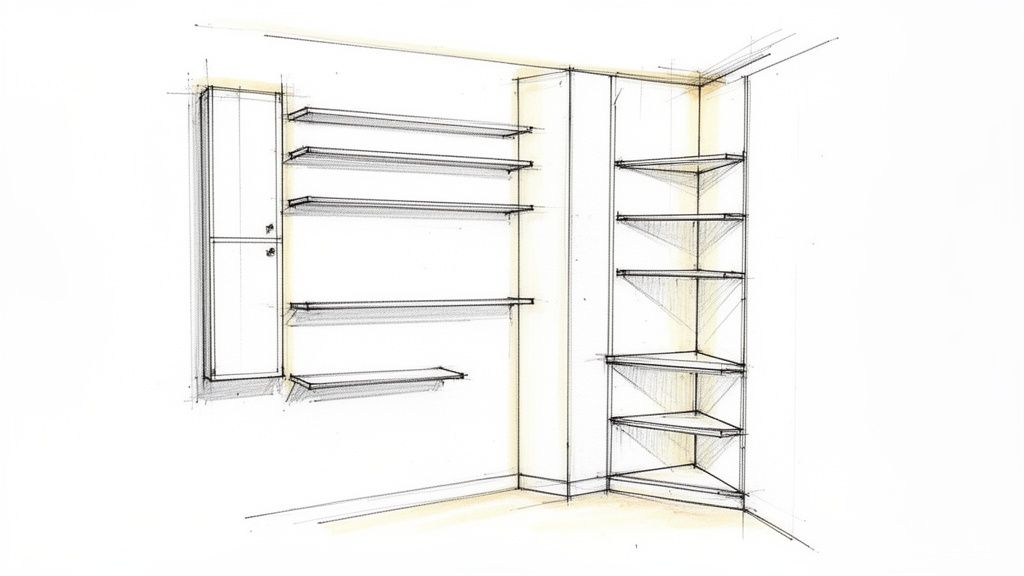
    • Tables with Open Shelving: A lower shelf is a great spot to stack a few of your favorite art books, place a decorative basket for magazines, or keep a cozy throw blanket within arm's reach.
    • Ottomans with Hidden Storage: For the ultimate clutter-busting solution, you can't beat a storage ottoman. Just lift the top, and you've got a spacious compartment ready to swallow up board games, extra pillows, or toys in an instant.

    Choosing a table with the right kind of storage transforms it from a piece of furniture you just have to an active tool that helps you stay organized. It’s a simple change that makes a huge difference in keeping your living space tidy and relaxing with almost zero extra effort.

    Tables That Work Harder for You

    Your living room probably wears a lot of different hats, and your coffee table should be able to keep up. Innovative, functional designs can be a total game-changer, especially for busy households. Some people are even taking this a step further by looking into the best smart home devices to see how technology can add even more convenience to their living spaces.

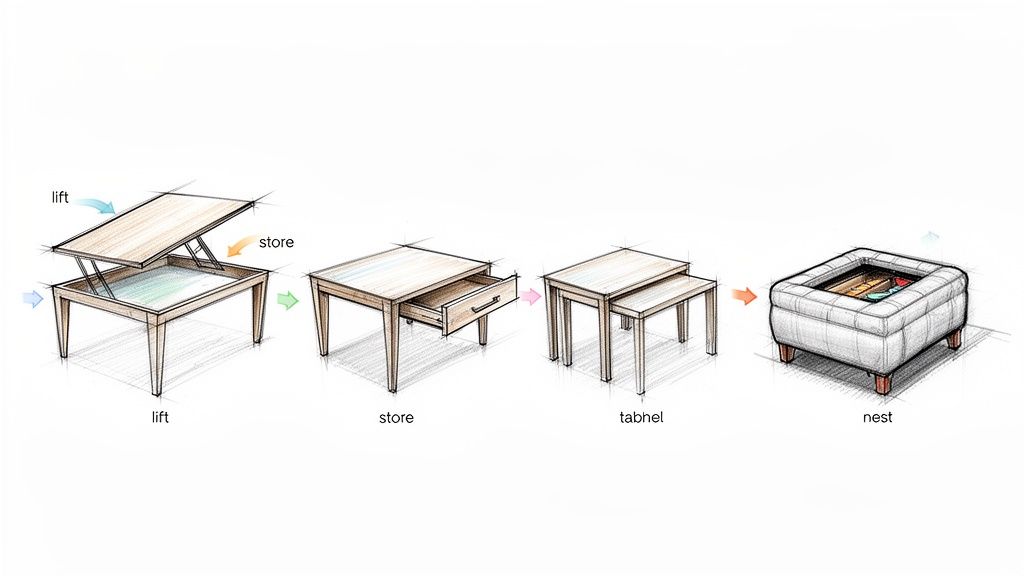
    A lift-top coffee table is a perfect example of this in action. Do you ever find yourself eating dinner on the couch or trying to work on your laptop? These tables are incredible. The top lifts up and pulls toward you, creating an elevated surface at a comfortable height, saving you from hunching over. In just a few seconds, your sofa area becomes a more usable desk or dining spot.

    If you're working with a smaller room or just need your space to be more flexible, nesting tables are a brilliant choice. You get two or more tables of varying sizes that tuck neatly together to save floor space. Then, when guests come over, you can pull them apart and give everyone their own spot for a drink and a plate of appetizers.

    To help you decide which features might be right for your home, here’s a quick comparison of the most popular functional coffee table types.

    Comparing Coffee Table Features for Your Needs

    Feature Type Best For Key Considerations
    Lift-Top Working from home, dining on the sofa, or crafting. The mechanism should be smooth and sturdy. Make sure the height is comfortable for you when seated.
    Hidden Storage Families with kids, anyone who hates clutter, storing blankets and games. Consider drawers vs. an open cavity. Drawers are better for small items; open storage is great for bulkier things.
    Nesting Tables Small spaces, frequent entertainers, and flexible layouts. Look for a stable design when nested and separated. Ensure the smaller tables are easy to pull out and move around.
    Open Shelving Displaying books or decor, easy access to frequently used items. Can look cluttered if not styled intentionally. Might require more frequent dusting than enclosed storage.

    Ultimately, the key is to look past the aesthetics for a moment and really think about how a coffee table can support your daily life. When you match these smart features to your family’s specific needs, you’ll end up with a piece that doesn't just look amazing—it makes your home function better, too.

    Making a Confident Choice in North Georgia

    Four sketch illustrations demonstrate various functional coffee table designs, including lift-top, storage, nesting, and ottoman with storage.

    You’ve done the homework—you measured your space, considered your family's daily grind, and maybe even bookmarked a few favorites online. So, what’s the final step in how to choose a coffee table? Seeing your top contenders in person.

    Online photos are a great starting point, but they can’t always capture the true color, texture, and sheer presence of a piece of furniture. Visiting a showroom is where you move from theory to reality. It lets you get a real feel for the coffee table’s quality and scale in a way a screen just can’t replicate. You can double-check the height, test the stability, and see how the finish really looks under normal lighting.

    What to Look For in a Showroom

    When you’re on the floor, it’s your chance to play detective and spot the signs of quality craftsmanship. Don’t be shy about it! This is your opportunity to make sure the piece is built to last.

    Here are a few things our own furniture experts always check:

    • Give it a nudge. Gently push on the table to see if it wobbles or feels flimsy. A well-built table should feel solid and grounded.
    • Inspect the details. If it’s a wood table, ask if it’s solid wood or a veneer. Look closely at the joints and connections for any gaps or sloppy construction.
    • Work the features. If the table has drawers, slide them open and shut. Do they glide smoothly? For a lift-top, test the mechanism to make sure it operates easily and feels secure when raised.

    This is also the perfect time to ask questions. Our staff can give you the lowdown on the materials, the durability of the finish, and the best way to care for your new table so it looks great for years.

    Visiting a showroom bridges that critical gap between your research and your final decision. It’s where you can confirm that the table you like online is the table you’ll love in your home.

    Bringing Your Vision Home

    This final, hands-on step is what helps you make a confident investment. By combining your careful planning with the real-world experience of seeing and touching the furniture, you all but eliminate any future surprises or buyer's remorse.

    So, take your time in the showroom. Find a nearby sofa and sit down to see how the table feels from a natural vantage point. Try to visualize it with your rug, your decor, and your family gathered around it. This thoughtful approach ensures the coffee table you bring home is more than just a piece of furniture—it’s a great fit for your North Georgia lifestyle.

    Common Questions About Choosing a Coffee Table

    Even after doing all your homework, a few last-minute questions always seem to surface right when you think you've found the right one. Don't worry, it happens to everyone. Think of this as your final check, where we give straight answers to the most common questions we hear on our showroom floors every single day.

    Should My Coffee Table Match My End Tables?

    This is easily one of the questions we get asked the most. The short answer? No, they absolutely don’t have to match. In fact, your room will probably look a lot more interesting and professionally designed if they don't. The goal is coordination, not a carbon copy.

    Instead of matching, look for a common thread that ties the pieces together. For example:

    • Material: Try pairing a solid oak coffee table with end tables that have oak legs but maybe a different top, like metal or stone.
    • Finish: A dark wood coffee table can look great with black metal end tables. The shared dark tones create a connected, intentional feel.
    • Shape: You could use a round coffee table to soften the lines of two square end tables. This contrast adds visual balance to the room.

    Ultimately, you want a space that feels curated and collected over time, not like you bought everything from a single page in a catalog.

    What’s the Best Coffee Table for a Home With Kids or Pets?

    When your living room doubles as a playground or a dog park, durability and safety are the name of the game. For homes with toddlers, an upholstered ottoman is a fantastic choice. No sharp corners for little heads to bump, and it provides a soft surface for them to play on.

    Another great option is a round or oval wood table. Again, no sharp corners means more peace of mind for you. If you go this route, look for a rustic or distressed wood finish. It's incredibly forgiving and will hide the inevitable scratches from toys or pet claws—in fact, a few dings and scrapes often just add to its character.

    Our Recommendation: Always look for tables with a tough, protective finish that can handle spills and daily use. When in doubt, a solid, heavy piece will always hold up better in a busy home than something more delicate.

    How Do I Know if a Coffee Table Is Good Quality?

    It's easy to get distracted by a table's looks, but a few simple checks can tell you if it’s built to last. When you're in the showroom, don't be afraid to get a little hands-on.

    First, give the table a little shove. A quality piece should feel solid and stable and shouldn't wobble or creak. Next, check out the moving parts. If it has drawers, pull them out and push them back in. Do they glide smoothly, or do they stick and rattle?

    For any wood table, ask if it's made from solid wood or a veneer. Solid wood is almost always more durable and has the huge advantage of being able to be refinished years down the road. Lastly, run your hand over the finish. It should feel even and smooth, with no rough spots or drips. These small details are the biggest clues to good craftsmanship and tell you a lot about how that table will stand up to time.


    Ready to see how the right coffee table can complete your living room? The knowledgeable team at Woodstock Furniture & Mattress Outlet is here to help you explore a great selection of styles, materials, and functional options in person. Visit one of our North Georgia showrooms today!

  • Decorating Tips for Small Living Rooms: Maximize Style in Tiny Spaces

    Decorating Tips for Small Living Rooms: Maximize Style in Tiny Spaces

    A small living room presents a unique design challenge: how do you create a space that’s functional, comfortable, and stylish without feeling cramped? The key isn't about finding a secret way to add square footage, but about using smart, proven design principles to make the space you have work harder. It's about choosing furniture that serves multiple purposes, arranging it for optimal flow, and using visual strategies to create an illusion of openness. This guide moves beyond generic advice to provide practical, actionable decorating tips for small living rooms that you can implement.

    We'll explore how strategic choices in color, storage, and layout can transform a compact area into a welcoming and functional heart of your home. We'll focus on real-world solutions that help you solve common problems, from clutter and poor traffic flow to a lack of light. To further enhance comfort and airflow without compromising on style, exploring a guide to the best ceiling fans for small rooms can provide tailored solutions for your compact living space. By the end, you'll have a clear roadmap for creating a living room that feels both spacious and personal, no matter its dimensions.

    1. Multifunctional Furniture with Hidden Storage

    One of the most effective decorating tips for small living rooms involves choosing furniture that does more than one job. Multifunctional pieces combine essential functions like seating, sleeping, or surface space with concealed storage, allowing you to maximize every square foot without adding clutter. This strategy is foundational for small spaces because it eliminates the need for extra, space-consuming storage units like bookshelves or cabinets.

    By integrating storage directly into the furniture you already need, you maintain a clean, open, and organized environment. An ottoman can double as a coffee table and a hidden chest for blankets, while a sectional can house a pull-out bed and a chaise with a lift-top compartment for board games or pillows.

    Why This Approach Works for Small Spaces

    In a compact living room, every piece must justify its footprint. A standard sofa only offers seating, but a storage sectional provides seating and a place to tuck away seasonal decor or extra linens. This dual-purpose design is the key to creating a functional room that feels larger than it is.

    Key Insight: The goal is to reduce the total number of furniture items in the room. By making each piece work harder, you free up valuable floor space, which improves traffic flow and creates a more breathable, uncluttered atmosphere.

    Actionable Tips for Implementation

    Before purchasing, think carefully about what you need to store and how you will use the piece daily.

    • Measure First: Check the dimensions of the internal storage compartments to ensure they can hold the items you have in mind, whether it's throw pillows, magazines, or electronics.
    • Prioritize Easy Access: For items you use frequently, opt for pieces with easy-to-lift lids or smooth-gliding drawers. Ottomans on wheels offer extra flexibility, allowing you to move them easily for cleaning or rearranging.
    • Organize Internally: Use drawer dividers or fabric bins inside larger compartments. This prevents your hidden storage from becoming a chaotic mess and helps you find what you need quickly.
    • Consider Weight and Durability: Look for soft-close mechanisms to prevent slamming and wear. If you plan to store heavy items, check the weight capacity and construction of the piece to ensure long-term durability.

    At Woodstock Furniture & Mattress Outlet, our knowledgeable team can help you find multifunctional solutions that fit your specific layout and storage needs, guiding you to pieces that offer both style and practicality.

    2. Strategic Use of Vertical Space and Wall-Mounted Storage

    One of the most impactful decorating tips for small living rooms is to draw the eye upward. Utilizing vertical space with wall-mounted storage is a classic design strategy that maximizes your room’s potential without sacrificing precious floor area. This approach uses otherwise empty walls for practical storage, creating an open, airy feel while keeping essentials organized and accessible.

    By mounting shelves, cabinets, or even an entire entertainment unit to the wall, you reclaim the floor for traffic flow and seating. This technique is especially powerful in compact rooms because it not only adds function but also creates the illusion of higher ceilings, making the entire space feel larger and more expansive.

    Hand-drawn sketch illustrating a custom built-in shelving and cabinet unit in a corner.

    Why This Approach Works for Small Spaces

    In a small living room, the floor is a valuable asset. Wall-mounted solutions like floating shelves or tall, narrow bookcases free up that real estate completely. Instead of a bulky media console sitting on the floor, a wall-mounted version provides the same function while visually "floating," which reduces visual weight and clutter.

    Key Insight: Directing focus vertically tricks the eye into perceiving more volume and height. This visual lift prevents the room from feeling cramped or boxed-in, a common challenge in smaller layouts.

    Actionable Tips for Implementation

    Proper installation and styling are key to making vertical storage look intentional rather than cluttered.

    • Secure Installation: Always anchor shelves and cabinets to wall studs for maximum stability and safety. If studs aren't available, use appropriate drywall anchors rated for the weight of your items.
    • Create Breathing Room: Avoid packing shelves completely full. Aim to leave around 30% of the surface as "negative space" to maintain a clean, uncluttered aesthetic.
    • Balance Open and Closed Storage: Combine open shelves for displaying decor with wall-mounted cabinets or baskets to hide less attractive items like cables, remotes, or paperwork.
    • Style with Intention: Group objects of varying heights, shapes, and textures to create visually interesting vignettes. Use cohesive elements like matching baskets or boxes to unify the look.

    At Woodstock Furniture & Mattress Outlet, you can find a variety of bookcases and entertainment centers that help you take advantage of your home's vertical space, and our team is always ready to offer guidance on selecting pieces that fit your room's scale and style.

    3. Light Colors and Reflective Surfaces for Visual Expansion

    One of the most powerful decorating tips for small living rooms is to harness the power of light. By strategically using light colors and reflective surfaces, you can create a powerful optical illusion that makes a compact room feel significantly larger, brighter, and more open. This technique works by maximizing both natural and artificial light, causing it to bounce around the space and trick the eye into perceiving more depth.

    Light, neutral palettes like soft whites, creams, pale grays, and light blues make walls appear to recede, pushing them visually outward. When combined with reflective elements such as mirrors, glass tabletops, or metallic accents, this effect is amplified. A well-placed mirror can double the visual space and light, while a glass coffee table keeps sight lines clear, preventing the room from feeling crowded.

    A hand-drawn sketch illustrating a modern living room with a yellow sofa, glass coffee table, and large mirror.

    Why This Approach Works for Small Spaces

    In a small living room, dark colors can absorb light and make the walls feel like they are closing in. Light colors do the opposite; they reflect light, creating an airy and expansive atmosphere. Mirrors and other reflective surfaces act as secondary light sources, scattering brightness into darker corners and adding layers of visual interest without taking up physical space.

    Key Insight: The goal is to manipulate light to erase boundaries. A mirror doesn’t just show a reflection; it can create a "window" to a perceived continuation of the room, effectively expanding its dimensions without any structural changes.

    Actionable Tips for Implementation

    To make this strategy effective, balance is key. You want to create a bright space that still feels warm and inviting, not sterile or cold.

    • Choose the Right Paint: Opt for light neutrals with warm undertones to prevent the room from feeling chilly. Test paint swatches on your walls at different times of day to see how they interact with your home's natural light.
    • Strategic Mirror Placement: Position a large mirror directly opposite a window to capture and reflect the maximum amount of daylight. Placing one on a wall perpendicular to a window can also help distribute light more evenly throughout the room.
    • Incorporate "Invisible" Furniture: Select pieces like a glass coffee table, acrylic console table, or chairs with open bases. These items serve their function without visually obstructing the floor, which helps maintain a sense of openness.
    • Balance with Texture: To avoid a sterile look, introduce soft textures through area rugs, plush throw pillows, and cozy blankets. Natural wood accents can also add warmth and ground the light color scheme.

    At Woodstock Furniture & Mattress Outlet, you can find a wide range of accent pieces, from elegant mirrors to glass-topped tables, that will help you bring this light-enhancing strategy to life in your home.

    4. Smart Layout and Furniture Arrangement for Flow

    How you arrange your furniture is one of the most impactful decorating tips for small living rooms. Strategic placement maximizes floor space and creates natural traffic pathways, preventing the room from feeling cramped or difficult to navigate. Instead of pushing every piece against the walls, this approach involves creating intentional zones and ensuring clear sight lines.

    Thoughtful furniture arrangement considers the room's focal points, such as a window, fireplace, or media center, and organizes seating around them. By "floating" furniture away from the walls, you can paradoxically make the space feel larger, more open, and more inviting. This technique transforms a room from a simple container for furniture into a functional and harmonious living area.

    Why This Approach Works for Small Spaces

    In a small living room, every decision must support the feeling of openness. Pushing furniture against the walls creates a tight, crowded perimeter and leaves an awkward, underutilized space in the middle. Floating the main seating group and creating clear pathways directs movement and allows the room to breathe.

    Key Insight: A well-planned layout creates a sense of purpose and order. By establishing clear zones for conversation, entertainment, or reading, you make the room more intuitive and comfortable to use, which enhances the perception of spaciousness.

    Actionable Tips for Implementation

    Before moving heavy items, map out your new layout to ensure it works for your space and lifestyle.

    • Plan Virtually First: Use a tool like the Woodstock Furniture & Mattress Outlet Room Planner to experiment with different arrangements digitally. This saves you the effort of physically moving furniture until you find a layout that works.
    • Create Clear Pathways: Ensure there are at least 18 to 24 inches of clearance for major traffic routes. This prevents the room from feeling like an obstacle course.
    • Anchor Your Arrangement: Use a large area rug to define the main seating area. The front legs of your sofa and chairs should sit on the rug to create a cohesive, anchored look.
    • Float Your Sofa: If space allows, pull your sofa 12 to 18 inches away from the wall. This simple trick creates visual depth and makes the room feel wider.
    • Embrace Angled Placement: Don't be afraid to angle an accent chair or a small table in a corner. This can break up boxy lines and add dynamic visual interest.

    5. Strategic Lighting Layers to Enhance Space and Ambiance

    Effective lighting is one of the most transformative decorating tips for small living rooms, yet it's often overlooked. A single, harsh overhead light can cast shadows that make a room feel smaller and more enclosed. Strategic lighting layers, however, combine multiple light sources at different heights to create depth, eliminate dark corners, and foster a warm, inviting atmosphere.

    This approach involves balancing three types of lighting: ambient (overall illumination), task (focused light for activities like reading), and accent (light that highlights decor or architectural features). By layering them, you can draw the eye around the room, making it feel more dynamic and spacious. Well-placed floor lamps, table lamps, and wall sconces can make a small room feel open, airy, and welcoming.

    Why This Approach Works for Small Spaces

    In a compact living room, shadows are the enemy of spaciousness. Dark, unlit corners can visually shrink the room’s boundaries. A layered lighting plan ensures that light reaches every part of the space, creating an even, consistent glow that pushes the walls back.

    Key Insight: The goal is to create visual interest and guide the eye upward and outward. By placing lights at various heights, from a table lamp to a floor lamp to a wall sconce, you add vertical dimension that prevents the room from feeling flat and cramped.

    Actionable Tips for Implementation

    Think of lighting as a tool to sculpt your room’s dimensions and mood. Start with your overhead fixture and build layers from there.

    • Install Dimmers: Add dimmers to your main overhead lights. This gives you complete control over the ambient brightness, allowing you to transition from a bright, functional space to a cozy, relaxed environment.
    • Warm Up the Tone: Choose light bulbs with a warm-white color temperature (around 2700K). This creates a comfortable and inviting feel, unlike cool or blue-toned lights that can feel sterile.
    • Target Dark Corners: Place a tall floor lamp or an uplight in a dark corner. This simple trick instantly makes the entire room feel larger by illuminating its full perimeter.
    • Balance with Task Lighting: Add table lamps on end tables or a console. Not only do they provide necessary light for reading, but they also contribute to the overall balance and symmetry of your decor.
    • Highlight Key Features: Use accent lighting, like a picture light over artwork or LED strips under shelves, to draw attention to your favorite decorative elements.

    At Woodstock Furniture & Mattress Outlet, we offer a great selection of floor lamps, table lamps, and accent furniture for building your layered lighting scheme. Our team can help you choose pieces that complement your style and solve your small-space challenges.

    6. Decluttering and Minimalist Design Principles

    One of the most impactful decorating tips for small living rooms costs nothing but time: embracing decluttering and minimalist design. This approach centers on intentionally keeping only essential and cherished items, which creates visual breathing room and makes a compact space feel significantly larger and more serene. Clutter consumes both physical and visual space, making a room feel chaotic and cramped.

    Minimalism isn't about creating a cold or empty environment; it’s about quality over quantity. By carefully curating your decor, limiting your color palette, and displaying items with purpose, you create a calm and functional atmosphere. Whether it's a living room organized with Marie Kondo's KonMari method or a space inspired by clean Japanese design, this principle can transform a room from stressful to restful.

    Why This Approach Works for Small Spaces

    In a small living room, every object competes for attention. Excess items, from too many throw pillows to crowded bookshelves, create visual noise that makes the brain perceive the space as smaller than it is. A minimalist approach removes this distraction, allowing the room's architecture and key furniture pieces to stand out.

    Key Insight: Decluttering is the foundation of effective small-space design. Before you can optimize a room with mirrors or multifunctional furniture, you must first create a clean slate by removing what doesn’t belong.

    Actionable Tips for Implementation

    Adopting a minimalist mindset is a gradual process. Start small to avoid feeling overwhelmed and focus on creating a space that feels personal and functional.

    • Curate with Intention: Begin by removing items that don’t serve a practical function or bring you joy. If an item doesn't have a purpose or a special meaning, it may be contributing to the clutter.
    • Implement the 'One In, One Out' Rule: To maintain a clutter-free space, make a habit of letting go of one item every time you bring something new into the room.
    • Keep Surfaces Clear: Limit tabletop and shelf decor to a few carefully chosen items. A clean surface on a coffee table or console creates an immediate sense of openness.
    • Edit Your Textiles: Instead of a dozen pillows and multiple throws, choose two or three high-quality pieces that add texture and comfort without overwhelming the sofa.
    • Digitize What You Can: Reduce physical clutter by scanning old photos, documents, and manuals, then storing them digitally.

    At Woodstock Furniture & Mattress Outlet, we believe a great room starts with a thoughtful plan. Our team can help you select foundational pieces that support a clean, organized aesthetic, ensuring your small living room is both beautiful and functional.

    7. Strategic Use of Area Rugs, Textures, and Layering

    While minimalism is often recommended for small spaces, a room devoid of texture can feel cold and uninviting. Strategic layering with area rugs, varied textiles, and décor adds depth, personality, and warmth. This approach makes a small living room feel intentionally designed and curated, balancing a clean layout with a cozy, welcoming atmosphere.

    An area rug can anchor a furniture arrangement, creating a defined zone for conversation or relaxation without the need for walls. Layering different textures, such as a soft wool throw on a linen sofa or a woven jute basket next to a smooth metal lamp, creates a rich visual experience that makes the space feel more substantial and complete.

    A hand-drawn sketch showing two sofas, a plant, and a basket in a small living room setup.

    Why This Approach Works for Small Spaces

    In a small room, adding visual interest without adding physical bulk is essential. Textures and layers engage the eye and create a sense of depth, preventing the space from feeling flat or one-dimensional. An appropriately sized rug can also trick the eye into seeing the room as larger by clearly defining the living area’s boundaries.

    Key Insight: Layering is a powerful tool in decorating tips for small living rooms because it adds character and comfort without consuming valuable floor space. It’s about creating a rich sensory experience that makes a compact room feel luxurious and thoughtfully composed.

    Actionable Tips for Implementation

    To layer effectively, focus on balance and cohesion to avoid a cluttered look.

    • Get the Rug Size Right: A common mistake is choosing a rug that's too small. Ensure the rug is large enough for at least the front legs of your sofa and any armchairs to rest on it. For expert guidance, there are excellent resources like this guide on how to choose the perfect area rug that covers sizing and placement in detail.
    • Mix Materials: Combine a variety of textures for a dynamic effect. Pair soft elements like velvet pillows or chenille throws with rougher materials like jute, rattan, or natural wood.
    • Incorporate Natural Elements: Plants, wooden accent tables, or leather ottomans add warmth and an organic feel, making the space more inviting.
    • Use Pillows and Throws: These are easy and affordable ways to introduce new textures and colors. You can swap them out seasonally to refresh the room’s look.

    7-Point Comparison: Small Living Room Decorating Tips

    Strategy Implementation complexity Resource requirements Expected outcomes Ideal use cases Key advantages
    Multifunctional Furniture with Hidden Storage Medium — choose pieces and ensure fit/assembly Moderate — cost of furniture, measuring, delivery/assembly Increased storage without extra footprint; less visible clutter Small living rooms, studios, multi-use spaces Maximizes usable space; hides clutter; multifunctional use
    Strategic Use of Vertical Space and Wall-Mounted Storage Medium–High — requires secure installation Low–Moderate — shelving, anchors, possible pro install Frees floor area; creates taller visual lines Rooms with free wall area or high ceilings Adds storage with minimal footprint; customizable to wall
    Light Colors and Reflective Surfaces for Visual Expansion Low — paint, mirrors, select finishes Low — paint, mirrors, a few reflective accents Brighter, visually larger room; improved light distribution Dim or small rooms lacking natural light Cost-effective visual expansion; broadly compatible with styles
    Smart Layout and Furniture Arrangement for Flow Low–Medium — planning and measuring required Low — time, measuring tools, possible new scale-appropriate pieces Better traffic flow; clearly defined zones; more intentional feel Irregular layouts; multipurpose living rooms Improves function without large purchases; flexible and reversible
    Strategic Lighting Layers to Enhance Space and Ambiance Medium — planning fixtures and control Moderate — fixtures, bulbs, possible electrician Eliminates dark corners; adds depth and mood control Dark rooms or spaces used for varied activities Enhances perceived space; adaptable ambiance and task lighting
    Decluttering and Minimalist Design Principles Low — requires editing and behavior change Very low — time and organizational supplies Cleaner, calmer room that reads larger Overcrowded rooms; those seeking low-maintenance design Cost-effective; improves maintenance and perceived space
    Strategic Use of Area Rugs, Textures, and Layering Low–Medium — styling and scale decisions Low–Moderate — rugs, textiles, accessories Warmth, visual depth, and defined zones without walls Rooms needing personality while keeping openness Adds comfort and depth; defines areas without built partitions

    Your Space, Your Way: Bringing It All Together

    Transforming a compact living room from a challenge into a chic, functional haven is a journey of intentional design, not of limitation. Throughout this guide, we've explored a variety of powerful decorating tips for small living rooms, each designed to maximize both style and utility. The core principle tying them all together is simple: every element should serve a purpose, and often, multiple purposes.

    The journey begins with a foundation of smart furniture choices. Opting for multifunctional pieces like storage ottomans, lift-top coffee tables, or sleeper sofas isn't just a space-saving trick; it’s a lifestyle upgrade that streamlines your daily routine. By selecting furniture that works harder, you inherently reduce clutter and create a more organized, serene environment. This philosophy extends upward, as we’ve seen how leveraging vertical space with tall bookshelves and wall-mounted shelving draws the eye upward, creating an illusion of height and freeing up precious floor area.

    Key Takeaways for Lasting Impact

    The visual expansion of your space hinges on the thoughtful interplay of light and color. A strategic palette of lighter hues on walls, combined with the reflective power of well-placed mirrors, can dramatically alter the perception of a room's boundaries. But remember, a room devoid of depth can feel sterile. This is where strategic layering comes in.

    • Layer Your Lighting: Combine ambient, task, and accent lighting to add warmth, dimension, and functionality. Avoid a single, harsh overhead light, which can make a small space feel flat and uninviting.
    • Embrace Texture: Introduce varied textures through rugs, pillows, and throws. A well-defined area rug, for instance, anchors your furniture arrangement and creates a cohesive, designated living zone.
    • Curate with Purpose: The minimalist principle of "less is more" can be a powerful tool. Regularly declutter and choose decor that is meaningful and appropriately scaled. This allows each piece to breathe and contribute to the overall aesthetic without overwhelming the room.

    Ultimately, mastering these decorating tips for small living rooms is about creating a space that supports and enhances your life. It’s about being deliberate with your layout to ensure easy traffic flow, choosing pieces that solve real-world problems, and styling with a personal touch that makes the room feel truly yours. A small living room, when designed with care, can be one of the most comfortable and character-filled spaces in your home. It proves that thoughtful design always triumphs over square footage.


    Ready to put these ideas into action? Seeing how different scales, styles, and multifunctional pieces work in a real-world setting can be a helpful next step. We invite you to visit a Woodstock Furniture & Mattress Outlet showroom to explore a selection of furniture suited for cozier spaces and get hands-on guidance from our knowledgeable team.

  • How to Build a Patio The Right Way From Start to Finish

    How to Build a Patio The Right Way From Start to Finish

    Building a patio can be broken down into four main stages: thoughtful planning, prepping a solid base, installing your surface, and adding the finishing touches. Success really hinges on getting the upfront work right—choosing a good site, excavating and compacting properly, and being meticulous during the install. Get these right, and you'll have an outdoor space that lasts for years.

    Planning Your Perfect Patio Before You Dig

    Top-down architectural plan illustrating a patio layout with surrounding landscaping and building access.

    A great patio project starts long before you ever pick up a shovel. A good, thoughtful plan is an incredibly valuable tool. It's what helps prevent costly mistakes and ensures the final result is exactly what you envisioned.

    Rushing this stage can lead to patios that are too small, in an awkward spot, or have a constant puddle in the middle. Taking the time now to consider every detail can save a lot of frustration and expense later on.

    Finding the Ideal Location

    First things first, where is this patio going to live? This is a key initial decision. You need to think about how you actually want to use the space. Is this for sipping coffee in the morning sun? Family dinners in the evening? Or is it your personal sunbathing deck? The spot you pick will dictate how useful it is throughout the day.

    When you're scouting your yard, keep these key factors in mind:

    • Sun and Shade: Pay attention to how the sun moves across your property. An east-facing patio is pleasant for morning people, but a west-facing one can get very hot in the afternoon. Look for spots where mature trees or the house itself can offer some much-needed shade.
    • Privacy: How much do you want to feel like you’re in your own private space? Take a look around. Can your neighbors see everything from their windows? Fences, hedges, or even some large planters can work wonders for creating a more intimate vibe.
    • Accessibility: Your patio should feel connected to your home, not like a separate island. A spot right off the kitchen or living room is convenient for carrying out food and drinks. Think about the flow—will you be navigating stairs or tight corners every time you go outside?

    Measuring and Marking Your Territory

    Okay, you’ve picked your spot. Now it's time to map out the footprint. This is a crucial step for getting an accurate estimate on materials. Grab some stakes and string to create a simple outline of the patio area.

    Now, live with it for a few days. Seriously. Drag your current outdoor furniture into the outlined space to get a real feel for the size. Is there enough room to pull out chairs and walk around the table? Is there space for the grill and a conversation area? It’s a lot easier to move some string than it is to realize you needed another two feet of pavers after they're already laid.

    One of the most common regrets homeowners have is building their patio too small. A good rule of thumb is to allow for at least a 3-foot-wide pathway around your furniture for people to move around comfortably.

    Checking Local Codes and Permits

    Before you dig that first shovelful of dirt, you absolutely must check with your local city or homeowners' association (HOA). I can't stress this enough. Skipping this step can lead to fines or, even worse, being forced to tear out all your hard work.

    Many areas have specific rules about:

    • Permit Requirements: Patios over a certain size or built from certain materials (like poured concrete) often require a building permit.
    • Setbacks: There are usually regulations dictating how close your patio can be to your property lines, wells, or septic systems.
    • Impervious Surface Limits: Some towns limit how much of your lot can be covered by non-porous surfaces to help manage stormwater runoff.

    A quick call or visit to your local building department’s website is all it takes. It's a small task that ensures your project is above board from the get-go.

    Creating a Realistic Project Budget

    With your plan in hand, you can finally put together a real-world budget. A well-built patio is an investment, and knowing the costs upfront is the best way to avoid sticker shock later. Your budget should cover everything from materials and tool rentals to any help you might hire.

    Break your costs down into categories: base materials (gravel, sand), the surface itself (pavers, concrete), edging, and finishing touches like polymeric sand or sealer. And don't forget to budget for renting heavy equipment like a plate compactor—it's non-negotiable for a stable, long-lasting base. It's often recommended to set aside a 10-15% contingency fund to handle any surprises that pop up along the way.

    Choosing the Right Patio Material for Your Home

    Picking the material for your patio is a huge decision. It does more than just look good—it sets the entire tone for your outdoor space, dictates your maintenance routine for years, and can impact the project's difficulty. This is where the fun really begins and your vision starts to become a reality.

    Every option has its own set of real-world pros and cons. Let's break down the differences in cost, toughness, and how much sweat equity is involved. Getting a handle on these details now will help you pick a material that fits your budget, your DIY skills, and how you want to enjoy your backyard down the road.

    Interlocking Pavers: The Flexible and Forgiving Choice

    There's a good reason why interlocking concrete pavers are so popular. They come in a staggering variety of colors, shapes, and textures, which lets you get creative with patterns like classic herringbone or a simple running bond. That design flexibility makes it a whole lot easier to match your patio to your home's existing style.

    But the real advantage of pavers is how easy they are to fix. Life happens. A paver gets a nasty oil stain, a tree root pushes up a section, or one cracks under pressure. With pavers, you can just lift out the problem pieces, fix the base underneath, and pop in new ones. That’s a massive advantage compared to a solid slab, where a single crack can mean a much bigger, more complicated repair.

    Homeowners are increasingly looking for durable, personalized outdoor living spaces, and paver patios fit the bill perfectly. They're a huge piece of the global patio installation market, which was around $15 billion in 2025. In the U.S. alone, deck and patio construction pulled in $1.3 billion in revenue in 2025, with pavers leading the way for residential projects because of their looks and toughness.

    Poured Concrete: The Durable, Blank-Canvas Option

    For a solid, no-fuss patio, poured concrete is a reliable choice. When it's done right, you get a seamless, ultra-durable surface that will last for decades with very little upkeep. It’s a straightforward, functional workhorse that can handle heavy patio furniture and tons of foot traffic without batting an eye.

    Don't mistake "simple" for "boring," though. Modern techniques can turn a basic concrete slab into something special. Stamped concrete can be made to look just like stone, brick, or even wood planks. You can also add stains and dyes to give the surface rich, permanent color. If you're on the fence, it's worth exploring the benefits of a paver patio over concrete to see which better fits your long-term goals.

    The biggest challenge with concrete? Repairs. Cracks are almost inevitable, especially in places with dramatic temperature swings. You can patch them, but the repair will likely always be visible and rarely matches the original color and texture perfectly.

    Natural Flagstone: For a Truly Organic Look

    If you're dreaming of a patio that looks like it grew right out of the landscape, flagstone is your answer. These are flat slabs of quarried stone—like slate, bluestone, or limestone—and every single piece is unique in its shape, color, and texture. This creates a stunning, one-of-a-kind surface with an organic feel that blends right into a garden setting.

    You have two main ways to install flagstone:

    • Dry-laid: This method involves setting the stones on a base of gravel and sand, much like pavers. You then fill the gaps with more sand, fine gravel, or even a groundcover plant.
    • Mortared: For a more solid, permanent patio, the flagstones are set onto a concrete slab and joined together with mortar.

    Keep in mind, laying flagstone is like putting together a giant, heavy puzzle. Because of the irregular shapes, it takes a lot more time and patience to fit the pieces together in a way that looks natural and feels stable. This can drive up labor costs if you hire a pro or demand a lot more of your time if you DIY.

    Flagstone is also usually pricier than pavers or a basic concrete slab. But for anyone who values that natural, high-end look, the character and timeless durability of real stone is often well worth the extra investment.

    Patio Material Comparison Guide

    Choosing the right material is a balancing act between cost, effort, and aesthetics. This table breaks down the key differences to help you decide which path is right for your backyard project.

    Material Average Cost (Per Sq. Ft.) DIY Difficulty Durability & Maintenance Best For
    Interlocking Pavers $8 – $25 Moderate Excellent; easy to repair individual stones. Needs occasional sweeping and weeding. Homeowners wanting creative design flexibility and simple repairs.
    Poured Concrete $6 – $15 High Very durable but difficult to repair cracks seamlessly. Needs sealing every few years. Budget-conscious projects and those looking for a modern, seamless surface.
    Natural Flagstone $15 – $35+ High Extremely durable and long-lasting. Mortared joints may need occasional repair. Creating a natural, rustic, or high-end look that blends with the landscape.

    Ultimately, whether you choose the design freedom of pavers, the solid simplicity of concrete, or the natural beauty of flagstone, the best material is the one that you'll be happy to live with for many seasons to come.

    Building a Solid Foundation for Your Patio

    Let’s be honest, this is the part of the project where the real work happens. A beautiful, long-lasting patio is only as strong as what lies beneath it. The base is the unseen hero of your entire project, the critical element that prevents sinking, shifting, and cracking down the road.

    This is absolutely the most labor-intensive part of building a patio, and cutting corners here is a mistake that will show up later. Getting this foundation right involves digging, layering materials, and compacting them into a stable, interlocking mass. Think of it like the foundation of your house; without a solid one, everything built on top is at risk.

    How Deep Should You Dig Your Patio Base?

    First things first, you have to excavate. The depth you need to dig depends entirely on your local climate and the patio material you've chosen. The goal is simple: get rid of all the soft topsoil and organic stuff until you hit the firm subsoil underneath.

    Here are some general guidelines to get you started:

    • For Paver Patios: A typical paver installation needs a hole 6 to 8 inches deep. This accounts for 4-6 inches of compacted gravel, a 1-inch bed of sand, and the height of the paver itself.
    • For Colder Climates: If you live somewhere with heavy freeze-thaw cycles, you’ll want to go deeper. To combat frost heave, you might need to excavate up to 10-12 inches to make room for a thicker, more stable base.
    • For Natural Stone: Since flagstones can be irregularly thick, you may need a slightly deeper base just to accommodate their size and still get a perfectly level final surface.

    Once you’ve marked out your patio’s perimeter, start digging. Try to get the bottom of the excavated area as level as you can, but make sure to build in a slight, consistent slope for drainage. More on that in a minute.

    The All-Important Compacted Gravel Sub-Base

    With the area dug out, it's time to build the sub-base, which is the real load-bearing layer of your foundation. You’ll want to use crushed angular gravel for this, often called crusher run or ¾” minus gravel. The key is that the stones are angular—their sharp edges lock together tightly when compacted, creating an incredibly stable platform.

    Here's a helpful tip: add the gravel in layers, or "lifts." It's far more effective to add 2-3 inches of gravel, compact it thoroughly, and then add the next layer. If you try to dump in a thick 6-inch layer and compact it all at once, you’ll only compact the top, leaving the bottom loose and prone to settling.

    The single most important tool for this stage is a plate compactor. You can rent one from any home improvement store. While it might be tempting to just tamp the gravel by hand, only a machine can provide the necessary force to properly interlock the aggregate and remove air pockets. This is what keeps your patio from settling later.

    Add Geotextile Fabric for Extra Stability

    For an even more robust foundation, it's a good practice to lay down a layer of geotextile fabric at the bottom of your excavated area before adding any gravel. This permeable fabric acts as a barrier between your gravel base and the soil below.

    This simple step does two things. First, it stops the gravel from mixing with the subsoil over time, which would weaken your base. Second, it helps stop weeds from growing up from below, saving you a headache later. It's a cheap addition that adds serious durability to your project.

    Creating the Perfect Slope for Drainage

    Proper water management is non-negotiable. A patio that pools water is a nightmare—it can damage the surface, create a slipping hazard, and even put pressure on your home's foundation. The industry standard is to create a slope that drops 1/4 inch for every one foot of distance, angled away from your house.

    The easiest way to set this slope is with stakes and string lines. Place stakes at opposite ends of the patio and run a line between them. Use a line level to get the string perfectly horizontal, then lower the string on the "downhill" side by the required amount. For example, on a 12-foot-wide patio, you would lower the string by 3 inches (12 feet x 1/4 inch). This string becomes your perfect guide for grading both the gravel and sand layers.

    The Final Sand Setting Bed

    After your gravel sub-base is fully compacted and graded to the right slope, the very last layer before the pavers go down is the setting bed. This is just a 1-inch thick layer of coarse sand. Its job isn't structural; it just provides a smooth, easily workable surface to set the pavers into and helps accommodate any minor differences in their thickness.

    To get this layer perfectly flat, use a technique called "screeding." Lay two pipes or straight rails on top of your compacted base, making sure they’re set to the right height and slope. Pour sand between them, then pull a straight 2×4 across the tops of the rails to screed off the excess. You'll be left with a perfectly smooth bed. Carefully remove the rails and fill in the gaps with a little more sand.

    If you opt for poured concrete, the foundation process is pretty similar. Building a concrete patio often starts with excavating 6-8 inches and installing a 4-inch compacted gravel base. Forms are set, and adding wire mesh reinforcement can cut the risk of cracking by 50%. That same slight slope of 1/4 inch per foot is also crucial to avoid the puddles that can plague flat concrete pours. You can discover more insights about this process on datainsightsmarket.com.

    Installing Your Patio Surface Like a Pro

    Now for the fun part. With your foundation perfectly prepped and ready to go, you've hit the most rewarding stage of the whole project—installing the patio surface. This is where your vision finally starts looking like a real patio, whether you're laying beautiful pavers one by one or smoothing out a fresh slab of concrete.

    Taking your time here is what separates an okay job from a professional one. The techniques are different depending on your material, but the core idea is the same: work methodically, check your levels constantly, and don't rush the details. Every stone you set is a tangible reward for all that digging and hauling.

    Laying Pavers With Precision

    Think of laying pavers like putting together a heavy, interlocking puzzle. It’s a systematic process where every single piece has to be perfectly seated to get that clean, uniform look.

    First up is the sand bed. Once you've spread your sand, you need to create a perfectly flat surface for the pavers to sit on. The technique for this is called screeding. You'll lay two parallel pipes across your compacted gravel base, making sure they're set to the exact slope you need for drainage. Then, you just pull a straight 2×4 across the tops of those pipes, scraping away any excess sand. What's left is a flawless, smooth bed.

    With that done, you're ready to start laying pavers.

    • Pick Your Pattern: For beginners, a classic running bond is a good starting point. If you're feeling a bit more ambitious, a herringbone pattern not only looks fantastic but also provides a stronger structural interlock.
    • Start From a Fixed Edge: Always begin laying your pavers against a hard, straight edge, like the foundation of your house or the side of your driveway. Work your way out from there.
    • Place, Don't Slide: This is a big one. Gently place each paver straight down into the sand. If you slide them into place, you'll mess up the smooth bed you just worked so hard to screed.
    • Tap and Check: Give each paver a gentle tap with a rubber mallet to set it firmly into the sand. Keep a level handy and check your work constantly—both along individual pavers and across larger sections.

    This diagram shows the crucial foundation work that has to happen before you even think about laying that first paver.

    Diagram illustrating the three steps of patio foundation: dig, gravel, and compact.

    Getting these base layers right is what ensures the pavers you're laying now will stay put for years to come, without sinking or shifting.

    Installing Edge Restraints to Lock It All In

    Edge restraints are the unsung heroes of a long-lasting paver patio. They create a rigid border that stops the outside pavers from creeping outward under the pressure of foot traffic and freeze-thaw cycles. Seriously, don't skip this step.

    These plastic or metal strips get installed around the entire perimeter of your patio. You'll want to drive long landscape spikes through them and down into the compacted gravel base to secure them. Once the restraints are in, your whole paver system is locked together, creating a strong, unified surface that won't go anywhere.

    Pouring and Finishing a Concrete Patio

    Decided on a poured concrete patio instead? The process is totally different but requires just as much attention to detail. Once your forms and gravel base are in place, it's time to add some muscle. Laying a grid of wire mesh or rebar inside the form is absolutely critical. It gives the slab massive tensile strength and is your best defense against major cracking down the road.

    When it's time to pour, you need to work fast, so make sure you have a few extra sets of hands ready to help. Get the concrete spread evenly throughout the forms as quickly as you can.

    The real craft comes in the finishing stages:

    1. Screeding: Right after the pour, use a long, straight 2×4 to level the concrete. Rest the board on top of your forms and pull it toward you with a back-and-forth sawing motion.
    2. Floating: Next, use a bull float (or a smaller magnesium float for tight spots) to smooth the surface. This pushes the heavier aggregate down and brings the finer cement "cream" to the top, giving you a smoother canvas to work with.
    3. Broom Finish: Wait until the watery sheen disappears from the surface, then lightly drag a clean push broom across the slab in one direction. This creates a subtle texture that's essential for a non-slip finish.

    A quick pro-tip: Proper curing is what gives concrete its long-term strength. After the patio has set up, you need to keep the surface damp for several days. Lightly misting it with a hose or covering it with plastic sheeting slows down the hydration process, resulting in a much tougher, more durable slab.

    Applying the Finishing Touches to Your New Patio

    An illustration of a broom sweeping dirt and splashing water on a tiled patio floor, with a table and chairs in the background.

    Alright, the heavy lifting is done. Now it’s time for the final details that take your project from a construction site to a true outdoor living space. These last few steps are all about locking in your hard work, protecting your investment, and setting the stage for years of backyard enjoyment. This is where your vision really comes to life.

    Think of this part as adding the professional polish. From securing the paver joints to sealing the surface, these actions ensure your brand-new patio is durable, low-maintenance, and ready for furniture.

    Locking Pavers with Polymeric Sand

    If you've built a paver patio, this step is an absolute must. Polymeric sand isn't just regular sand; it's a fine sand mixed with a special polymer that acts like a strong binding agent when you add water. It hardens up to create a firm, flexible joint that locks your pavers together, stops weeds from poking through, and prevents ants from making a home between the cracks.

    Getting the application right is key:

    • Start Bone-Dry: First and foremost, the pavers have to be completely dry. Any moisture on the surface can activate the sand too early, leaving a permanent, hazy film on your new pavers.
    • Sweep It In: Pour the sand out and use a push broom to work it into every single joint. Make sure you sweep from a few different angles to get those joints packed tight all the way to the top.
    • Compact & Refill: You'll want to run a plate compactor over the pavers one last time. This helps the sand settle deep into the joints. You'll likely see some gaps appear, so just sweep more sand in to top them off.
    • Blow It Clean: Grab a leaf blower on its lowest setting and carefully clear off every last grain of sand from the paver surfaces. Be obsessive about this part—any sand left on top will stain when you add water.
    • Gentle Shower: Finally, set your hose nozzle to a light "shower" setting. Gently mist the entire patio. You want the water to soak in and activate the polymers, not blast the sand out of the joints.

    Polymeric sand is a strong defense against the most common paver patio annoyances. Taking the time to apply it correctly will save you hours of weeding and maintenance down the road, keeping your patio looking clean and stable.

    Protecting Your Investment with a Sealer

    Whether you went with pavers, concrete, or flagstone, applying a quality sealer is just plain smart. A good sealer protects the surface from stains (think spilled drinks or greasy food), deepens the color, and makes cleaning up a breeze. It also acts as a shield against moisture and UV rays, which are the main culprits behind fading and wear over time.

    You'll need to be patient, though. Wait at least 30 to 60 days after installation before you seal anything. This allows any efflorescence (that chalky white stuff that can appear) to work its way out. As always, read and follow the manufacturer’s instructions to the letter, as every product is a little different.

    Furnishing Your New Outdoor Room

    Now for the fun part—turning that slab of stone or concrete into a true extension of your home. Choosing the right outdoor furniture is what makes the space both comfortable and truly usable. Start by thinking about how you plan to use the area. Is this your new spot for morning coffee, big family dinners, or just lounging with a good book?

    You’ll want to look for durable materials like aluminum, teak, or all-weather wicker that can handle the Georgia climate without falling apart. When you visit us at the store, you can actually sit in the chairs, feel the fabrics, and see the quality for yourself. Our team can help you map out a layout that makes the most of your new space, whether you’re dreaming of a cozy sectional around a fire pit or a big dining table that’s ready for a party.

    Common Questions About Building a Patio

    Even the most detailed guide can't cover every single question that pops up during a big project like building a patio. Let's tackle some of the most common things homeowners ask when they're getting ready to transform their backyard. Think of this as a quick-fire round to give you confidence as you get started.

    How Long Does It Take to Build a Patio Myself?

    The timeline for a DIY patio really boils down to three things: the size of your patio, the material you’re using, and your own experience level.

    For a pretty standard 200-square-foot paver patio, you should block off at least two full weekends of hard work. Don't underestimate the prep work; the first weekend is almost always eaten up by excavation and building the base. That's the most back-breaking part of the whole job.

    Your second weekend will feel more rewarding as you get to the fun stuff: laying the pavers, making your cuts, locking it all in with edge restraints, and sweeping in the jointing sand. If you're new to this kind of project, I'd strongly suggest penciling in a third weekend. It's a smart buffer for any unexpected hiccups or a bout of bad weather.

    What Is the Best Way to Ensure Proper Drainage?

    Getting drainage right is absolutely non-negotiable for a patio that's built to last. It’s the single biggest factor in preventing water from pooling on top or, even worse, flowing back toward your house's foundation.

    The secret is to build a very slight, consistent slope into the patio, directing water away from your home. The industry gold standard is a 1/4-inch drop for every one foot of distance. This grade is so subtle you'll never notice it when you're walking across the patio, but it's a game-changer for moving water effectively. You'll establish this slope when you're prepping the base, using string lines and a level to keep it consistent from one end to the other.

    A properly graded patio is the number one defense against water issues. Taking the time to get the slope right during the foundation phase will prevent major headaches for years to come.

    Can I Build a Patio on Uneven Ground?

    Yes, you can absolutely build a stunning patio on a sloped or uneven yard, but it’s going to require more site prep. You can't just lay pavers down and follow the existing contours of a hill.

    The right way to do it is to create a perfectly level and stable area by digging into the high side of the slope and using that soil to build up the low side. This technique is often called "cut and fill." For anything more than a gentle grade, this will almost always mean you need to build a small retaining wall on the downhill side. This wall is critical—it’s what holds all that base material in place and prevents your patio from sliding. It adds a bit of complexity, but the end result can be a gorgeous, functional terraced space.

    What Are the Most Common DIY Patio Mistakes?

    After seeing countless projects over the years, a few rookie mistakes pop up time and time again. By far, the most critical error is inadequate base preparation. Skimping on the depth of your gravel base or failing to compact it thoroughly is a recipe for disaster. It will lead to a patio that sinks and becomes a lumpy, uneven mess.

    Another common slip-up is forgetting to build in that crucial slope for drainage, which leads to puddles and potential water damage. Lastly, many first-timers forget to install proper edge restraints around their paver patio. Without them, the pavers have nothing to push against, and they'll slowly spread apart, creating ugly gaps. If you focus your energy on getting these foundational steps right, you'll end up with a patio you can be proud of for decades.


    Now that your patio is built, it's time for the best part: turning it into an inviting outdoor room for you and your family. At Woodstock Furniture & Mattress Outlet, our team can help you find outdoor furniture to match your style and make the most of your new space. Visit us to see our full selection of outdoor furniture in person.

  • When Is the Best Time of Year to Buy a Mattress?

    When Is the Best Time of Year to Buy a Mattress?

    If you’ve ever wondered when the best month to buy a mattress is, the general wisdom points to two key windows during the year. You can often find great value in late spring around May and again in late fall during November.

    These aren't just random months; they're tied to the natural rhythm of the mattress industry.

    The Best Times of Year to Shop for a Mattress

    Knowing the seasonal flow of the mattress world can help you time your purchase. Instead of just looking for holiday promotions, it helps to understand why certain months are better than others for mattress shopping.

    Think of it like a car dealership. They need to clear out last year's models to make room for the new ones rolling onto the lot. The mattress industry works in a very similar way, just on a slightly different schedule. This cycle creates two prime seasons where you can find excellent value without sacrificing quality.

    By getting a feel for these industry patterns, you can walk into a store as an informed shopper, ready to make a great decision for your sleep and your budget.

    Why May and November Stand Out

    So, what’s the logic behind May and November? It really boils down to two things: new product launches and major shopping holidays.

    • Late Spring (May): This is when many mattress manufacturers roll out their new models for the year. To make space on the showroom floor for the latest designs, retailers need to move the previous year's inventory. These outgoing models are still brand-new, high-quality mattresses, but they are often priced to sell to make way for new arrivals.

    • Late Fall (November): This window is influenced by the major holiday shopping season. While it’s not specific to mattresses, the increased retail activity during events like Black Friday and Cyber Monday means retailers across the board are presenting compelling offers to earn your business. This creates a market dynamic that’s favorable for the shopper.

    This timeline gives you a bird's-eye view of the two key shopping windows driven by new model releases and the big holiday retail cycles.

    As you can see, both late spring and late fall offer their own unique opportunities based on the natural ebb and flow of the mattress world.

    To make it even simpler, here's a quick breakdown of what makes each season a good time to shop.

    Mattress Shopping Seasons at a Glance

    Month Primary Reason What to Expect
    May New Model Year Rollouts Good value on last year's models to clear showroom space. Think of it as a "model-year clearance."
    November Holiday Shopping Season Competitive pricing and broader retail events like Black Friday and Cyber Monday.

    This table sums it up nicely. Whether you're looking for value on an outgoing model or capitalizing on holiday retail activity, both months can offer a strategic advantage.

    Planning Your Purchase with Confidence

    Knowing these seasonal trends helps you plan your purchase without feeling rushed into a decision. If your current mattress is holding up and you can afford to wait, timing your shopping trip around these windows can be a smart move.

    However, the most important factor is always your own sleep quality. A worn-out mattress that’s causing you aches, pains, or restless nights needs to be replaced as soon as you can, regardless of what the calendar says.

    The real goal here is finding the right mattress—one that gives you the support and comfort you need for truly restorative sleep. Think of your purchase as a long-term investment in your health, because that’s exactly what it is.

    At the end of the day, being aware of these industry patterns just gives you more power as a shopper. It lets you line up your own needs with the market’s rhythm, helping you make a confident, well-informed choice. Whether you decide to shop in May, November, or any other time, understanding the "why" behind the calendar helps you navigate the process with more clarity and less stress.

    Why Late Spring Is a Great Time to Look

    While you can find mattress deals throughout the year, late spring—especially around May—is a notable time for shoppers. This isn't just about a single holiday. It's about a predictable cycle in the mattress world that you can use to your advantage.

    The biggest driver here is the annual rollout of new mattress models. Think of it like the car industry; mattress manufacturers often launch their latest designs in the late spring and early summer. When they do, retailers face a simple logistical problem.

    They need to clear the showroom floor to make space for the incoming inventory. This creates a great opportunity for anyone who wants to find a high-quality mattress at a good value.

    The Model-Year Analogy

    The easiest way to understand this is to go back to that car comparison. When new 2025 models arrive at the dealership, what happens to the 2024 models still on the lot? They suddenly become a priority to sell. That 2024 car is still brand-new and packed with great features. It just isn't the very latest version.

    The exact same thing happens with mattresses. A mattress from last year's collection isn't old or used—it's a factory-fresh product with proven technology that's already given countless people a great night's sleep. If you value established quality over having the absolute newest feature, this can be a great time to shop.

    You get quality materials and construction at a more wallet-friendly price, simply because it's making way for its successor.

    Weighing Your Options: New vs. Established

    So, do you go for the brand-new model or the outgoing one? It's really just a simple trade-off. Here’s how to think about it:

    • Outgoing Models (The "2024 Car"): This is often where you'll find excellent value. You're getting a high-quality, brand-new mattress with proven tech at a lower cost.
    • New Models (The "2025 Car"): These will have the latest innovations—maybe a new cooling gel, a more advanced support system, or an updated look. This is the move if you want the absolute cutting edge.

    There's no wrong answer here; it all boils down to what you prioritize. If your budget is a major factor, looking for last year's models in late spring is a sound strategy.

    The key takeaway is that "new" doesn't automatically mean "better for you." A mattress from the previous year’s collection, especially from a reputable brand, is still a significant upgrade over a worn-out bed and often provides exceptional comfort and support.

    Market Dynamics in May

    The timing around May is also important because of how people shop. As summer approaches, many families get into a home-refresh mindset, and upgrading the bedroom is often high on the list. This sparks competition between retailers.

    In fact, some interesting mattress sales statistics show that while the number of mattresses sold can spike in the second quarter, average prices often dip because retailers are competing for your business. This creates a good opportunity for finding value on quality brands like Tempur-Pedic or Stearns & Foster.

    Ultimately, knowing how the late spring market works puts you in the driver's seat. You're not just hoping for a discount; you're shopping with a clear strategy, knowing that great value can be found on high-quality, established models that need to make way for new inventory.

    Understanding the November Mattress Market

    As the leaves change and the year starts to wind down, November rolls in as another good time for mattress shopping. This isn't just about stumbling upon a deal; it's about understanding what's happening behind the scenes in the retail world. The entire market kicks into high gear this month, and all that extra activity and competition can create a favorable environment for shoppers.

    Instead of getting swept up in holiday noise, a smart approach is to see this period for what it really is: a time when retailers are looking to finish the year strong and clear out inventory before new products arrive. This creates a natural opportunity for value, driven by simple supply and demand. Knowing this helps you approach the market strategically, making a choice that fits your timeline and your sleep needs.

    Why November Is a Key Shopping Month

    The retail activity in November is a powerful force. Retailers aren't just competing with each other; they're also deep into planning their inventory for the year ahead. This two-pronged pressure often results in a consumer-friendly marketplace where finding good value is common.

    Think of it as the grand finale of the retail calendar. Stores are looking at their annual numbers and making a final push to hit their goals. For a major purchase like a mattress, this can mean the entire value proposition—the blend of product quality, customer service, and price—is often at its peak.

    The Inventory Reset Cycle

    Much like late spring is all about making room for new models, late fall is about clearing the decks for the new year. By November, retailers have a clear picture of which models have been popular and which ones need to go to make space. This end-of-year inventory shuffle is a huge reason why November stands out.

    This cycle opens up opportunities across a range of products, from popular innerspring mattresses to the latest memory foam and hybrid options. It’s a chance to explore different brands and technologies, knowing that the market is tilted in your favor.

    The real goal is to see past the calendar hype and recognize the real business reasons that make this month a strategic time to shop. It’s less about a specific date and more about the overall market climate.

    Data from the global mattress market backs this up, showing that the fourth quarter often sees a major spike in sales. With millions of mattresses sold every year in the U.S., this seasonal pattern is a sure thing. Retailers, including us here in North Georgia, adjust their approach to meet this demand, often by moving existing stock to get ready for what’s next. You can dive deeper into these market trends in this detailed report from Allied Market research.

    Making an Informed Decision

    At the end of the day, the best time to buy a mattress is when you truly need one. But if you have some flexibility, understanding the November market can help you make a more confident and strategic choice.

    Here are a few things to keep in mind:

    • Focus on Your Needs First: Before you even look at a calendar, figure out what you need. Are you looking for better back support? More pressure relief? Something with cooling tech?
    • Do Your Research: Get to know the types of mattresses you’re interested in—hybrid, memory foam, innerspring—and the brands that make them.
    • Test in Person: No matter when you buy, this is a very important step. You have to test a mattress in person. Lie down in your go-to sleeping position for at least 10-15 minutes to get a true feel for it.

    By approaching the November shopping season with a clear plan and a solid understanding of what you need, you can easily tune out the noise and focus on what really matters: finding the right mattress for a great night's sleep.

    How to Find Value Any Time of Year

    While the big holiday weekends in May and November get a lot of attention, the truth is, a bad night’s sleep doesn’t care what month it is. If your mattress is giving you back pain or you’re just tossing and turning all night, the right time to replace it is now.

    Waiting for a specific time of year can mean weeks or even months of poor rest, and that takes a toll on your health.

    The good news is, you don’t have to wait to find good value. It’s less about timing the calendar perfectly and more about knowing where to look and what to ask for. If you shift your focus from seasonal events to the fundamentals of mattress shopping, you can walk away with a great mattress any day of the year.

    Look Beyond the Newest Models

    One of the easiest ways to find a hidden gem is to ask about floor models or recently discontinued lines. It’s the same idea as the end-of-model-year clearances in May, just on a smaller, year-round scale.

    • Floor Models: These are the mattresses that have been out on our showroom floor for customers to try out. They’re often sold at a discount to make room for new inventory. They've been gently tested, but they've got tons of life left and you get them for a much lower price.

    • Discontinued or Clearance Items: Sometimes a manufacturer will update something small, like the cover fabric or a single foam layer, which makes the previous version "obsolete." These outgoing models are still brand-new and factory-sealed—they just need to be cleared out.

    A simple question like, "Do you have any floor models or clearance mattresses in a medium-firm?" can unlock some good options.

    Prioritize the In-Store Comfort Test

    No matter what time of year it is, the single most important thing you can do is test a mattress in person. You have to lie down on it for at least 10-15 minutes in the position you actually sleep in.

    It’s the only way to really know if it’s giving you the right support for your spine and taking the pressure off your hips and shoulders.

    This completely removes the guesswork. A mattress can look perfect online, but it might feel all wrong for your body. An in-store visit is a non-negotiable step to make sure your investment actually leads to better sleep.

    A great price on the wrong mattress is never a good value. The ultimate goal is to find the right intersection of comfort, support, and budget—and that process begins with a real-world comfort test.

    This is true for any mattress you buy. It doesn't matter if you're looking for a king-size for your own bedroom or trying to find the best mattress for a toddler bed, where things like proper firmness and safety are critically important.

    Build a Relationship with a Sleep Expert

    Beyond the mattress itself, the real value comes from getting solid advice. Working with a knowledgeable, non-commissioned sleep expert can completely change your shopping experience for the better.

    They do more than just point you toward a specific model. They listen to your specific problems—whether you sleep hot, get woken up by a restless partner, or deal with chronic pain—and help you find a mattress with the features to solve them.

    A helpful sleep expert can:

    • Explain the real-world difference between memory foam, latex, hybrid, and innerspring mattresses.
    • Help you navigate all the different firmness levels to find the one that’s just right for your sleep position.
    • Introduce you to options you might not have even considered, like an adjustable base to help with snoring or acid reflux.

    This kind of relationship-based approach ensures you’re not just buying a product, but investing in a real solution for your sleep. Here at Woodstock Furniture & Mattress Outlet, our team is trained to be your guide. We’re focused on educating you so you can make a good long-term decision for your own health and happiness.

    Why the In-Store Experience Matters

    Knowing the best month to buy a mattress gives you a strategic edge, but it's only one piece of the puzzle. Online research is a fantastic place to start, but it simply can’t replace the single most important step in finding the right mattress: feeling it for yourself. Think of an in-store visit as the final, critical piece of your research, the part where abstract product descriptions turn into real-world comfort and support.

    It’s a lot like buying a pair of shoes. You can read all the reviews and admire photos online, but you’ll never really know if they fit until you try them on and walk around a bit. A mattress is a far more complex and personal purchase, making that hands-on experience even more crucial for your long-term satisfaction.

    The Limits of Online Shopping

    Shopping for a mattress online is undeniably convenient, but that convenience comes with a huge trade-off—you can’t physically test the product. Words like "plush," "medium," or "firm" are totally subjective and can feel completely different from one brand to the next. One company's "medium-firm" might feel like another's "firm," leaving you guessing which one is truly right for your body.

    Sure, returns are often possible, but they can be a logistical headache. The goal isn’t to find a mattress you can simply send back; it’s to find the right one on the very first try. An in-store comfort test is your best tool for getting it right and avoiding that hassle.

    Translating Sleep Problems into Solutions

    This is where the guidance of a knowledgeable sleep expert becomes invaluable. A great mattress salesperson isn't there to pressure you; they’re there to be your translator. They have the experience to take the sleep problems you're describing and connect them to specific mattress features that can actually help.

    For instance:

    • "I always wake up with lower back pain." An expert might immediately guide you to a hybrid mattress with zoned support, which provides extra firmness right under your hips to keep your spine properly aligned.
    • "My partner's tossing and turning wakes me up." They would likely show you memory foam or pocketed coil mattresses, both known for their excellent motion isolation.
    • "I sleep incredibly hot." This would kick off a conversation about cooling technologies, like phase-change materials, gel-infused foams, or naturally breathable latex.

    This level of personalized guidance is something you just can't replicate online. It turns what could be a confusing shopping trip into a collaborative, problem-solving session focused entirely on your unique needs.

    A mattress showroom isn’t just a store; it’s a laboratory for your sleep. It’s a place where you can directly compare different materials and firmness levels to discover what your body actually prefers, not just what a website claims is best.

    The Importance of a Proper Comfort Test

    When you do visit a store, it’s crucial to test out the mattresses the right way. Don't just sit on the edge or give it a quick push with your hand. You need to simulate how you actually sleep at home.

    Here’s how to do it effectively:

    1. Wear Comfortable Clothes: You want to be able to move freely and really relax.
    2. Lie Down for 10-15 Minutes: This gives your body enough time to settle in and for you to feel the true support and pressure relief the mattress offers.
    3. Assume Your Sleep Position: Whether you're a side, back, or stomach sleeper, get into that position to see how the mattress contours to your body and supports your spine.
    4. Move Around: Try changing positions. Is it easy to move, or does the mattress make you feel a bit stuck?

    This hands-on process is the only way to be confident that the mattress you choose will feel just as good in your bedroom as it does in the showroom. Visiting a place like the Woodstock Furniture & Mattress Outlet Sleep Center allows you to compare top brands like Tempur-Pedic, Stearns & Foster, and Sealy side-by-side, making your final decision that much easier and more informed.

    Got Questions About Mattress Shopping? We’ve Got Answers.

    Even after you've learned about the best time to buy, a few practical questions always seem to pop up. It's totally normal. Getting straight answers is the final piece of the puzzle, giving you the confidence to make a great decision.

    This section tackles the most common questions we hear from shoppers every day. We want to give you straightforward, helpful info to get you across the finish line on your journey to better sleep.

    Is It Better to Buy a Mattress Online or In-Store?

    This is a common question, and honestly, it all comes down to trade-offs. Shopping online is undeniably convenient. You’ve got a massive selection at your fingertips and most companies offer at-home trial periods.

    But there’s a catch: you can’t actually try the mattress before you buy it. What looks amazing online might not feel right for your body. And while you can usually return it, coordinating a mattress return can be a real headache.

    That’s where shopping in-store shines. You get the all-important “comfort test.” You can lie down, feel the difference between memory foam and a hybrid, and really compare firmness levels for yourself. This simple, hands-on step dramatically cuts the risk of picking the wrong bed. The right choice really just depends on what you value more: pre-purchase confidence or at-home convenience.

    How Much Should I Expect to Spend on a Good Mattress?

    Mattress prices are all over the map, depending on the size, brand, and what’s inside. A quality queen mattress can run anywhere from several hundred to several thousand dollars. It really helps to know what you’re getting for your money at each level.

    • Entry-Level: This is where you'll find most of your basic innerspring models.
    • Mid-Range: This tier is packed with great memory foam and quality hybrid mattresses.
    • Premium-Level: The high end is where you’ll find advanced hybrid systems, natural materials like latex, or mattresses with special cooling and support tech.

    The best way to think about it is as an investment in your health. A great mattress can improve your sleep every single night for the next 7-10 years. That kind of impact on your daily energy and well-being is worth prioritizing.

    What Should I Look for When Testing a Mattress?

    To get the most out of your store visit, you need to go in with a game plan. Don’t just poke the mattress or sit on the edge for a second. You need to simulate a real night's sleep as best you can.

    First, wear comfy clothes. Plan to spend at least 10-15 minutes on any mattress you’re seriously considering. Lie down in the position you actually sleep in—back, side, or stomach. Pay close attention to how it supports your spine and if it relieves pressure on your hips and shoulders.

    A few other things to check: See how easy it is to roll over and change positions. If you share the bed, have your partner move around to test for motion transfer. And definitely sit on the edge to make sure it feels sturdy and supportive.

    Are Holiday Weekends Always the Best Time to Buy?

    Holiday weekends like Memorial Day and Labor Day are known for mattress promotions, but it's smart to look at the bigger picture. The activity around these events can sometimes create a sense of urgency.

    A retailer focused on consistent, fair value will often have comparable pricing all year long, without the high-pressure countdowns. The most important thing is to do your homework on the specific mattress that’s right for you.

    Let your need for better rest—not a date on the calendar—drive your timeline. And while you’re figuring out the best time to invest in your comfort, remember that the mattress is just one part of the equation. You can take your sleep to the next level by exploring top natural remedies for better sleep. Taking this kind of holistic approach ensures your entire sleep environment is set up for success.


    At Woodstock Furniture & Mattress Outlet, our goal is to help you find the right sleep solution, any day of the year. Our team is here to offer expert guidance without the pressure, making sure you find a mattress you’ll love for years. Come visit one of our North Georgia locations and experience the difference for yourself.

    Explore our mattress selection and find your perfect fit

  • What Size Is a King Bed? Your Complete Dimensions Guide

    What Size Is a King Bed? Your Complete Dimensions Guide

    If you've ever asked, "what size is a king bed?", you're not alone. The simple answer is that a standard king bed is 76 inches wide by 80 inches long.

    A helpful way to visualize this is to picture two Twin XL mattresses sitting side-by-side. Put them together, and you have the exact footprint of a standard king. This generous width is precisely why it’s a popular choice for couples who want more personal space.

    Understanding Standard King Bed Dimensions

    A standard king mattress, which you'll sometimes hear called an Eastern King, is one of the widest mattress sizes you’ll typically find. That expansive surface gives each sleeper 38 inches of personal space. To put that in perspective, that's a significant upgrade in elbow room compared to what a full or queen mattress can offer. This makes it a great mattress for couples who value stretching out without bumping into their partner all night.

    The king bed became more common during the post-WWII suburban boom in the 1950s and 60s. As American homes became larger, so did the desire for more spacious furniture. The king bed fit that need well and has remained a popular option for master bedrooms ever since. If you're curious, you can find some interesting information on how mattress sizes evolved and became standardized over the years.

    Standard King Bed Dimensions at a Glance

    To make it even easier to picture how a king bed will fit in your space, we've put together this quick reference with all the key numbers.

    Measurement Inches Feet Centimeters
    Width 76" ~6.33 ft ~193 cm
    Length 80" ~6.67 ft ~203 cm
    Surface Area 6,080 sq. in. ~42.2 sq. ft ~39,174 sq. cm

    Having these measurements handy will be very useful when you're taping out the floor of your bedroom or shopping for a new bed frame.

    Comparing a King Bed to Other Mattress Sizes

    Knowing the exact dimensions of a king bed is a great start, but those numbers only tell part of the story. To get a feel for how it works in a real room, it helps to compare it to other popular sizes, like the Queen and California King. Understanding these trade-offs is key to picking a mattress that fits your life.

    A standard king mattress offers the most width available in standard mattress sizing. That makes it an excellent choice for couples who prefer their own personal space. If you find yourself sharing the bed with kids or pets, that extra real estate can be the difference between a restless night and a peaceful one.

    King vs. Queen: The Width Factor

    The most noticeable difference between a king and a queen is the width. A king bed is a full 16 inches wider than a queen. While they’re both the same length (80 inches), that extra foot-and-a-half of side-to-side space on a king is like giving each person their own Twin XL mattress to sleep on. For many, that's a significant improvement in comfort.

    On the other hand, a queen bed, at 60 inches wide, is often a more practical choice for smaller master bedrooms. It still provides ample space for a single sleeper and is usually comfortable for couples who don't mind sleeping closer together.

    King vs. California King: Length vs. Width

    This is where things can get a little confusing for shoppers, so let's clear it up. A California King is not wider than a standard king. In fact, it’s actually four inches narrower, measuring 72 inches across. The trade-off is that it’s also four inches longer, hitting 84 inches from head to toe. This makes it a great mattress for taller folks (usually over 6 feet tall) who are tired of their feet dangling off the end of the bed.

    The decision really boils down to this: a standard king is built for more width, while a California King is built for more length. Pick the one that solves your biggest sleep problem.

    It’s an interesting bit of history that the California King was introduced back in the 1960s to offer a longer option for taller individuals, providing 7% more length than a standard king. You can read more about the history of mattress standardization and its impact if you're curious!

    For our North Georgia customers, we're seeing more people pair spacious king mattresses from brands like Helix or DreamCloud with adjustable bases. They can be helpful for improving circulation and easing back pain.

    This diagram gives you a simple, clear look at a standard king bed's measurements.

    A diagram illustrating the standard width and length dimensions for a King size bed.

    As you can see, that 76-inch width is the defining feature that delivers its roomy feel, especially for couples.

    To make comparing sizes even easier, we've put together this simple chart.

    Mattress Size Comparison Chart

    Mattress Size Dimensions (Inches) Surface Area (Sq. Inches) Best For
    Twin 38" x 75" 2,850 Children, single adults in small spaces
    Twin XL 38" x 80" 3,040 Taller children, college dorms, single adults
    Full 54" x 75" 4,050 Single sleepers who want more width
    Queen 60" x 80" 4,800 Single sleepers, couples, guest rooms
    King 76" x 80" 6,080 Couples who value personal space, families
    California King 72" x 84" 6,048 Taller individuals and couples (over 6')

    Seeing the numbers side-by-side really helps put the sheer size of a king mattress into perspective.

    Will a King Bed Fit in Your Bedroom?

    We see it all the time. A customer loves the spacious feel of a king mattress, only to get it home and realize it swallows their bedroom. A common pitfall when buying a king bed is underestimating its sheer size. A little planning upfront can save you a ton of hassle and keep your bedroom feeling like a peaceful retreat, not a cluttered obstacle course.

    As a good rule of thumb, your bedroom should be at least 12 feet by 12 feet to comfortably house a king bed. This size generally gives you enough room for the bed itself, a couple of nightstands, and a dresser without making the room feel cramped.

    Floor plan sketch showing a 12x12 ft room with a King bed, clearances, and furniture.

    Measure Twice, Buy Once

    Before you start browsing, grab a tape measure. Accurately measuring your room is the one step you should not skip.

    Once you have your room's dimensions, here's a simple trick we always recommend: use painter's tape to mark out the bed's footprint (76 inches by 80 inches) on the floor. This gives you a powerful visual of exactly how much space it will take up. It's much more effective than just trying to picture the numbers in your head.

    Your goal is to leave at least 30 inches of clearance around the sides and foot of the bed. This is a good amount of space for comfortable walking paths and for opening drawers or closet doors without having to squeeze by.

    That clearance is what keeps your bedroom functional. Anything less, and the room starts to feel difficult to navigate. If you want to get a better sense of your layout without the guesswork, you can even use a home design AI tool to get a clear preview of your new bedroom setup.

    Choosing the Right Frame and Foundation

    A great mattress is only half the equation for a good night's sleep; what’s underneath it is just as important. The right support system isn't just for looks—it plays a huge role in how your mattress performs and how long it lasts. Let's make sure your entire bed setup works together.

    Your frame or foundation choice should fit both your mattress type and your lifestyle. For example, most memory foam or hybrid mattresses sold today work well on a solid platform bed. This setup gives them the firm, even support they need to feel their best.

    Common Foundation Types for a King Bed

    When it comes to supporting your king mattress, you generally have three main options. Each one has its own set of benefits, and figuring out which one is right for you is a key step to building a comfortable bed.

    • Box Spring: This is the traditional choice, typically a fabric-wrapped wooden frame. For a king mattress, you'll almost always see a "split" foundation, which is just two separate Twin XL-sized boxes placed side-by-side. This design makes it much easier to navigate tight corners, stairwells, and doorways during delivery.

    • Platform Bed: These beds have a built-in solid or slatted surface, which means you don't need a separate box spring. They offer a clean, modern look and the kind of consistent support that memory foam and hybrid mattresses thrive on.

    • Adjustable Base: If you want more customizable comfort, an adjustable base lets you raise your head and feet with a remote. It's a great option for anyone who likes to read or watch TV in bed, or for those who need to sleep in a specific position to help with things like snoring or acid reflux.

    One of the biggest things to think about when it comes to a king foundation is just getting it into your house. A split foundation (two 38” x 80” bases) is the standard for a reason—trying to move a single 76” x 80” foundation through a doorway would be next to impossible for most people.

    Finding the Perfect Bedding for Your King Bed

    You’ve brought home your new king mattress, and now comes the fun part: dressing it up. But this is also where many people run into a common snag, especially when it comes to the difference between a standard king and a California king. We see this all the time. Just remember this one critical fact: their bedding is not interchangeable.

    It all comes down to their different shapes. A standard king is wider and a bit shorter (76" x 80"), while a Cal king is narrower but longer (72" x 84"). If you try to put a Cal king fitted sheet onto a standard king mattress, you'll find it's too narrow to fit and has frustrating extra fabric at the ends. The reverse is just as problematic; a standard king sheet will never stretch to cover the full length of a Cal king. Getting this right is the key to a snug, clean fit.

    Detailed diagram illustrating bed dimensions and various bedding components like fitted sheets and duvets.

    Tips for a Perfect Fit

    Beyond just grabbing the right "king" label off the shelf, a couple of tips can make a world of difference in how your bed looks and feels.

    • Check Mattress Depth: Today's mattresses come in all sorts of thicknesses, from sleek low-profile models to plush pillow tops. Before you buy a fitted sheet, always check the "pocket depth" listed on the packaging. This tells you the maximum mattress height it can handle, ensuring it wraps securely around the corners without popping off every time you move.
    • Consider Upsizing Your Comforter: For a luxurious, hotel-style vibe where the comforter drapes generously over the sides, consider buying your comforter or duvet one size up. Using a California king comforter on a standard king bed provides extra overhang for better coverage and a plush look.

    Paying close attention to these details isn't a new concept. While massive communal beds like the 11×11 foot Great Bed of Ware existed in the 16th century, the California King didn't show up until the 1960s to accommodate taller people. Even now, bed sizes vary across the globe, with places like New Zealand and Portugal having their own unique king dimensions. You can learn more about the fascinating history of bed sizes if you're curious.

    Common Questions About King Size Beds

    Even after you've done your homework, a few questions always seem to pop up when shoppers are trying to decide if a king bed is the right choice. Getting straight answers can make all the difference, so we've put together the most common questions we hear on our showroom floors to help you feel confident in your choice.

    Are a King and a California King the Same Size?

    No, and this is probably the single most common point of confusion we see. They are different. A standard king is wider and a bit shorter, clocking in at 76 inches wide by 80 inches long. This makes it a great choice for couples who value their personal space and don't want to bump elbows all night.

    A California king, on the other hand, flips those priorities. It's narrower but longer, measuring 72 inches wide by 84 inches long. That extra length makes it a helpful solution for taller folks who are tired of their feet dangling off the end of the bed. Just remember to buy the right sheets and frame for whichever one you choose!

    Can I Use Two Twin XL Mattresses on a King Frame?

    Yes, you can! In fact, it's a popular and clever setup that we call a split king. When you place two Twin XL mattresses side-by-side, they measure 76" x 80" — the exact same dimensions as a standard king mattress.

    This is the go-to configuration for adjustable bed bases. It allows each person to raise or lower their side of the bed independently. So, if one of you wants to sit up and read while the other lies flat, a split king makes it happen.

    Key Takeaway: A split king offers customized comfort for couples. It's the standard solution for pairing a king size bed with an adjustable base, giving you a level of flexibility that a single mattress just can't match.

    What Is the Minimum Room Size for a King Bed?

    To keep your bedroom from feeling like it's all bed and nothing else, we generally recommend a room that's at least 12 feet by 12 feet. This usually gives you enough room for the bed and a couple of nightstands, plus the crucial 30 inches of clearance on both sides and at the foot of the bed. You'll want that walkway space for getting around without stubbing your toes or bumping into furniture.


    At Woodstock Furniture & Mattress Outlet, our team is always here to answer any other questions you might have and help you find the right sleep setup for your home. Feel free to visit one of our North Georgia locations to see these options for yourself.

    Explore Our Mattress Collection

  • Finding a Suitable Mattress for Side Sleepers

    Finding a Suitable Mattress for Side Sleepers

    Generally speaking, a good mattress for most side sleepers falls somewhere in the medium-soft to medium-firm range. This area usually gives the right mix of cushioning pressure relief for the shoulders and hips, while still being sturdy enough to keep the spine straight and help prevent morning backache.

    Why Your Sleep Position Shapes Your Mattress Needs

    If you’re one of the millions who curls up on their side at night, you may already know the struggle. You might spend half the night trying to find that one spot that doesn't make your shoulder go numb or your hip ache by morning. It’s not in your head—it’s just physics. When you lie on your side, your body's curves create significant pressure points, and a mattress that isn't a good fit can make it worse.

    Think of it like trying to fit a key into a lock. Your body has its own unique shape, especially with the pronounced curves at your shoulders and hips. A mattress that's too firm is like the wrong key; it doesn’t fit your shape, jamming up against those curves and creating painful pressure. On the flip side, a mattress that’s too soft lets you sink in too far, bending your spine out of alignment and causing a different kind of discomfort.

    The Goal: Pressure Relief Meets Support

    A well-suited mattress for a side sleeper is one that fits the body's contours just right, helping to unlock a restful night’s sleep. It needs to be soft enough to cradle your pressure points but supportive enough to hold your spine in a straight, neutral line. For side sleepers, getting this balance right is essential if you want to wake up feeling refreshed and pain-free.

    But finding this balance is about more than just picking a familiar brand name. It's about understanding how a few key factors work together to create the right sleep surface for you. These elements include:

    • Mattress Firmness: This is a major factor. It determines how much "give" the surface has.
    • Mattress Materials: From memory foam to latex to hybrid coils, different materials offer very different feels and benefits.
    • Your Body Type: Your own weight and shape will change how you interact with any mattress.

    At its core, the biggest challenge for a side sleeper is finding a mattress that can spread body weight evenly across the entire surface. If it can’t, the shoulders and hips are left to carry most of the load, which can lead to tossing, turning, and waking up sore.

    This guide is here to walk you through each of these pieces of the puzzle. Our goal is to give you clear, honest information and take the confusion out of the mattress buying process. Once you understand what your body actually needs, you’ll be able to confidently choose a mattress that can give you lasting comfort and truly support the way you sleep.

    Decoding Mattress Firmness for Side Sleepers

    When you're trying to find a suitable mattress for side sleeping, firmness isn't just a matter of personal preference—it's one of the most important keys to a night of pain-free rest. Think of firmness as the amount of "push back" a mattress gives your body. The goal here is to find one that balances this pushback with a gentle, cradling feel.

    Go too firm, and your shoulder and hip will feel like they're jammed against a board, unable to sink in at all. This can force your spine out of alignment and is a classic recipe for waking up with sore joints and a stiff lower back. But swing too far the other way with a mattress that's overly soft, and your heavier hips will sink way too deep, causing your spine to curve downward like a hammock.

    Finding the Right Balance

    For the vast majority of side sleepers, the ideal range is medium-soft to medium-firm. On the typical 1-10 firmness scale you see online, that usually translates to a 4 to 7.

    This range is often a "Goldilocks" solution. It's soft enough to cushion the widest parts of your body (your shoulders and hips), but it’s also firm enough to properly support your waist and lower back. This combination is what helps keep your spine in a straight, neutral line all night long.

    A lot of people think a firmer mattress automatically means better support. That’s a common myth. True support comes from proper alignment, not from sleeping on a rock-hard surface. A mattress that actually adapts to your body's curves is what provides genuine, restorative support.

    This visual guide breaks down the balancing act every side sleeper has to manage: finding a mattress that relieves pressure without sacrificing that essential spinal support.

    Flowchart guiding mattress selection based on body shape, pressure relief, and spinal alignment.

    As the chart shows, you need both cradling pressure relief and straight spinal support. For a side sleeper, these two things are equally critical for real comfort.

    How Body Weight Affects Firmness Needs

    Your body weight is a huge piece of this puzzle because it dictates how much pressure you put on the mattress. A bed is going to feel completely different to someone who weighs 120 pounds versus someone who weighs 220 pounds.

    Lighter folks may need a softer surface to get enough contouring, while heavier sleepers may need a firmer mattress to keep from sinking in too much and losing support. It's simple physics: more weight requires more resistance to get the right amount of sinkage and alignment. Understanding this relationship takes the guesswork out of the equation and helps you find a mattress that feels well-suited for you.

    The key takeaway here is that mattress firmness is not one-size-fits-all. Your body type is a major factor in determining which firmness level will give you the right mix of comfort and support when sleeping on your side.

    This is especially important because side sleeping is a very common position—some studies show that side sleepers make up around 60% of the population. This has pushed mattress companies to innovate, leading to models specifically designed to cradle those pressure points. For instance, testing from the Sleep Foundation has shown that medium-firm hybrid mattresses with zoned support can reduce shoulder sinkage by up to 25% compared to standard models. You can even review more detailed mattress testing results for side sleepers to see just how big of a difference the right construction and firmness can make.

    Firmness Recommendations by Body Weight

    To make this a bit more concrete, we’ve put together a general guide to help you zero in on your ideal firmness level.

    Mattress Firmness Guide for Side Sleepers by Body Weight

    This table should give you a solid starting point for finding a suitable firmness based on your approximate body weight.

    Body Weight Recommended Firmness (1-10 Scale) Why It Works
    Under 130 lbs 4-5 (Medium-Soft) Lighter individuals don't sink as deeply, so a softer mattress is often needed to allow the shoulders and hips to contour properly and relieve pressure.
    130 to 230 lbs 5-7 (Medium to Medium-Firm) This weight range aligns with standard firmness ratings. A medium feel offers a balanced blend of body-hugging comfort and robust spinal support.
    Over 230 lbs 7-8 (Medium-Firm to Firm) Heavier individuals may need a firmer surface to prevent sinking too far into the mattress, which could compromise spinal alignment and support.

    Remember, this is a guideline. Personal preference still plays a role, but this chart can get you much closer to finding a mattress that works well for your body and sleeping style.

    Comparing Mattress Materials for Pressure Relief

    Once you have a general firmness level in mind, the next step is to figure out which materials can deliver that feel. For side sleepers, this decision is all about one thing: pressure relief. You need a surface that can contour to your body's curves and spread your weight out evenly.

    Different materials get the job done in very different ways. Knowing what's inside a mattress gives you a good idea of what to expect in terms of feel, how long it will last, and even how hot or cool it will sleep. The goal here isn't to find a single "best" material, but to find the one that clicks with your own comfort preferences.

    Detailed diagram of a memory foam mattress cross-section with springs, latex layer, and comfort features.

    Memory Foam Mattresses

    Memory foam is known for its deep, body-hugging feel. When you lie down, it slowly softens in response to your body heat and weight, creating a cradle-like impression. This is incredibly effective at taking the pressure off your shoulders and hips.

    That slow-response sensation is exactly why memory foam is a go-to for side sleepers who complain about sharp pain points. It essentially absorbs pressure instead of pushing back against you.

    • Who it’s for: Side sleepers who want significant pressure relief and like a distinct "sinking in" or "hugged" feeling. It's also a great choice for couples because its dense structure is amazing at absorbing movement and preventing one partner from waking the other.
    • What to consider: A potential drawback of traditional memory foam is that it can trap body heat. However, many modern foams now include cooling technologies like gel infusions or perforated designs to improve airflow.

    Hybrid Mattresses

    Hybrid mattresses are a combination of materials. They typically combine a supportive core of innerspring coils with thick, comfortable layers of foam or latex on top. This construction gives you the benefits of both systems in a single mattress.

    You get the pressure relief and contouring from the top foam layers, but you also get the responsive support, bounce, and breathability from the coil base below. For a lot of side sleepers, this strikes a great balance that isn't too extreme in any one direction.

    A hybrid mattress is often an effective middle ground. It provides the deep cushioning a side sleeper’s joints need, while the coils help prevent that "stuck" feeling some people get from all-foam beds.

    That coil system also promotes much better airflow through the whole mattress, making hybrids a great pick if you tend to sleep warm.

    Innerspring Mattresses

    Traditional innerspring mattresses are built around a core of interconnected steel coils. While they are known for being bouncy, supportive, and often more affordable, they can sometimes cause problems for people who sleep on their side.

    The issue is that their comfort layers are usually quite thin, which means they don't always offer enough padding to properly cushion the hips and shoulders. A firm innerspring can sometimes create pressure points instead of relieving them.

    • Who it’s for: While not always the first choice for dedicated side sleepers, an innerspring might work for combination sleepers who only spend some of the night on their side. They're also an option for anyone who prefers a very firm, bouncy surface.
    • What to consider: If you're considering an innerspring, look for models with pocketed coils (where each spring is wrapped in its own fabric sleeve). They conform to your body much better and reduce motion transfer compared to older, interconnected spring systems.

    Latex Mattresses

    Latex mattresses are made from either natural or synthetic latex foam. They offer a totally different feel from memory foam's slow sink. Latex has a more buoyant and responsive contouring feel—it cradles your pressure points but has a gentle push-back that makes you feel like you're sleeping "on" the mattress, not "in" it.

    This material is also naturally breathable and very durable. For side sleepers who want pressure relief without the deep hug of memory foam, latex is an excellent alternative. It contours to your shape but still makes it easy to roll over and change positions during the night.

    Each of these materials comes with its own set of pros and cons. The only way to really know which one you'll prefer is to try them out. Visiting a showroom lets you compare these very different sensations side-by-side to find what feels best for your body.

    Essential Features for a Side Sleeper's Mattress

    Once you’ve got a handle on mattress firmness and materials, we need to talk about a few key features that can make or break your sleep. For side sleepers, these aren’t just industry buzzwords; they are practical solutions to waking up with a sore shoulder or an aching lower back.

    Knowing what these features are and why they matter will help you cut through the marketing fluff and focus on what’s actually going to give you a great night’s sleep. Each of these elements works together to create a sleep surface that adapts to your body, not the other way around. Let’s dive in.

    The Importance of Pressure Relief

    For a side sleeper, one of the most important jobs a mattress has is to provide excellent pressure relief. Think of it as the mattress’s ability to gently cradle the widest parts of your body—your shoulders and hips—to keep pain and stiffness at bay. When you lie on your side, those two spots bear the brunt of your body weight.

    Without enough pressure relief, all that force gets concentrated on those small areas. The result can be numbness, tingling, and aching joints in the morning. A mattress with good pressure relief spreads your weight out more evenly across the surface, effectively “hugging” your curves and stopping those pressure points from building up.

    This is exactly why materials like memory foam and latex are so popular with side sleepers. They are designed to contour and give way under pressure, providing that critical cushioning right where you need it most.

    The Foundation of Spinal Alignment

    Just as important as pressure relief is spinal alignment. Picture a straight line running from the base of your neck all the way down to your tailbone. A suitable mattress for a side sleeper will keep this line neutral and straight all night long.

    A huge part of what a quality mattress does is help you maintain proper posture while you sleep and keep spinal discs healthy. If a mattress is too firm, it can shove your hips and shoulders upward, causing your spine to bow uncomfortably. On the flip side, if it’s too soft, your midsection will sink way too deep, creating a hammock-like curve. Either way, you’re putting a ton of strain on your back muscles and setting yourself up for pain.

    The ideal mattress has enough support underneath to hold up your waist and lower back, while being soft enough on top to let your shoulders and hips sink in just the right amount.

    Other Important Features

    While pressure relief and alignment are the two pillars of comfort for side sleepers, a few other features can seriously upgrade your sleep experience—especially if you share the bed.

    • Zoned Support: Some mattresses have zoned support systems. This means the mattress is built with different firmness levels in different areas. Usually, it’s firmer in the center third to support the heavier lumbar area and a bit softer at the head and feet to cushion the shoulders and legs. This targeted design is an effective way to address both pressure relief and alignment in a single mattress.

    • Motion Isolation: If you have a partner, motion isolation is important. This is all about the mattress's ability to absorb movement on one side of the bed so it doesn’t travel to the other. Dense materials like memory foam are great at this, making sure your partner’s tossing and turning doesn’t disturb your sleep.

    • Edge Support: Strong edge support simply means the perimeter of the mattress is sturdy and stable. Good edge support is great for couples because it lets you use the entire surface of the bed without that feeling that you might roll off. It also makes getting in and out of bed easier.

    How to Properly Test a Mattress for Comfort

    Reading reviews and looking at specs online is a solid first step. But at the end of the day, there’s no substitute for actually lying on a mattress. Your body is the only true judge of whether a mattress has that just-right blend of soft comfort and firm support.

    Whether you're visiting a showroom or trying a bed in your own home, being intentional about how you test it can save you from a world of hurt. It's not about hopping on a few beds for thirty seconds; it's about giving your body a chance to really feel how the mattress responds. This is where all your research pays off.

    The In-Store Test Drive

    Walking into a showroom is your best chance to compare different materials and firmness levels side-by-side. A mattress that sounds like a dream on paper can feel totally wrong once you lie on it.

    To get the most out of your visit, treat it like you're test-driving a car:

    1. Wear Comfortable Clothes: You can’t get a real feel for a mattress in stiff jeans or a suit. Think sweatpants or athletic wear — something that lets you move and relax without feeling constricted.

    2. Assume Your Position: Don't just sit on the edge. Lie down in the exact same side-sleeping position you use at home. Get comfortable, just like you would if you were turning in for the night.

    3. Stay a While: This is the most important part. Your body needs time to settle in and really feel the mattress. Plan to spend at least 10 to 15 minutes on any mattress you're seriously considering. This is long enough to tell if your shoulder or hip starts to feel pinched or uncomfortable.

    4. Perform a Spine Check: If you're shopping with a partner or friend, have them take a look at your back while you're on your side. Your spine should be in a straight, horizontal line from your neck to your tailbone. If it's sagging or bowing, that mattress isn't giving you the support you need.

    The goal here is simple: see how the mattress feels right now. Does it immediately cradle your shoulder? Can you feel it supporting the curve of your waist? A few minutes of focused testing can tell you everything you need to know.

    Visiting a store with a large selection, like the Sleep Center at Woodstock Furniture & Mattress Outlet, is a huge advantage. You can feel the distinct differences between memory foam, hybrid, and latex beds all in one trip, and our sleep experts can help point you in the right direction.

    The At-Home Sleep Trial

    Even the best showroom test can't fully predict how you'll feel after eight hours of sleep. That's where at-home sleep trials come in. Many brands will give you several weeks—or even months—to sleep on their mattress in your own bedroom, often with a return or exchange option.

    This trial period is absolutely critical because every new mattress comes with an adjustment period. Your body has spent years getting used to your old bed, and it can take a couple of weeks to fully adapt to a new feel, even one that’s much healthier for you.

    Before you commit, always read the fine print on the sleep trial. Look for any fees for returns or exchanges. Think of the trial as the final step in your research—a no-pressure way to confirm you’ve made a good choice for years of comfortable sleep.

    Building Your Complete Sleep System

    A great mattress is the heart of a good night's sleep, but it’s really only one piece of the puzzle. If you want to get the most out of your new mattress, you need to think bigger and build a complete sleep system where everything works together in harmony. For side sleepers, the right pillow and foundation are just as critical as the mattress itself for waking up pain-free.

    The key is to start thinking about your mattress, pillow, and foundation as a single, cohesive unit. Why? Because each part directly impacts how the others feel and perform.

    A detailed sketch of an adjustable bed with a mattress and a supportive pillow, highlighting its design.

    The Role of the Right Pillow

    When you lie on your side, a pretty significant gap opens up between your head and the mattress. Your pillow’s job is to fill that space perfectly, keeping your head and neck in a straight line with the rest of your spine. If your pillow is too thin, your head will sag down. Too thick, and it’ll be pushed up at an awkward angle.

    For side sleepers, a thicker, more supportive pillow is almost always necessary. The goal is to create a straight, horizontal line from your head to your tailbone, and the pillow is the final piece of that alignment puzzle.

    Look for materials like memory foam, latex, or other dense fills that won’t flatten out under the weight of your head during the night. The ideal pillow should feel substantial and hold its shape while still contouring to your neck just right.

    Choosing the Right Foundation

    The foundation under your mattress does more than just get it off the floor. It provides crucial support that changes how the mattress feels and how long it lasts. In fact, using the wrong base can even void your mattress warranty.

    Here are the most common options you'll run into:

    • Platform Beds: These have a solid or slatted surface, giving your mattress firm, even support. They work great with most modern mattresses, especially memory foam and hybrid models.
    • Box Springs: These are designed for traditional innerspring mattresses. A box spring has its own set of coils inside to absorb shock. They are not recommended for foam or hybrid mattresses because they don't provide a solid enough surface.
    • Adjustable Bases: An adjustable base gives you ultimate control. For side sleepers, you can slightly raise your head and feet, which can help with things like acid reflux or snoring without forcing you onto your back.

    To build a truly complete sleep system, it's crucial to understand how all these pieces fit together. For a deeper dive, check out this guide to selecting your ideal mattress. By pairing your perfect mattress with the right pillow and a supportive foundation, you create a personalized sleep sanctuary that sets you up for deeper, more restorative rest.

    Common Questions from Side Sleepers

    Even after you've learned the ropes on firmness, materials, and support, you might still have a few nagging questions. That’s totally normal. Finding the right mattress is a big deal, and it’s smart to cover all your bases before making a decision.

    Below, we’ve tackled some of the most common questions our mattress experts hear from side sleepers every day. These straightforward answers may help you feel more confident in your search.

    I Am a Combination Sleeper but Favor My Side What Should I Look For?

    This is a really common scenario. For combination sleepers who find themselves on their side most of the night, a medium-firm hybrid mattress is usually a fantastic place to start. It gives you that critical pressure relief for your hips and shoulders when you're on your side.

    Just as importantly, the responsive coils make it much easier to roll over and change positions without feeling like you’re fighting your way out of quicksand. You’re looking for that sweet spot—a mattress that offers both contouring comfort and a lively, buoyant feel.

    Can a Mattress Topper Fix My Too-Firm Mattress?

    Yes, sometimes a topper can be an effective and budget-friendly solution. If your mattress is still in good shape and offers solid support but just feels too firm, adding a 2-3 inch memory foam or latex topper can introduce that crucial layer of cushioning your pressure points are craving.

    However, it's key to remember that a topper is just a band-aid, not a cure. It can change the feel of your mattress, but it absolutely cannot fix an old, sagging bed that has lost its core support.

    Think of a mattress topper as a comfort adjustment, not a structural repair. It adds softness to a supportive base but won't bring a worn-out mattress back to life.

    How Can I Tell if My Spine Is Aligned Correctly?

    There's actually a pretty easy way to check your alignment, whether you're testing mattresses in a store or on your bed at home. Lie down in your usual side-sleeping position and have a partner or friend take a look at your back.

    Your spine, from the base of your neck all the way down to your tailbone, should form a straight, horizontal line. If your hips sink in too far, your spine will sag downwards into a hammock shape. If the mattress is too firm, your spine will bow upwards. You should feel comfortably "held" without any weird strain.

    What if My Partner and I Have Very Different Body Weights?

    This is a common challenge for couples. Oftentimes, a medium-firm mattress can be a good compromise, as it can comfortably accommodate a wider range of body types and sleep styles.

    When you have different needs, it’s also critical to look for a mattress with excellent motion isolation. Materials like memory foam or a well-made hybrid with high-quality pocketed coils are champs at absorbing movement, so you won’t feel every toss and turn from your partner. For couples with drastically different needs, some brands offer split king mattresses, which allow each of you to have your own ideal firmness on your side of the bed.


    Finding a suitable mattress comes down to understanding your own unique needs and knowing what to look for. At Woodstock Furniture & Mattress Outlet, our sleep experts are here to guide you through the process, letting you test and compare dozens of options from well-regarded brands in our Sleep Center. Visit us to find the supportive, comfortable mattress you deserve.

  • How to Arrange Bedroom Furniture for a Functional Layout

    How to Arrange Bedroom Furniture for a Functional Layout

    Arranging your bedroom furniture is about more than just making it look nice. It’s about creating a space that actually works—a place that feels functional, promotes restful sleep, and serves as your personal sanctuary. A good approach is to start with your bed as the focal point, make sure you can walk around easily, and then logically place everything else around it.

    Your Blueprint for a Better Bedroom Starts Here

    Ever feel like your bedroom is just a little bit… off? Maybe it’s cluttered, awkward to move around in, or just doesn't feel relaxing. A simple plan can change all that. The way you arrange your furniture has a huge impact on how a room feels, and can make it seem larger, more organized, and more calming. We're going to walk through the practical steps to rethink your layout, focusing on function and flow first.

    This isn’t about chasing the latest design trend; it's about making your room work for your real, everyday life. A well-arranged bedroom just makes things easier, from getting ready in the morning to winding down at night.

    The Impact of a Thoughtful Layout

    Getting your furniture placement right can solve a bunch of common frustrations you might not even realize are layout-related. Here’s what you stand to gain:

    • Better Traffic Flow: Creating clear, open paths from the door to the closet and around the bed means no more awkward shuffling or bumping into things.
    • A Bigger Feel: Even a small room can feel surprisingly open and airy when furniture isn't blocking walkways or crammed against every wall.
    • Improved Functionality: This is key. A good layout ensures drawers can open all the way, your nightstand is actually within reach, and every piece of furniture can do its job without getting in the way.
    • A More Relaxing Vibe: Cutting down on both physical and visual clutter is a game-changer for creating a peaceful atmosphere where you can actually relax and get better sleep.

    A well-planned bedroom layout is foundational. It’s much easier to move furniture on paper or in a digital planner than to physically shuffle heavy dressers and bed frames multiple times.

    Before we dive into the nitty-gritty of placement, let's nail down the core concepts. Think of these as the fundamental principles for any bedroom layout.

    | Core Principles of Bedroom Furniture Arrangement |
    | :— | :— | :— |
    | Arrangement Principle | Key Action | Why It Matters |
    | Bed as the Anchor | Position the bed first, ideally on the main wall opposite the door. | This establishes a clear focal point and naturally organizes the rest of the room's flow. |
    | Clear the Pathways | Leave at least 30-36 inches for main walkways. | Ensures you can move freely without feeling cramped or bumping into furniture. |
    | Scale and Proportion | Choose furniture that fits the room's size—avoid oversized pieces in small rooms. | Properly scaled furniture prevents a room from feeling cluttered and overwhelming. |
    | Functional Placement | Place items like dressers and nightstands where they are most useful. | Easy access to daily essentials simplifies routines and reduces clutter. |
    | Create Zones | If space allows, group furniture to create distinct areas (e.g., a sleeping zone, a reading nook). | This adds function and makes the room feel more intentional and organized. |

    Getting these basics right will set you up for success as you start placing individual pieces.

    Why Getting This Right Matters

    The push for functional, beautiful bedrooms isn't just a trend; it's a reflection of how much we're all investing in our home comfort these days. The global bedroom furniture market is large for a reason—people want smart arrangements. Industry experts often recommend treating the bed as the room's anchor. Placing it against the longest wall or opposite the entrance is a classic strategy that makes any room feel more spacious.

    Once the bed is set, you can bring in the supporting cast. Nightstands should be roughly the same height as your mattress for easy access. After that, position your dresser to create balance, but be sure to leave at least 36 inches for your main walkways. This single rule is crucial for avoiding that cramped, hard-to-navigate feeling. If you're curious about the bigger picture, you can find more on furniture industry trends in reports from sources like Custom Market Insights.

    Laying the Groundwork by Measuring Your Space

    I know it’s tempting to just start shoving furniture around to see what fits. But trust me, that approach almost always ends in frustration—scuffed walls, a bed that won’t quite clear the doorway, or a dresser that unexpectedly blocks an outlet you desperately need.

    The single most important step in arranging your bedroom furniture is to start with a solid plan. Before you even think about lifting anything heavy, grab your tape measure. Creating a simple floor plan saves you a ton of time, a sore back, and prevents those layout mistakes that drive you crazy later. It turns guesswork into intentional design.

    Taking Accurate Bedroom Measurements

    First things first, let's get the raw numbers. Don't just eyeball it; being precise here will pay off big time. Jot these down on a piece of paper or in a notes app on your phone.

    • Wall-to-Wall Length and Width: Get the main dimensions of the room to figure out your total square footage. This is your canvas.
    • Window and Door Placements: Measure the width of every window and door. Here's a pro tip: also measure the distance from the corners of the room to the edges of their frames. This tells you exactly how much solid wall space you have to work with.
    • Architectural Features: Don’t forget to account for any fixed elements. This means radiators, built-in shelving, fireplaces, or any odd bump-outs that eat into your usable floor space.
    • Ceiling Height: While this doesn't directly impact your floor plan, knowing your ceiling height is critical when you're looking at furniture with any kind of vertical presence, like a tall headboard or a statement armoire.

    Once you have these numbers, you can sketch out a quick, to-scale drawing on graph paper. A good rule of thumb is to let each square represent six inches or one foot. Suddenly, you can see your space in a whole new way.

    Translating Measurements into a Functional Plan

    With your room’s blueprint in hand, it's time to measure your furniture. Get the length, width, and height of every single piece you plan to use—your bed, dresser, nightstands, and any seating or desks.

    Now for the fun part. Grab another piece of paper and create small cutouts for each piece of furniture using the same scale as your room sketch. You can now move your "furniture" all over your floor plan without breaking a sweat.

    This simple exercise helps you answer critical questions ahead of time:

    • Will my dresser drawers actually be able to open all the way without banging into the bed?
    • Is there enough room to comfortably walk between the foot of the bed and the wall? You should really aim for at least 30 inches for main pathways.
    • Does that perfect spot for the nightstand end up blocking the closet door?

    Planning isn't just about making furniture fit; it's about designing a room that truly works for you. By mapping everything out first, you ensure the final layout is both practical and peaceful.

    Ultimately, a solid plan is about more than just measurements. For instance, if you want to learn how to decorate a baby room, mapping out the design is a key step to a stress-free project. The same principle applies to any room refresh, guaranteeing a better outcome when you think about function from the very beginning.

    Placing Your Bed as the Anchor of the Room

    Now that you've got your room’s measurements, it's time to tackle the most important piece of furniture you own: your bed. Make no mistake, the bed is the anchor of the bedroom. Its position dictates not just the flow and feel of your space, but where every other item will logically fit. Getting this one decision right sets the stage for a layout that feels intentional and effortless.

    The most common advice you'll hear—and for good reason—is to place your bed against the longest, uninterrupted wall. Ideally, this is the wall you see first when you walk into the room, creating an immediate and calming focal point. Designers call this the "commanding position," and it establishes a sense of order that makes the room feel balanced from the moment you enter.

    Finding the Best Wall for Your Bed

    While putting the bed opposite the door is a classic rule, not every room cooperates. You might be dealing with windows, closets, or awkwardly placed doors that make this setup feel impossible. Don't worry, there are plenty of excellent alternatives that work just as well.

    Consider these options when you're figuring out where the bed should go:

    • Under a Window: This can look beautiful, especially with an attractive headboard that complements the window frame. The trick is to choose a headboard that's lower than the windowsill so you don't block that precious natural light. You'll also want to invest in good window treatments for privacy and to keep the morning sun from waking you up too early.
    • On a Diagonal: If you want a more dynamic, unconventional feel in a square-shaped room, angling your bed out from a corner can be a great move. It really breaks up the boxy feel, but it does take up more floor space. This is best suited for larger bedrooms where you won't feel cramped.
    • Between Two Windows: Got a wall with two windows? Placing the bed between them creates a gorgeous, symmetrical look. It frames the bed perfectly and turns that entire wall into an impressive feature.

    The goal is to find a spot that feels natural and gives you a clear view of the doorway from your bed. There's an instinctual comfort in being able to see who is entering the room without being directly in the line of sight from the hallway.

    Matching Bed Size to Room Scale

    The size of your bed plays a huge role in how the room feels. A massive king bed can completely overwhelm a small room, while a twin might feel lost in a large primary suite. Scale is everything.

    • For King & California King Beds: These require a substantial wall to anchor them properly. In a primary suite, placing a king bed on the main wall opposite the entrance creates that grand, hotel-like feel and leaves plenty of space on either side for sizable nightstands.
    • For Queen & Full Beds: These are the versatile workhorses of the bedroom world and fit well in most average-sized rooms. A queen bed still has enough presence to be a focal point without eating up all the floor space, leaving room for a dresser or even a small seating area.
    • For Twin Beds: In a smaller guest room or a child's room, pushing a twin bed against a wall or into a corner is a classic space-saving trick. This opens up the center of the room, making it feel larger and providing more floor area for play or other furniture.

    Believe it or not, studies show that a poor furniture arrangement can waste up to 40% of a room's usable space. One simple principle to reclaim that space is creating "traffic triangles" by arranging the bed, dresser, and closet so paths between them are 36 to 42 inches wide. This rule alone can significantly cut down on frustrating navigation issues. And for the growing number of people with a home office nook in the bedroom, tucking a desk beside the bed at a 90-degree angle maintains function without wrecking the room's flow. You can learn more about the trends shaping how we furnish our homes in this bedroom furniture market research.

    This simple infographic breaks down the foundational process of measuring and planning your room's layout.

    Infographic illustrating a three-step room measurement process: measure, sketch, and plan for furniture.

    Following these steps—Measure, Sketch, Plan—ensures that your furniture arrangement is based on accurate dimensions, preventing common layout mistakes before they happen.

    Arranging Other Essential Bedroom Furniture

    Once your bed is in the right spot, everything else starts to click into place. Now we can figure out where to put the other key pieces—nightstands, dressers, and maybe some seating—to build a layout that’s balanced and works for you. These pieces are the supporting cast; they complement the bed and make the whole room feel complete.

    The idea isn’t just to cram furniture into empty corners. It’s about being intentional with each piece so your daily flow feels natural, from grabbing your phone in the morning to putting away clean laundry.

    A top-down sketch of a bedroom layout with a bed, nightstand, dresser, bench, and armchair, including clearance lines.

    Positioning Your Nightstands and Dresser

    Nightstands do more than just hold a lamp; they frame the bed and give you that crucial bedside storage. Here’s a simple but solid guideline: pick nightstands that are about the same height as the top of your mattress. This makes it easy to reach for a glass of water or hit snooze without fumbling around.

    For your dresser or chest of drawers, you’ve got a couple of go-to options:

    • Opposite the Bed: Sticking a long dresser on the wall facing the bed is a classic move that creates a really pleasing sense of symmetry.
    • On the Longest Wall: If the wall opposite your bed has a window or door in the way, your next best bet is the longest uninterrupted wall. This gives you plenty of space without throwing off the room's balance.

    Before you settle on a spot for any storage piece, do this one crucial check: can you open all the drawers and cabinet doors completely? Make sure they don't smack into the bed frame or anything else. Trust me, there’s nothing more annoying than a drawer that only opens halfway.

    Incorporating Seating and Creating Zones

    If you’ve got the room for it, adding a spot to sit can transform your bedroom from just a sleeping space into a real personal retreat. It also helps to create different "zones" for different activities.

    • A Bench at the Foot of the Bed: A bench adds a nice visual finish to the bed, gives you a place to sit while putting on shoes, and is perfect for laying out your outfit for the next day.
    • An Accent Chair in a Corner: An empty corner is the perfect home for a comfy armchair and a small side table. Add a floor lamp, and you’ve instantly carved out a cozy reading nook for when you need to unwind.
    • A Small Loveseat or Settee: For larger primary bedrooms, a small loveseat can anchor a whole separate seating area. It’s the perfect spot for sipping your morning coffee or chatting before turning in for the night.

    No matter what seating you add, the key is making sure it doesn’t block your main walkways. You should always have a clear, easy path from the door to your bed and from the bed to your closet.

    As the North American bedroom furniture market grows, homeowners are getting smarter about layouts that look good and function well. It really boils down to symmetry and scale. For instance, in about 65% of standard 12×14-foot rooms, centering the bed creates that visual harmony we all crave. Just be sure to leave at least two to three feet of clearance around it. One clever trick we've seen is putting wardrobes or dressers on the shorter walls—it can actually make the floor space feel bigger. For a deeper dive into these trends, check out the latest industry analysis from Grand View Research.

    Avoiding Common Bedroom Layout Mistakes

    Even with the best intentions, a bedroom layout plan can go sideways. But learning how to arrange bedroom furniture is often about knowing what not to do. By understanding the most common slip-ups, you can dodge them entirely and create a space that feels like it was put together by a professional.

    The good news? Most of these mistakes are incredibly easy to fix. They usually come down to issues with scale, flow, and lighting. Sometimes, a few small tweaks can take a room from feeling awkward to absolutely perfect.

    Sketches illustrating 'before' and 'after' bedroom furniture arrangements for improved space.

    We see homeowners make the same few mistakes over and over again. Here’s a quick troubleshooting guide to help you spot them—and fix them—in your own space.

    | Common Bedroom Layout Problems and Solutions |
    | :— | :— | :— |
    | Common Mistake | Why It's a Problem | How to Fix It |
    | Pushing Everything Against the Walls | It creates a "racetrack" effect with a dead zone in the middle, making the room feel static and less inviting. | Pull furniture, especially the bed and seating, a few inches away from the walls to create depth and let the room breathe. |
    | Ignoring Scale and Proportion | Tiny furniture gets lost in a big room, and oversized pieces make a small room feel cramped and claustrophobic. | Match furniture size to the room. Use your measurements to ensure pieces fit with adequate clearance before buying. |
    | Blocking Natural Light | Placing tall furniture in front of windows casts shadows and makes the room feel smaller, darker, and less welcoming. | Keep windows as unobstructed as possible. Position tall pieces like armoires or bookcases on solid walls away from windows. |
    | Obstructing Traffic Flow | A blocked path from the door to the closet or bathroom creates daily frustration and makes the room feel poorly planned. | Ensure major walkways are at least 30-36 inches wide. Walk the paths yourself—if you have to shuffle, rearrange. |
    | Forgetting a Focal Point | Without a clear focal point, the room can feel chaotic and unfocused, with no clear place for the eye to rest. | Make the bed the star of the show. Center it on the main wall and use a beautiful headboard or artwork to draw attention. |

    By keeping these common issues in mind, you can design a layout that's not just beautiful but also functional for your daily life. A well-arranged room just feels better, and avoiding these simple mistakes is the key to getting there.

    Bringing Your Vision to Life with Planning Tools

    Okay, this is where the magic happens. After you've measured your space and have a good idea of where the bed should go, it's time to put your plan to the test. This is one of the most rewarding parts of the process, because you finally get to see your vision start to take shape.

    Thankfully, you don’t have to start shoving heavy furniture around just to see if something works. Instead of guessing how a layout will feel, you can use a few handy digital tools to experiment without breaking a sweat. This approach saves you a ton of physical effort and helps you spot potential problems before you’ve lugged that heavy dresser up the stairs.

    The Value of a Virtual Walkthrough

    Digital room planners are a game-changer for visualizing how furniture will actually fit and function in your room. You just plug in your dimensions, then drag and drop furniture pieces to see how everything plays together.

    This lets you confirm all the critical details right from your couch:

    • Check Your Clearances: Can you actually walk around the bed? See if you have the recommended 30 to 36 inches for your main pathways.
    • Test Drawer & Door Swing: This is a big one. You can place a dresser and instantly see if the drawers will smack into your bed frame when you open them.
    • Experiment with Scale: Wondering if a king bed will overwhelm the space? Drop one in your virtual room and see how much floor space you have left compared to a queen.

    A good planning tool is like a blueprint for your bedroom. It takes the guesswork out of the equation, making sure the layout that looks great on paper will actually work in real life. The result is a more functional, harmonious space.

    To get started, you can check out some of the useful online interior design tools that let you play with different layouts and styles. They’re a fantastic way to explore the possibilities and lock in your plan.

    From Digital Plan to Real-World Feel

    As great as these digital tools are for logistics and floor plans, nothing beats seeing and touching the furniture in person. Once you’ve mapped out a layout that you're happy with, the final piece of the puzzle is visiting a showroom. It’s the only way to get a true sense of a piece’s scale, quality, and texture—things a screen just can't fully capture.

    At our Woodstock Furniture & Mattress Outlet showrooms, you can see firsthand how different pieces look and feel. This helps you find options to fit the plan you’ve so carefully crafted. Our team is always here to offer guidance and help you bring that vision to life, making sure the final result is a bedroom you’ll love coming home to.

    Frequently Asked Questions About Arranging Bedroom Furniture

    Even with the best-laid plans, questions always seem to pop up once you start moving the heavy stuff around. Arranging bedroom furniture can bring up some tricky challenges that feel totally unique to your own space. We get it. Here are some straightforward answers to the questions we hear most often from homeowners just like you.

    What Is the First Piece of Furniture I Should Place in a Bedroom?

    Always, always start with the bed. No exceptions. It's the biggest, most important piece in the room, and everything else will revolve around it. Placing the bed first acts as an anchor for your entire layout.

    From there, you can arrange your nightstands, dressers, and everything else in relation to it. This approach keeps things logical and balanced, and you won't risk boxing yourself in with smaller items only to realize you have to start all over again.

    How Much Space Should I Leave for Walkways in My Bedroom?

    You'll want to aim for at least 30 to 36 inches of clear space for your main traffic paths. Think about the route from your doorway to the bed, and from the bed to the closet. These are the paths you'll walk every single day.

    For secondary paths, like the space between the side of your bed and a wall, you can get away with as little as 24 inches. But honestly, more is always better if you want to avoid that cramped, claustrophobic feeling.

    Here's a helpful trick from our designers: After you think you've placed your furniture, actually walk the paths. If you have to turn sideways or do a little shuffle to get through, it’s too narrow for comfortable, everyday use.

    Can I Put My Bed in Front of a Window?

    Yes, you absolutely can! Placing a bed in front of a window can create a stunning focal point, but you have to be thoughtful about it.

    First, make sure your headboard is low enough that it sits nicely beneath the windowsill. This way, you're not blocking out all that wonderful natural light. Second, invest in some quality curtains or blinds. This is non-negotiable for light control and privacy, but it also helps insulate against any drafts that could mess with your sleep.

    How Do I Arrange Furniture in a Very Small Bedroom?

    When you're working with a small bedroom, the name of the game is maximizing every single square inch. The secret is to think vertically and be strategic with your choices.

    • Bed Placement: The best move is usually to push the bed into a corner or up against the longest wall. This opens up as much floor space in the center of the room as possible.
    • Vertical Storage: Go for tall, narrow dressers instead of the wide, low ones. This simple switch draws the eye upward and saves precious floor real estate.
    • Smart Furniture: Look for pieces that do double duty. A bed with built-in drawers underneath or a storage bench at the foot of the bed can be a lifesaver.
    • Off-the-Floor Solutions: Wall-mounted shelves and floating nightstands are your best friends in a small room. They free up the floor and make the space feel much larger and less cluttered.

    At Woodstock Furniture & Mattress Outlet, our team has seen just about every layout challenge you can imagine. We can offer practical advice to help you figure out what works for your unique space. Come on down and let's find the right furniture for your vision.

    Find a Woodstock Furniture & Mattress Outlet location near you

  • 10 Practical Home Office Storage Ideas to Organize Your Workspace

    10 Practical Home Office Storage Ideas to Organize Your Workspace

    A well-organized home office is more than just a tidy space; it's a foundation for focus, productivity, and peace of mind. But finding the right storage solutions can feel overwhelming, especially when faced with paper piles, tangled cords, and a lack of dedicated space for essential supplies. This struggle is common, turning a potential hub of productivity into a source of daily frustration.

    This guide moves beyond generic advice to offer specific, actionable home office storage ideas tailored to different needs, room sizes, and budgets. We'll explore ten practical solutions, from floating shelves to versatile credenzas, breaking down the problem each one solves and how to implement it effectively. The goal is to help you build a workspace that not only looks professional but also functions seamlessly, allowing you to do your best work without the distraction of clutter. By understanding how each storage piece contributes to the overall function of your space, you can make informed decisions. For a broader perspective on creating an efficient and inspiring home office, explore various actionable office interior design ideas that can complement your new storage strategy. Let's transform your cluttered corner into a streamlined command center.

    1. Floating Wall Shelves

    Floating shelves are a minimalist's dream, offering a great home office storage idea for rooms where floor space is a premium. By mounting directly to the wall with hidden hardware, they create a clean, modern look that draws the eye upward, making a small office feel more open and airy. This approach transforms unused vertical wall space into a functional display for books, supplies, and decor without adding visual bulk.

    A hand-drawn sketch depicting three floating wooden wall shelves above a desk, adorned with books, potted plants, and framed artwork.

    They are particularly effective above a desk, keeping essential items like notebooks, pen holders, and reference materials within arm's reach while freeing up your work surface. This declutters your primary workspace, which can directly enhance focus and productivity.

    Quick Tips for Implementation

    • Installation: Mount shelves at or slightly above eye level (typically 48-60 inches from the floor) for easy access and a balanced look. Always use anchors appropriate for your wall type (drywall, plaster, or masonry) and verify the shelf's weight capacity.
    • Styling: Avoid a cluttered look by leaving about 20-30% of the shelf space empty. Group items by color or function, and mix textures by combining books, small plants, and framed photos.
    • Placement: Consider installing a single long shelf above your monitor to act as a display for inspirational quotes or art, or place a trio of shorter shelves on an adjacent wall to store project-specific binders and supplies.

    For those who prefer a more grounded storage solution with similar vertical benefits, traditional bookcases and shelving units can offer substantial storage capacity and a classic aesthetic.

    2. Under-Desk Storage Cabinets and Pedestals

    Under-desk storage is one of the most practical home office storage ideas for reclaiming your workspace. These compact cabinets and drawer units fit neatly beneath your desk, providing concealed storage for files, stationery, and tech accessories. This keeps your desktop clear and professional-looking, minimizing distractions and maximizing the surface area available for essential tasks. By utilizing this often-overlooked space, you can maintain a clean, organized aesthetic without sacrificing accessibility.

    These units are perfect for hiding the clutter that accumulates throughout the workday. From popular consumer options to professional-grade pedestals, under-desk storage keeps supplies out of sight but within easy reach. This solution is especially valuable in dual-purpose spaces where the office needs to revert to a living area at the end of the day.

    Quick Tips for Implementation

    • Measurement: Before purchasing, measure the height and depth clearance under your desk to ensure a proper fit that still allows for adequate legroom. Account for any crossbars or support structures.
    • Organization: Use drawer dividers and trays to neatly organize smaller items like pens, paper clips, and charging cables. Label each drawer to find what you need quickly.
    • Placement: Position heavier items like reams of paper in the bottom drawers to improve stability and prevent tipping. Consider a mobile pedestal with wheels for the flexibility to move it as needed.

    For a fully integrated solution, consider pairing these cabinets with storage desks, which feature built-in drawers and file storage for a seamless and cohesive look.

    3. Tall Bookcases and Shelving Units

    For those who need maximum storage capacity, tall bookcases and shelving units are classic home office storage ideas that deliver. By capitalizing on vertical space, these substantial pieces can transform an entire wall into a highly organized library for books, binders, and supplies. They effectively centralize your storage, preventing clutter from spreading across your desk and floor.

    This approach is perfect for consolidating a large volume of materials in one accessible location. A well-organized bookcase not only keeps your office tidy but also adds architectural character and a sense of permanence to the room, creating a sophisticated and studious atmosphere.

    Quick Tips for Implementation

    • Styling: Create visual interest by alternating the orientation of books, with some standing vertically and others stacked horizontally. Use decorative boxes or stylish baskets on lower shelves to conceal less attractive items like cables or bulk supplies.
    • Organization: Place frequently accessed items, like reference manuals and daily planners, on shelves between waist and shoulder height. Reserve the highest shelves for archival materials or decor and the bottom shelves for heavy equipment or bins.
    • Safety: For taller units, always secure them to the wall using the anti-tip hardware provided. This is crucial for stability, especially in homes with children or pets.

    If you need a robust storage solution, exploring a selection of bookcases and shelving units can provide durable options to fit any office aesthetic, from traditional to contemporary.

    4. Filing Cabinets and Lateral File Storage

    For those managing important documents, tax records, or client files, a dedicated filing cabinet is one of the most essential home office storage ideas. Traditional vertical cabinets are excellent for tight spaces, but lateral filing cabinets offer wider, shallower drawers. This design maximizes accessibility, allowing you to see and retrieve files more easily while providing a sturdy surface for a printer or other equipment.

    This classic storage solution keeps sensitive paperwork organized, secure, and protected from damage or loss. By centralizing your documents, you eliminate paper clutter from your desk and other surfaces, creating a more professional and efficient work environment where critical information is always within reach but neatly tucked away.

    Quick Tips for Implementation

    • Systematize: Before you start filing, choose a system that works for you, such as alphabetical, chronological, or project-based. Use clearly labeled file folders and hanging organizers with tabs for quick identification.
    • Organize: Place frequently accessed files in the top or middle drawers. Store heavier, less-used documents or archival records in the bottom drawers to maintain stability and ease of access.
    • Labeling: Use a label maker for a professional, consistent look that makes finding specific documents fast and effortless. Keeping a digital or physical inventory of important records is also a great practice.

    For a cohesive office that combines paper management with digital needs, consider pairing your cabinet with storage desks or credenzas, which often include built-in file drawers and other organizational features.

    5. Wall-Mounted Pegboards and Organizers

    A wall-mounted pegboard is a highly versatile and customizable solution, making it one of the most adaptive home office storage ideas available. These perforated panels use a system of hooks, shelves, and containers that can be rearranged in countless combinations. This flexibility is perfect for creative professionals, crafters, or anyone whose storage needs change from project to project, transforming an empty wall into a highly functional and visible organization hub.

    An illustration of a white pegboard filled with organized craft and office tools over a desk.

    Popularized by DIY communities and home organization influencers, pegboards keep frequently used tools and supplies off your desk but still within easy reach. By displaying items vertically, they reduce clutter on your primary work surface, which can help improve focus and streamline your workflow. It’s an ideal system for keeping everything from scissors and pens to charging cables and notebooks tidy and accessible.

    Quick Tips for Implementation

    • Installation: For optimal accessibility, mount the pegboard so its center is at or slightly above eye level when seated (around 48-60 inches from the floor). Use heavy-duty wall anchors to ensure it can support the weight of your items.
    • Styling: Group similar items together, such as all your writing utensils or all your cutting tools. Use small bins and baskets to contain loose supplies like paper clips or sticky notes, which helps reduce visual clutter. You can even paint the pegboard to match your office decor.
    • Placement: A small pegboard placed directly above your desk provides a convenient spot for essential tools. For larger collections of supplies, consider dedicating an entire wall to a pegboard system, creating a feature that is both practical and visually interesting.

    For those who need to store more substantial items like printers or large binders, pairing a pegboard with sturdy shelving units or bookcases can create a comprehensive and balanced storage system.

    6. Desk Hutches and Overhead Storage

    Desk hutches are classic home office storage ideas that add vertical storage directly to your workspace. These units sit on top of or attach to the back of a desk, providing shelves, cubbies, and sometimes small cabinets without taking up any additional floor space. This integrated approach keeps your essential books, binders, and supplies organized and within easy reach, clearing the main desk surface for active tasks.

    This solution is ideal for anyone who needs immediate access to a variety of materials throughout the workday. By using the vertical area above the desk, a hutch centralizes storage and helps create a defined and efficient work zone, which can significantly improve focus and workflow.

    Quick Tips for Implementation

    • Fit and Safety: Measure your desk's width and depth carefully to ensure the hutch fits properly and creates a balanced look. Always secure the hutch to the desk or wall according to the manufacturer's instructions to prevent tipping.
    • Organization: Dedicate specific cubbies for different categories, like one for reference books, another for office supplies, and a third for current project files. Store heavier items on the bottom shelves to maintain stability.
    • Lighting: Many hutches can obstruct overhead light. Consider installing a stick-on LED light strip under the lowest shelf to illuminate your work surface and reduce eye strain.

    For a similar, all-in-one solution, storage desks often incorporate built-in shelving and drawers, offering a seamless and coordinated look with ample organizational capacity.

    7. Rolling Carts and Mobile Storage Units

    Rolling carts are the ultimate chameleon of home office storage ideas, offering unparalleled flexibility for dynamic workspaces. These multi-tiered, mobile units can be effortlessly repositioned to serve different functions, making them perfect for multipurpose rooms or offices shared with family members. They provide accessible, open storage for everything from printer paper and ink cartridges to project files and craft supplies, adapting to your workflow on the fly.

    A four-tier metal rolling utility cart organized with various office supplies next to a desk.

    Their portability is their greatest strength. A cart can serve as a "command center" for a specific project, holding all necessary materials, and then be wheeled out of sight when the work is done. This keeps your primary desk surface clear and allows you to quickly reconfigure your space for different tasks or to accommodate guests, a feature that fixed furniture cannot offer.

    Quick Tips for Implementation

    • Organization: Use small bins, baskets, or drawer organizers on each tier to contain loose items like pens, paper clips, and charging cables. This prevents the cart from becoming a mobile junk drawer.
    • Stability: Always lock the wheels once the cart is in its desired position to prevent it from moving unexpectedly. For safety, place heavier items on the bottom shelf and lighter, frequently used supplies on top.
    • Placement: Position the cart next to your desk to act as an extension of your workspace, keeping essential tools within arm’s reach. You can also tuck it into a closet or corner when not in use to maximize floor space.

    For those needing a more permanent and secure mobile solution, file cabinets and credenzas can provide robust, lockable storage with the classic appeal of traditional office furniture.

    8. Desk Drawers and Drawer Dividers

    Organized desk drawers are the unsung heroes of a productive workspace, offering one of the most essential home office storage ideas for tackling daily clutter. By using drawer dividers and organizers, you transform a standard "junk drawer" into a highly efficient system. This approach ensures every pen, paperclip, and charging cable has a designated home, making items easy to find and keeping your desk surface clear for focused work.

    This method is particularly powerful for those who need quick access to a variety of small supplies without sacrificing a minimalist aesthetic. A tidy drawer means a tidy mind, directly contributing to a smoother workflow by eliminating the frustration of searching for misplaced items. It’s a simple change that delivers a significant impact on daily efficiency.

    Quick Tips for Implementation

    • Grouping: Categorize similar items together. Designate specific compartments for writing tools, tech accessories (cables, adapters), sticky notes, and stationery to streamline access.
    • Prioritization: Place your most frequently used items, like your favorite pen or a stapler, in the front-most sections of the top drawer for maximum convenience.
    • Auditing: Once a quarter, take a few minutes to declutter your drawers. Remove items you no longer use, consolidate supplies, and wipe down the organizers to maintain the system.

    For a comprehensive solution, many storage desks and file cabinets are designed to easily accommodate third-party organizers, giving you a head start on a clutter-free office.

    9. Built-In and Custom Storage Solutions

    For a truly seamless and maximized home office, built-in and custom storage solutions offer an unparalleled level of integration. Unlike freestanding furniture, these systems are designed and installed specifically for your room's unique dimensions and your exact workflow needs. This approach creates a cohesive, high-end look by turning architectural quirks into functional features, such as building cabinets into an awkward alcove or designing a wall-to-wall desk and shelving unit.

    This can be an effective home office storage idea for those who need to store a wide variety of items, from files and tech equipment to books and supplies, all within a unified system. A custom solution ensures every inch of space is used efficiently, eliminating clutter and establishing a permanent, professional-grade workspace that perfectly matches your home's aesthetic.

    Quick Tips for Implementation

    • Plan Your Inventory: Before consulting a designer or builder, make a detailed list of everything you need to store. Categorize items and measure larger equipment to ensure the custom design accommodates your specific needs.
    • Future-Proof the Design: Think about your future needs. Incorporate adjustable shelving and flexible compartments that can adapt as your work or technology changes over time.
    • Integrate Technology: Plan for cable management, integrated lighting, and accessible power outlets from the beginning. Hiding wires within the custom cabinetry creates a clean, organized look and improves functionality.

    If a fully custom build isn't the right fit, you can achieve a similar integrated feel using modular shelving units and credenzas. Many retailers offer pieces that can be combined to create a tailored and highly functional storage system.

    10. Credenzas and Sideboards for Office Storage

    Credenzas and sideboards are sophisticated, low-profile cabinets that serve as powerful home office storage ideas, blending concealed storage with elegant design. Originally found in dining rooms, their versatile function makes them ideal for an office, offering a long surface and ample cabinet space without the visual height of a traditional bookcase. This makes them perfect for storing bulky items like printers, paper reams, and binders out of sight, maintaining a clean and uncluttered aesthetic.

    Positioned behind a desk or against a prominent wall, a credenza acts as a functional anchor for the room. Its top surface is perfect for a secondary work area, displaying decor, or housing equipment, while the enclosed cabinets keep visual noise to a minimum. This dual-purpose nature is invaluable in home offices where style and substance must coexist.

    Quick Tips for Implementation

    • Placement: Place your credenza against a wall opposite your desk for easy access or directly behind it to create an executive-style workspace. Ensure it doesn't obstruct major walkways.
    • Organization: Use the concealed cabinets for less-attractive necessities like routers, shredders, and archival files. Organize the interior with drawer dividers and labeled bins to quickly find what you need.
    • Styling: Treat the top surface like a console table. Add a table lamp for ambient lighting, a decorative tray for small items, and a piece of art or a plant to personalize the space. Choose a finish that complements your desk and other furniture for a cohesive look.

    For those seeking functional and stylish storage solutions, a selection of credenzas and sideboards offers numerous options that can elevate a home office from purely practical to professionally polished.

    10-Item Home Office Storage Comparison

    Item Implementation Complexity Resource Requirements Expected Outcomes Ideal Use Cases Key Advantages
    Floating Wall Shelves Medium — wall anchors/stud locating required Low–Medium — shelves, anchors, drill; modest budget Adds vertical, visible storage with modern look; limited heavy-load capacity Small offices needing accessible storage without floor footprint Space-saving, stylish, customizable
    Under-Desk Cabinets & Pedestals Low — mostly freestanding or simple assembly Medium — unit purchase, clearance measurement; optional casters Hidden, organized storage that frees desk surface Professionals needing secure, near-desk file/supply access Concealed storage, filing organization, mobile options
    Tall Bookcases & Shelving Units Medium–High — assembly and anchoring recommended Medium — significant wall/floor footprint; moderate budget High-capacity vertical storage and display; room-defining focal point Users with large book/file collections and ample wall space Maximum storage, display versatility, anchors room
    Filing Cabinets & Lateral Files Low–Medium — place and level; heavier models require help Medium — floor space, moderate cost; optional fireproof models Secure, organized document storage with professional appearance Home-based professionals managing client files and records Security, easy file access, scalable options
    Wall-Mounted Pegboards & Organizers Low — simple mounting and modular setup Low — pegboard, hooks/baskets; very affordable Highly visible, flexible organization; quick access to tools/supplies Creative professionals, makers, and frequent-access users Flexible, reconfigurable, cost-effective
    Desk Hutches & Overhead Storage Medium — mounting, sizing and alignment needed Medium — mounts, matching desk, moderate cost Reachable overhead storage that clears desk surface; may reduce perceived height Small spaces needing accessible overhead storage Accessible storage, integrated look, workflow improvement
    Rolling Carts & Mobile Storage Units Low — minimal assembly; plug-and-play Low — compact footprint, wheels, low–moderate cost Portable, multi-tiered storage; not a permanent solution Shared or multipurpose spaces; frequent reconfiguration Mobility, flexibility, compact and affordable
    Desk Drawers & Drawer Dividers Low — simple inserts or modular organizers Low — inexpensive organizers and dividers Compartmentalized small-item storage; tidy desktop All home-office workers wanting quick access to supplies Low cost, immediate organization, hidden storage
    Built-In & Custom Storage Solutions High — design, professional installation, longer timeline High — custom materials, contractors, higher budget Seamless, optimized storage tailored to space; increases home value Dedicated, permanent home offices and unique space challenges Maximizes space, cohesive high-end aesthetic, durable
    Credenzas & Sideboards for Office Storage Medium — delivery/placement; possible assembly Medium — notable floor footprint; moderate–high cost Concealed, at-height storage that doubles as furniture and surface Professionals hosting clients; need hidden equipment and files Professional appearance, concealed storage, multi-function surface

    Designing Your Ideal Workspace, One Piece at a Time

    Transforming a cluttered corner or a chaotic spare room into a functional and inspiring home office is a journey, not a destination. As we've explored, the path to a productive workspace is paved with thoughtful storage solutions that address your specific needs. From the vertical efficiency of tall bookcases and floating shelves to the discreet power of under-desk pedestals and drawer organizers, the right system brings order and calm to your workday. The goal isn't just to hide clutter; it's to create an environment where your tools, documents, and supplies are exactly where you need them, when you need them.

    The key takeaway is that there is no single "best" solution. An effective workspace is a personalized ecosystem. Your ideal setup might involve a sleek credenza to hide a printer and paper supplies, paired with a wall-mounted pegboard for frequently used tools. Another person might find that a traditional filing cabinet combined with a mobile rolling cart offers the perfect blend of long-term and short-term organization. The most impactful home office storage ideas are those that solve your unique workflow challenges, whether that's taming paper piles, organizing cables, or creating a dual-purpose space that serves multiple functions.

    Putting Your Plan into Action

    Before making any decisions, take a moment to assess your current pain points. Are you constantly searching for a specific file? Is your desk surface overrun with stationery? Identifying the problem is the first step toward finding the perfect solution.

    • Prioritize Function: Start with the pieces that will make the biggest immediate impact on your daily productivity. If paper management is your biggest hurdle, a lateral file cabinet might be a better first investment than decorative shelving.
    • Measure and Plan: Always measure your space twice. Consider not just the footprint of a new bookcase or desk, but also the clearance needed for opening drawers and doors.
    • Think Long-Term: Choose pieces that can adapt with you. A classic credenza or a well-built shelving unit is a versatile investment that can be repurposed in other rooms if your office needs change down the line.

    Ultimately, mastering your home office storage is about more than just organization. It's about creating a dedicated space that respects your work, reduces mental friction, and empowers you to do your best. By thoughtfully selecting and combining these ideas, you can build a workspace that is not only practical but also a place you genuinely enjoy spending time in.


    Ready to see how different storage solutions feel in a real-world setting? Exploring options like storage desks, credenzas, and quality bookcases in person can help you visualize your ideal workspace. The team at Woodstock Furniture & Mattress Outlet is here to help you navigate the options and find pieces that fit your style, budget, and functional needs without any pressure. Visit one of our North Georgia showrooms to get started.

  • 10 Outdoor Furniture Layout Ideas to Transform Your Patio in 2024

    10 Outdoor Furniture Layout Ideas to Transform Your Patio in 2024

    Creating an inviting outdoor living area is less about having the 'perfect' furniture and more about arranging it thoughtfully. Many homeowners invest in beautiful patio sets only to find their outdoor space feels awkward, cramped, or underutilized. The problem often isn't the furniture itself; it's the lack of a clear plan for flow, function, and conversation. A poorly arranged space can hinder movement and discourage use, turning a potential oasis into a mere collection of chairs.

    This guide moves beyond generic tips to provide 10 distinct, actionable outdoor furniture layout ideas tailored to real-world spaces. We'll explore how to solve common arrangement challenges, from defining functional zones on a large deck to maximizing a small balcony, using proven design principles. You will learn how to create clear traffic paths, establish a focal point, and choose furniture that fits your space's scale and your family's needs. We aim to equip you with the practical knowledge to transform your patio, deck, or yard into a functional, comfortable, and beautiful retreat that truly extends your home’s living area.

    To truly bring your outdoor vision to life, starting with a healthy foundation is key. A well-maintained lawn can significantly enhance the appeal of your furniture arrangements. Consider a comprehensive lawn care schedule template to ensure your outdoor canvas is perfect from the ground up. This curated list will provide the blueprint for what goes on top, helping you build a space you’ll enjoy all season long.

    1. Lounge-Centric Conversational Layout

    A lounge-centric conversational layout is one of the most popular and effective outdoor furniture layout ideas for fostering connection. This design arranges seating around a central focal point, such as a fire pit or a large coffee table, encouraging face-to-face interaction. Instead of positioning furniture to look outward, every piece is angled inward to create a cozy, enclosed atmosphere perfect for intimate gatherings.

    This layout excels at transforming a standard patio or deck into a dedicated social hub. It is a highly functional design for homeowners who prioritize entertaining, as it naturally draws guests together and facilitates easy conversation. Whether you're hosting a small get-together or enjoying a quiet family evening, this arrangement makes the space feel welcoming and purposeful.

    How to Implement This Layout

    Successfully creating a conversational zone requires careful planning and precise measurements.

    • Establish a Focal Point: Start by placing your central feature, like a cast aluminum fire pit or a durable low-profile table. This piece will anchor the entire arrangement.
    • Arrange Primary Seating: Position your largest seating items, such as an outdoor sectional or sofa, facing the focal point. This establishes the primary boundary of your conversational circle.
    • Add Secondary Seating: Fill in the gaps with smaller pieces like armchairs, loveseats, or ottomans. Angle them inward to complete the circle and ensure everyone can easily engage in conversation. Mixing seating heights and styles can add significant visual interest.
    • Maintain Proper Spacing: Ensure there is enough room for comfortable movement. Leave at least 18-24 inches of clearance for walkways around the main seating area. The distance between seating and the central table should be close enough for guests to set down a drink, typically 14-18 inches.

    Key Insight: The goal of this layout is to remove physical barriers to conversation. By turning chairs and sofas inward, you create a subtle psychological cue that encourages guests to connect with each other rather than observing the surrounding yard.

    2. Dining-Forward Patio Layout

    A dining-forward layout places an outdoor dining table and chairs at the heart of your patio or deck. This design treats the dining area as the primary anchor, making it the central feature for entertaining and daily life. All other elements, like lounge chairs or a grill station, are positioned as complementary, secondary zones.

    This layout is one of the most practical outdoor furniture layout ideas for those who love hosting meals, from casual family barbecues to more formal alfresco dinners. It excels in creating a designated purpose for the space, transforming a simple patio into a functional open-air dining room. By prioritizing the dining set, you communicate that the area is meant for gathering, sharing food, and making memories.

    How to Implement This Layout

    Creating a functional and inviting dining-forward space requires thoughtful placement and proportion.

    • Anchor with the Dining Set: Begin by positioning your dining table in the most prominent or convenient spot. This piece dictates the flow and scale of the entire layout. Consider placing it under a pergola or within easy reach of the kitchen.
    • Ensure Adequate Clearance: Leave at least 36 inches of space around the entire table. This provides enough room for guests to pull out their chairs and for people to walk behind them without feeling cramped.
    • Define the Zone: Use a large outdoor rug under the dining set to visually separate the dining area from the rest of the patio. This creates a distinct "room" and adds a layer of comfort and style. A collection of weather-resistant rugs can offer a great starting point.
    • Add Supporting Elements: Place secondary items like a serving buffet, bar cart, or grill station along the perimeter. This keeps them accessible for serving but out of the main traffic path, ensuring the focus remains on the dining experience.

    Key Insight: The success of a dining-forward layout hinges on comfort. Consider well-made outdoor dining chairs with cushions to encourage guests to linger long after the meal is over. An uncomfortable chair can cut an evening short.

    3. Multi-Zone Activity Layout

    A multi-zone activity layout is a sophisticated approach that maximizes the utility of larger outdoor spaces by dividing them into distinct functional areas. This design treats your patio or backyard like an open-concept home, creating separate "rooms" for different activities such as dining, lounging, and playing. By assigning a specific purpose to each section, you can host diverse groups and activities simultaneously without feeling crowded.

    This layout is ideal for homeowners with expansive backyards or rooftop terraces who want a versatile, organized, and highly functional outdoor living area. It transforms a single, large space into a multi-faceted environment that can easily accommodate a family dinner at one end and a quiet conversation by a fire pit at the other. This strategic division ensures every square foot of your outdoor space is used effectively.

    How to Implement This Layout

    Creating a cohesive multi-zone layout requires thoughtful planning to define each area while maintaining a unified aesthetic.

    • Map Your Zones: Begin by assessing your available square footage and listing the primary activities you want to accommodate. Common zones include a dining area with a table and chairs, a conversational lounge, and a recreational space.
    • Anchor Each Zone: Use large outdoor rugs to visually anchor and define each distinct area. A rug under a dining set clearly separates it from the adjacent seating area. You can also use large planters or low-profile hedges as subtle dividers.
    • Arrange Furniture by Function: Place furniture according to each zone's purpose. Group a dining table and chairs in one area, and arrange a sectional and coffee table in another for lounging. Maintain a consistent design theme (e.g., material or color palette) across all zones for a cohesive look.
    • Establish Clear Pathways: Ensure there are clear and wide walkways, ideally 3-4 feet, connecting the different zones. This allows for safe and easy traffic flow, preventing the space from feeling disjointed or obstructed.

    Key Insight: The success of a multi-zone layout lies in creating visual separation without building actual walls. Using elements like rugs, lighting, and strategic furniture placement allows you to define distinct "rooms" that feel both separate and connected, offering great outdoor versatility.

    4. L-Shaped Sectional Lounging Layout

    An L-shaped sectional lounging layout is one of the most efficient outdoor furniture layout ideas for maximizing both seating and comfort. This design anchors your space with a large sectional sofa, typically placed against a corner or along two walls, to create a defined and inviting outdoor living room. It’s a popular choice for its ability to offer extensive seating without the clutter of multiple separate pieces.

    This layout is exceptionally effective for transforming a deck or patio into a relaxed, cohesive social area. It excels for casual entertaining, family lounging, and creating a modern, resort-like feel. By using a single, large furniture piece to define the zone, you establish a strong visual anchor that makes the entire space feel more organized and intentional.

    How to Implement This Layout

    Creating a functional and stylish sectional lounge requires careful measurement and thoughtful furniture selection.

    • Measure Your Corner: Before you start looking at furniture, accurately measure the dimensions of the corner where you plan to place the sectional. A common mistake is underestimating the footprint; many L-shaped sectionals require a space of at least 15×15 feet to feel balanced.
    • Select a Modular Sectional: Consider a modular outdoor sectional. These versatile pieces allow you to reconfigure the layout, add or remove seats, and adapt the sofa to your specific space.
    • Accessorize for Comfort: Layer in comfort with high-quality cushions made from quick-dry foam and performance fabrics that resist stains, mildew, and sun fading. Add outdoor throw pillows and blankets to introduce color and texture.
    • Incorporate Storage and Surfaces: Complete the layout with a low-profile coffee table or a set of nesting tables for drinks and snacks. A nearby waterproof storage ottoman is a practical addition for stowing away cushions and accessories when not in use.

    Key Insight: The primary strength of an L-shaped sectional is its ability to create a visually enclosed “room” within an open outdoor space. It defines a boundary and a purpose, turning an undefined patio into a dedicated destination for relaxation and connection.

    5. Symmetrical Formal Layout

    A symmetrical formal layout brings a sense of order, elegance, and classical tradition to your outdoor space. This design approach is rooted in balance, arranging furniture and decor in a mirror-image formation along a central axis. By creating this perfect harmony, the layout establishes a sophisticated and structured atmosphere that feels intentional and visually calming.

    This style is particularly effective in spaces that complement traditional or transitional architecture, such as classic estate gardens or formal courtyards. It elevates the outdoor area from a casual hangout to a refined extension of the home, ideal for serene relaxation or hosting elegant gatherings. The inherent order of a symmetrical layout draws the eye and creates a powerful, cohesive design statement.

    How to Implement This Layout

    Creating a successful symmetrical layout requires precision and a strong central organizing principle.

    • Define Your Center Line: First, establish a central axis. This could be a physical element like a walkway, a visual line aimed at a stunning view, or an imaginary line running through the center of a key architectural feature like a set of French doors.
    • Place Your Focal Point: Position a strong focal point along this center line. A classic three-tiered fountain, a stately urn, or a timeless sculpture works perfectly to anchor the entire design.
    • Arrange Mirrored Pairs: Place matching furniture pieces equidistant from the center line, creating a mirror image. For example, position two identical outdoor loveseats or sets of armchairs facing each other across the axis. Collections of traditionally styled outdoor furniture can offer numerous matching pieces to achieve this look.
    • Reinforce with Decor: Complete the scene with paired accessories. Place identical planters, side tables, or outdoor lanterns on each side to reinforce the symmetry. An outdoor rug can also help define the space and ground the arrangement.

    Key Insight: The power of this layout lies in its predictability and balance. By repeating elements on both sides of a central line, you create a sense of rhythm and peace that is inherently pleasing to the eye, making the space feel both grand and restful.

    6. Shade Structure-Centric Layout

    A shade structure-centric layout uses an architectural element like a pergola, gazebo, or pavilion as the anchor for the entire outdoor space. Rather than letting the furniture float on an open patio, this approach organizes seating and dining areas beneath a protective covering. This design creates a distinct "room" outdoors, providing shelter from the sun and elements while defining a clear focal point.

    This layout is one of the most functional outdoor furniture layout ideas for extending the usability of your space across different weather conditions. It excels in climates with intense sun or frequent rain, transforming a patio into a reliable, all-day destination. By centering your activities under a structure, you create an inviting and comfortable retreat that feels both integrated with nature and protected from it.

    How to Implement This Layout

    Creating an effective shade-centric layout means treating the structure as the heart of your design.

    • Select and Position Your Structure: First, choose and install your primary shade structure. Position it to block the most intense morning or afternoon sun based on your climate and how you use the space. Ensure a minimum of 8 feet of headroom clearance, with 9-10 feet being ideal for an open, airy feel.
    • Arrange Anchor Furniture: Place your main furniture, such as a large outdoor dining table or a full seating group, directly underneath the structure. This anchors the zone and ensures maximum protection for you and your guests.
    • Define Traffic Flow: Keep clear pathways around the perimeter of the shade structure. A clearance of at least 24-36 inches allows for easy movement without disrupting those seated within the covered area.
    • Integrate Ambiance and Comfort: Enhance the space with functional accessories. Adding LED string lights or an outdoor pendant light provides evening ambiance, while an outdoor ceiling fan improves air circulation on hot days. When designing a Shade Structure-Centric Layout, choosing the right material for sun shades for your patio can define the space's comfort and usability.

    Key Insight: This layout moves beyond simple furniture arrangement and into architectural design. The structure itself becomes the primary feature, dictating the flow, function, and feel of the entire outdoor environment.

    7. Curved and Organic Layout

    A curved and organic layout moves away from traditional straight lines and rigid angles, embracing flowing, natural forms instead. This contemporary approach uses rounded furniture and soft pathways to create a relaxed, dynamic atmosphere. By arranging pieces in gentle arcs and circles, you can make an outdoor space feel more harmonious and connected to the surrounding landscape.

    Pencil sketch of an elegant outdoor furniture arrangement featuring a curved sofa, green plants, and stepping stones.

    This design is one of the most visually interesting outdoor furniture layout ideas for modern backyards, poolside lounges, and even urban rooftop terraces. It excels at softening hard architectural elements and creating a gentle, inviting flow that encourages guests to move through and explore the space. The result is an environment that feels less formal and more like a serene, natural retreat.

    How to Implement This Layout

    Creating an organic layout is about achieving a balanced, asymmetrical look that feels both intentional and effortless.

    • Anchor with a Curved Piece: Start with a significant curved furniture item, like a rounded outdoor sectional or a circular daybed. This piece will set the tone and establish the primary flowing line of your design.
    • Create Fluid Pathways: Guide movement with curved pathways made from stepping stones or pavers. Avoid straight walkways that would conflict with the organic feel of the furniture arrangement.
    • Incorporate Rounded Elements: Enhance the theme with rounded planters, circular area rugs, and spherical lighting fixtures. These complementary shapes reinforce the layout’s natural aesthetic.
    • Layer with Soft Textures: Add softness and visual flow with outdoor cushions, pillows, and throws in natural textures and colors. This layering helps to blur any remaining hard edges in the space.

    Key Insight: The power of a curved layout is its ability to mimic nature. There are few straight lines in the natural world, so incorporating organic shapes into your outdoor design creates a subconscious sense of calm and tranquility.

    8. Fire Pit Gathering Layout

    Among the most sought-after outdoor furniture layout ideas, the fire pit gathering layout creates an irresistible destination for evening entertainment and cooler weather. This design uses a fire pit or outdoor fireplace as its definitive focal point, with seating arranged in a circle or semi-circle around it. The fire serves as both a functional heat source and an atmospheric centerpiece that naturally draws people together.

    A hand-drawn sketch of a circular outdoor patio with a fire pit, surrounding sofas, chairs, and side tables.

    This layout is ideal for extending the use of your outdoor space beyond daylight hours and warm seasons. It excels in suburban backyards and patios where creating a dedicated zone for relaxation and socializing is a priority. From hosting s'mores nights with family to enjoying a quiet drink with friends, a fire pit layout transforms your patio into a cozy, year-round retreat.

    How to Implement This Layout

    Creating a safe, comfortable, and functional fire pit area requires attention to placement, materials, and spacing.

    • Prioritize Safety: Place your fire pit on a non-combustible surface like stone pavers or concrete, at least 10-15 feet away from your home, sheds, and any overhanging tree branches. Always check local fire codes and any HOA restrictions before installation.
    • Arrange Seating for Comfort: Position seating, such as deep-seated chairs or a curved sectional, approximately 6-8 feet away from the fire. This distance provides comfortable warmth without being overwhelming.
    • Add Functional Surfaces: Place side tables or small C-tables between chairs or at the ends of a sofa. This ensures guests have a convenient spot to place drinks, plates, and s'mores supplies without having to reach over the fire.
    • Incorporate Ambient Lighting: Since this layout is designed for evening use, supplement the fire's glow with other light sources. String lights, path lighting, or solar-powered lanterns placed around the perimeter can enhance visibility and ambiance without detracting from the fire.

    Key Insight: The success of a fire pit layout hinges on balancing ambiance with safety. The arrangement should feel intimate and enclosed, but with clear, safe pathways and adequate distance from the heat source to ensure everyone can relax and enjoy the space comfortably.

    9. Poolside Resort-Style Layout

    A poolside resort-style layout transforms your backyard into a personal oasis, inspired by high-end hotels and vacation destinations. This approach organizes furniture into distinct functional zones around a pool or water feature, emphasizing relaxation, entertainment, and comfort. The goal is to create a seamless, cohesive environment that feels like a retreat, complete with multiple lounging options and convenient amenities.

    This layout is ideal for homeowners with a pool who want to maximize their outdoor living space for both private relaxation and hosting guests. By creating dedicated areas for sunbathing, conversation, and refreshments, it provides a highly functional and visually stunning setting. It elevates a simple pool area into a comprehensive outdoor experience, making every day feel like a getaway.

    How to Implement This Layout

    Creating a true resort feel requires thoughtful zoning and attention to detail to ensure both beauty and functionality.

    • Zone Your Space: Identify key activity areas around the pool. Designate a primary zone for sunbathing with a row of sleek chaise lounges. Create a separate conversational nook with a weather-resistant deep seating set, and consider a third zone for a bar or dining area.
    • Prioritize Comfortable Lounging: Select high-quality, comfortable seating. Adjustable lounge chairs with thick, quick-drying cushions are essential. Supplement these with an outdoor daybed or a small sectional to offer varied relaxation options.
    • Integrate Shade and Amenities: No resort is complete without shade. Strategically place large cantilever umbrellas or a permanent pergola to offer respite from the sun. Add a mobile beverage cart or a small bar table with stools to keep drinks and snacks easily accessible.
    • Ensure Safety and Flow: Maintain clear, unobstructed pathways around the pool deck, adhering to local safety codes. Keep at least 3-4 feet of walking space around the perimeter. Ensure any furniture or decor does not block access to pool entry points or safety equipment.

    Key Insight: The success of a resort-style layout lies in its ability to anticipate needs. By providing a variety of seating, ample shade, and convenient access to refreshments, you create an effortless, high-end experience that encourages guests to relax and stay awhile.

    10. Flexible Modular Furniture Layout

    A flexible modular furniture layout is a contemporary and highly adaptable approach that prioritizes versatility above all else. This design uses individual, portable pieces that can be easily reconfigured to suit different occasions, from a large party to an intimate dinner. By using modular seating units, stackable chairs, and movable side tables, a space can transform from a dining setup to a lounging area with minimal effort.

    This layout is one of the most practical outdoor furniture layout ideas for modern homeowners who need their space to serve multiple functions. It's an ideal solution for renters, hosts who entertain diverse group sizes, or anyone who enjoys refreshing their outdoor look seasonally. The ability to quickly adapt the furniture arrangement makes the patio or deck a truly dynamic extension of the home.

    How to Implement This Layout

    Creating a cohesive and functional modular space is about selecting the right pieces and having a plan for reconfiguration.

    • Select Versatile Core Pieces: Start with a modular outdoor sectional or a set of armless chairs that can be clustered together or used separately. Lightweight materials like aluminum or all-weather wicker make rearrangement much easier.
    • Incorporate Multi-Function Furniture: Choose ottomans that can double as extra seating or coffee tables. Nesting side tables are perfect as they can be spread out for guests or tucked away to save space.
    • Establish Visual Cohesion: To prevent a mismatched look, stick to a consistent color palette or material family. For example, pair a teak modular sofa with matching wood side tables, even if they are from different collections.
    • Plan for Storage: Consider a deck box or waterproof bin to store cushions and smaller pieces when not in use. This keeps the area tidy and protects your furniture from the elements.

    Key Insight: The power of a modular layout is its ability to adapt to your life in real time. Before purchasing, think about the top three ways you'll use the space (e.g., dining, lounging, sunbathing) and ensure your chosen pieces can accommodate each scenario.

    10 Outdoor Furniture Layouts Comparison

    Layout Implementation complexity Resource requirements Expected outcomes Ideal use cases Key advantages
    Lounge-Centric Conversational Layout Low–Medium (simple arrangement, needs clearance) Moderate (modular seating for 4–8, central focal point) Intimate, conversation-focused gatherings Families and social entertainers on patios/decks Encourages engagement; flexible seating
    Dining-Forward Patio Layout Medium (clearances, shade, circulation) High (large dining table, chairs, shade structure, serving surfaces) Organized dining-focused entertaining Homeowners who host frequent outdoor meals Maximizes dining capacity; easy service flow
    Multi-Zone Activity Layout High (zoning, circulation, cohesion) Very high (multiple furniture sets, landscaping, lighting) Multi-functional space for simultaneous activities Large yards, frequent entertainers with varied needs Versatile use; supports diverse guest groups
    L-Shaped Sectional Lounging Layout Low–Medium (placement of sectional) Moderate (sectional, coffee table, cushions) Cozy, defined outdoor living room feel Small–medium patios; lounging-focused users Space-efficient seating; modular reconfiguration
    Symmetrical Formal Layout Medium (precise symmetry and sightlines) Moderate–High (matching pieces, central feature) Elegant, balanced and formal aesthetic Traditional/formal yards and classic-style homes Timeless, visually harmonious design
    Shade Structure-Centric Layout High (structure installation, permits) Very high (pergola/gazebo, integrated utilities) Protected, extended-use outdoor room Hot climates; year-round outdoor entertainers UV/weather protection; architectural focal point
    Curved and Organic Layout Medium–High (non-linear planning, sourcing) Moderate–High (curved furniture, landscape elements) Relaxed, dynamic flow with contemporary look Irregular patios, modern design enthusiasts Natural movement; forgiving for odd shapes
    Fire Pit Gathering Layout Medium (safety clearances, ventilation) Moderate (fire pit or fireplace, seating, safety features) Inviting evening gatherings with warmth and ambiance Fall/winter entertainers and cozy social groups Extends season; strong social focal point
    Poolside Resort-Style Layout Very high (complex planning, safety) Very high (pool, cabanas, multiple seating zones) Luxury resort-like environment with multiple zones High-end homeowners with pools; large entertaining Sophisticated amenities; varied seating options
    Flexible Modular Furniture Layout Low (easy reconfiguration) Moderate (many movable pieces, storage solutions) Highly adaptable spaces that transform easily Renters, small patios, changing lifestyle needs Maximum flexibility; easy to reconfigure and store

    Bringing Your Vision to Life

    You've explored the conversational nooks, the expansive dining setups, and the cozy fire pit arrangements. Now, the blank canvas of your patio, deck, or balcony should feel less like a challenge and more like an opportunity. Moving from inspiration to implementation is the most exciting part of this process. The outdoor furniture layout ideas we've covered aren't just templates; they are strategic frameworks designed to help you create a space that is a true extension of your home and a reflection of your lifestyle.

    The core principle connecting all these concepts is intentionality. A successful outdoor space doesn't happen by accident. It is the result of thoughtful planning that considers who will use the space, how they will use it, and how it can best serve their needs season after season. Remember, the right layout for your neighbor might not be the right one for you, and that’s perfectly okay. The goal is to design a personal retreat that enhances your daily life, whether that means hosting lively family barbecues, enjoying quiet morning coffees, or unwinding under the stars.

    Core Principles for Lasting Success

    As you finalize your plans, keep these fundamental takeaways at the forefront of your decision-making process. These principles are the difference between a functional space and an exceptional one.

    • Function Before Form: Always start with the primary purpose of your outdoor area. Do you need a dining space for eight, or a comfortable lounging zone for two? Answering this question first will guide every subsequent choice, from the size of your sofa to the placement of your accent tables.
    • Master the Measurements: This cannot be overstated. Accurate measurements prevent the common problem of purchasing furniture that is too large or too small for your space. Remember to account not just for the furniture's footprint but also for the crucial "negative space" needed for clear pathways and comfortable movement. A minimum of 30-36 inches for main walkways is a reliable rule of thumb.
    • Respect the Flow: A well-designed layout feels intuitive. Consider the natural entry and exit points, such as the back door or a gate. Your arrangement should facilitate easy movement between these points and key zones without creating awkward obstacles or bottlenecks.
    • Create Your Zones: Even in smaller areas, defining distinct zones for lounging, dining, or playing brings a sense of order and purpose. Area rugs are one of the most effective tools for visually separating these spaces and making a patio feel more like a deliberate, well-designed room.

    Putting Your Plan into Action

    With these foundational ideas in mind, your next steps are practical and straightforward. Begin by sketching your space on paper or using a simple online tool. Mark your dimensions, windows, and doors. Then, start experimenting with the layouts that resonated most with you. Cut out paper shapes to scale to represent furniture pieces; this tangible approach makes it easier to visualize spacing and flow before you commit.

    Ultimately, crafting the perfect outdoor living area is a journey of blending practical logic with personal creativity. By applying the principles of scale, flow, and zoning, you are empowered to transform any outdoor space into a beautiful, functional, and cherished haven. The most effective outdoor furniture layout ideas are the ones that are thoughtfully adapted to your unique home and family, creating the perfect backdrop for making memories for years to come.


    Feeling inspired but want to see how these concepts look in person? Seeing and touching the furniture can make all the difference. At Woodstock Furniture & Mattress Outlet, our spacious showrooms allow you to experience different layouts and materials firsthand, helping you make a more confident and informed decision for your home.

  • A Guide to the Dimensions of a King Size Bed

    A Guide to the Dimensions of a King Size Bed

    If you're ready to upgrade to a king size bed, you're not alone. But before you dive in, there's a crucial detail to nail down: which kind of king are you talking about?

    Most people don't realize there are two main types of king mattresses here in the U.S. Getting the dimensions straight from the get-go is the single most important step to make sure you end up with a bed that actually fits your room and your lifestyle.

    Your Quick Guide to King Bed Dimensions

    Let's cut right to the chase. A standard king size bed—often called an Eastern King—measures 76 inches wide by 80 inches long. It's the widest standard mattress available, making it a popular choice for couples who want plenty of personal space.

    This size became more common in the mid-20th century as bedrooms in American homes started getting bigger. The logic was simple: a standard king is the exact same size as two Twin XL mattresses pushed together. This setup gave each person their own distinct sleep zone. You can find more on the history of mattress sizes at mllinens.com.

    Visual comparison of Standard (Eastern) King and California King bed dimensions, showing width and length.

    Comparing Standard and California King

    The other major option is the California King, and this is where people sometimes get mixed up. It’s not bigger overall; it just distributes its size differently. It's longer, but also narrower than a standard king.

    Seeing the numbers side-by-side makes the trade-off clear.

    King vs. California King Dimensions at a Glance

    Feature Standard King (Eastern King) California King
    Width 76 inches 72 inches
    Length 80 inches 84 inches
    Total Area 6,080 sq. inches 6,048 sq. inches

    As you can see, the total surface area is nearly identical. The choice really boils down to your priorities.

    The key takeaway is simple: If you want maximum width for you, a partner, and maybe even kids or pets who like to pile in, the standard king is your answer. If you're tall and need extra legroom to avoid dangling feet, the California king was designed specifically to solve that problem.

    This fundamental difference in shape—wider versus longer—is the most important factor to consider. As we continue, we’ll dig into how these measurements translate into real-world comfort and what they mean for your room’s layout.

    Choosing Between a Standard and California King

    The raw numbers on a king-size bed only tell you part of the story. The real decision between a standard king and a California king comes down to solving a specific problem you’re having with your current sleep setup. It’s less about which one is technically "bigger" and more about which shape is going to improve your sleep.

    Here's an easy way to think about it: are you constantly fighting for more space side-to-side, or are your feet always hanging off the end? Once you answer that question, the right choice becomes much clearer.

    When to Choose a Standard King

    The standard king—sometimes just called an "Eastern King"—is all about width. At 76 inches wide, it gives each person in a couple the exact same amount of personal space as if they were sleeping alone on a Twin XL mattress. That alone makes it a great solution for some very common bedroom dilemmas.

    • You sleep with a partner who moves around a lot. If your partner is an active sleeper—tossing, turning, or pulling the covers—those extra inches of width create a much-needed buffer zone. Their movements are far less likely to jolt you awake.
    • Kids or pets frequently pile into bed with you. For families who enjoy a weekend morning snuggle or have a large dog who shares the bed, that extra width can be essential. It transforms the bed from a two-person sleeping space into a comfortable family hub.
    • You just prefer having more personal space. Some of us just like to spread out. A standard king ensures you can stretch your arms and legs out wide without encroaching on your partner’s side.

    If your main goal is to get more elbow room and stop feeling crowded, the standard king is almost always the right call.

    A standard king is designed to solve the problem of width. It’s the go-to for couples, co-sleepers, and anyone who feels boxed in by their current mattress.

    When a California King Makes More Sense

    On the other hand, the California king is a specialist. It trades four inches of width for four extra inches of length, measuring in at 72 inches wide by 84 inches long. That might not sound like a huge swap, but for a very specific group of people, it makes all the difference.

    A California king is likely your best fit if:

    • You or your partner are over six feet tall. This is the number one reason to get a Cal king. Those four inches of extra length mean no more feet dangling off the edge of the bed. Taller folks can finally stretch out completely and sleep in a natural, comfortable position.
    • Your bedroom is long and narrow. The slightly slimmer, longer profile of a California king can work well in a room that's more of a rectangle than a square. It can make the whole layout feel more balanced, preventing the room from looking cramped.

    The choice is an incredibly practical one. The California king was developed to solve the problem of beds being too short for taller sleepers. If that’s your biggest frustration, giving up a little width is a fair trade-off for a full night of comfortable, stretched-out sleep.

    How to Properly Measure Your Room for a King Bed

    It’s a common story: you find a spacious king bed at a showroom, only to get it home and realize it has swallowed your entire bedroom. One of the biggest regrets people have is underestimating just how much floor space these beds really take up. A simple tape measurement of your room's length and width is a start, but it doesn't tell the whole story.

    To make sure your new bed feels like a sanctuary and not a cluttered obstacle course, you have to think about functional space and flow. It's all about planning for "breathing room." Your bed doesn't exist in a vacuum; you need clear pathways to walk, space for closet doors to swing open, and room for essentials like nightstands.

    The 30-Inch Rule and Beyond

    As a general rule of thumb, try to leave at least 30 inches of clear walking space around the sides and foot of the bed. Anything less and the room will immediately feel cramped, making it difficult to get around or make the bed.

    Before you decide, walk through these critical checkpoints in your room:

    • Doorways and Drawers: Can your bedroom door, closet doors, and dresser drawers open completely without hitting the bed frame? This is an easy detail to overlook that can become a major frustration.
    • Nightstand Placement: Don't forget your nightstands. Make sure there's enough room on both sides of the bed for them to fit comfortably. Measure their width and add that to the bed's total width to get a true sense of the required space.
    • Other Furniture: Think about everything else in the room. Will there still be space for that bench at the foot of the bed, a vanity, or a reading chair?

    This visual guide can help simplify the choice between getting more width with a standard king or more length with a California king.

    Flowchart comparing king bed dimensions: Standard King (76x80) for width, California King (72x84) for length.

    As the flowchart shows, it’s a direct trade-off: are you trying to maximize personal space for two sleepers, or do you need to accommodate someone who's tall?

    A Pro Tip for Perfect Placement

    Numbers on a screen or a tape measure can be deceiving. To really feel how a king bed will fit in your room, you need to visualize it in the space. A helpful way to do this is with a roll of painter's tape.

    Use the tape to mark the exact 76" x 80" (Standard King) or 72" x 84" (California King) outline directly on your floor. Live with this taped-off area for a day or two. Walk around it, open your drawers, and see how it impacts the room's natural flow. This simple, practical step is one of the most effective ways to prevent a sizing mistake.

    It's also worth noting that what we call a "king size" bed isn't universal. In the United Kingdom or Europe, a standard king measures just 152 cm × 198 cm (60 × 78 inches)—much narrower than its American counterpart. These differences show how beds have evolved to fit regional bedroom sizes and preferences. You can learn more about these global differences in bed sizing on Wikipedia. It’s a good reminder to always confirm local standards when you're shopping.

    Accounting for Bed Frames and Headboards

    The mattress dimensions are just the starting point. It’s a classic mistake to focus only on the sleeping surface—that 76 by 80 inches of a standard king, for instance—and completely forget about the structure holding it up. Your bed frame and headboard can add a surprising number of inches to the total footprint, turning a room that felt spacious on paper into a very tight squeeze.

    Think of the mattress as the passenger and the frame and headboard as the vehicle. A slim, minimalist metal frame might only add an inch or two to the length and width. But a grand sleigh bed with a curved footboard or a deeply tufted, upholstered headboard can easily tack on an extra 6 to 10 inches of depth and width. Forgetting this is probably the most common oversight shoppers make.

    A sketch showing various bed components like a metal frame, platform, mattresses, and headboard with dimensions.

    How Different Styles Impact Total Size

    The style of the bed you choose has a direct impact on its final dimensions. You should always check the product specifications for the total measurements, not just the mattress size it’s built for. A good product page will list the fully assembled length, width, and height.

    Here’s a general guide to what you can expect from different styles:

    • Simple Metal Frames: These are your most space-efficient option, typically adding only 1-2 inches to the mattress dimensions.
    • Platform Beds: A basic platform bed might add 2-4 inches in width and length. However, models with a wider lip or built-in side tables will demand more floor space.
    • Upholstered Beds: All that plush, padded material on the headboard and side rails can add 4-8 inches to the total length and width. The thickness of the fabric and padding really adds up.
    • Sleigh Beds: With their signature curved headboards and footboards, these tend to take up the most space. They often add 8-12 inches or even more to the total length.
    • Beds with Storage: Frames that feature drawers or storage headboards are almost always wider and longer to accommodate the extra function.

    Since these components can dramatically alter the final size of your bed, it's helpful to see how it all breaks down.

    How Bed Components Add to Overall Dimensions

    The table below gives you a quick reference for estimating how much extra space different bed parts will take up beyond the mattress itself.

    Component Typical Added Width (Inches) Typical Added Length (Inches)
    Simple Metal Frame 1-2 1-2
    Platform Bed (Standard) 2-4 2-4
    Upholstered Frame 4-8 4-8 (headboard/footboard)
    Sleigh Bed 3-6 8-12+ (due to curves)
    Storage Bed 2-5 4-10 (depending on design)

    Use these numbers as a ballpark when you're planning your room layout to avoid any unwelcome surprises on delivery day.

    When you're in your room mapping things out with painter's tape, make sure you tape out the dimensions of the entire bed structure, not just the mattress. This one simple step will show you the bed's true real-world footprint.

    Failing to account for the frame can lead to all sorts of frustrating problems, like a bed that juts out and blocks a walkway or a headboard so thick your nightstands no longer fit. By checking the complete specifications before you buy, you can choose a bed that fits perfectly in both theory and practice—enhancing your room without overwhelming it.

    Navigating Delivery and Setup Challenges

    One of the most overlooked parts of buying a new bed is simply getting it from the store into your bedroom. It can be quite a problem when a new king size bed arrives, only to get stuck in a tight stairwell. This is a frustrating and preventable issue.

    Taking a few minutes to measure beforehand can mean the difference between a smooth delivery and a major headache.

    Before your bed shows up, grab a tape measure and walk the entire path it will take. Don't just measure the bedroom itself; you need to account for every single twist and turn it'll make along the way.

    Your Pre-Delivery Measurement Checklist

    To make sure your installation goes off without a hitch, measure the width and height of these common obstacles:

    • Doorways: This one’s obvious, but measure every doorway the bed has to pass through, from your front door to the bedroom. Don't forget to account for the thickness of the door itself and any doorknobs that stick out.
    • Hallways: Check the width of your hallways. Pay very close attention to any sharp corners or 90-degree turns, because that's where things usually get stuck.
    • Stairwells: If the bedroom is upstairs, measure the width of the stairs. You also need to check the ceiling height at any landings or turns to make sure there’s enough clearance to angle the mattress and foundation.

    Most king mattresses have some flexibility, but the box spring or foundation is usually completely rigid. The dimensions of a king size bed foundation are what cause the most trouble in tight spaces.

    If your delivery path looks a little challenging, a split box spring can be a great solution. It comes in two separate pieces, which makes maneuvering through narrow spots infinitely easier.

    Planning for the delivery is just as important as measuring your room. A few minutes with a tape measure can save you from the disappointment of a failed delivery and ensure your new bed arrives stress-free.

    You may also want to consider professional delivery and setup. An experienced delivery team has seen it all and knows how to navigate tricky spaces. They handle all the heavy lifting, assembly, and placement, letting you just relax and enjoy your new bed. It removes the guesswork and physical strain from the equation.

    A Few Final Questions About King Beds

    As you get closer to a decision, a few practical questions often come up. Let's tackle some of the most common ones we hear from shoppers sorting out the final details.

    Can I Use Standard King Sheets on a California King Mattress?

    No, the bedding for these two isn't interchangeable. It’s a common mix-up because of the similar names, but the shapes are completely different. A standard king is wider and shorter (76" x 80"), while a California king is narrower and longer (72" x 84").

    If you try to put a standard king fitted sheet on a Cal king, it'll be too wide and not long enough. You'll end up with a loose, baggy fit that won't stay put. Always buy bedding that specifically lists your mattress size to make sure your sheets stay snug all night long.

    What Is the Minimum Room Size for a King Bed?

    As a good rule of thumb, you’ll want a room that's at least 12 feet by 12 feet. This isn't just about squeezing the bed in; it's about making sure the room still feels functional and comfortable.

    A room this size usually gives you about 30 inches of clearance on both sides and at the foot of the bed. This is the "breathing room" you need to walk around, make the bed without bumping into walls, and add nightstands or a dresser without feeling cramped. If your room is much smaller than this, a queen usually creates a more balanced space.

    Don't forget to account for all your furniture, not just the bed. The goal is to create a restful, uncluttered space, and proper spacing is key to getting that feeling right.

    Is a Split King the Same Size as a Standard King?

    Yes, exactly the same. When you put the two halves of a split king together, the total dimensions are 76 inches wide by 80 inches long, matching a standard king perfectly.

    The "split" simply means it's made of two separate Twin XL mattresses (each 38" x 80") sitting side-by-side in a single frame. This setup is a popular choice for couples using an adjustable base, since it lets each person raise or lower their side of the bed independently without bothering their partner.

    Do I Need Special Bedding for a Deeper Mattress?

    You might, and it's a detail that’s easy to overlook. Many newer mattresses, especially those with thick pillow tops or hybrid layers, are much taller than older styles. If your mattress is over 12 to 14 inches high, you’ll probably need to look for deep-pocket sheets.

    Standard fitted sheets just don't have enough fabric to stretch over that extra height and tuck securely underneath. You'll find the corners constantly popping off. Before you buy any new sheets, check the pocket depth listed on the packaging to guarantee a good fit.


    Trying to keep all these details straight is a lot easier with a little help. At Woodstock Furniture & Mattress Outlet, our knowledgeable staff has years of experience helping people find the right bed for their space and their sleep needs. Come visit us in person to see these options for yourself and get answers to all your questions.