Taking care of a leather sofa can feel a little intimidating. People often worry that one accidental spill or a moment of carelessness will lead to permanent damage. But here's the honest truth from years of experience: proper leather care is all about gentle, consistent maintenance, not back-breaking labor.
Leather is an incredibly durable material that, when cared for, actually develops more character and beauty over time. This guide is designed to give you the confidence to maintain it for the long haul.
We'll walk through everything you need to know, from figuring out exactly what kind of leather you have to mastering the day-to-day upkeep that keeps it looking its best.
Why a Little Maintenance Goes a Long Way
Proper care isn't just about appearances; it's about protecting your investment. Without some regular attention, leather can slowly lose its natural oils. This leads to dryness, which eventually causes cracking and fading.
A simple maintenance routine prevents the buildup of dust, dirt, and body oils that can wear away the material's protective finish. This proactive approach pays off in several ways:
- It Preserves Softness: Regular care stops the leather from becoming stiff and brittle.
- It Maintains Appearance: This keeps the color rich and the surface looking clean and inviting.
- It Extends Lifespan: A well-maintained leather sofa can easily last for decades, often outliving fabric alternatives.
For a great overview on the fundamentals, check out this guide on how to clean leather the right way.
What This Guide Will Cover
We're going to demystify the whole process. You'll learn how to tackle common stains without panicking and why conditioning is so critical for your furniture's longevity. Our goal is to give you practical, straightforward advice that makes you feel empowered to care for your furniture, ensuring it remains a beautiful centerpiece in your home for years to come.
As a general rule of thumb, plan to condition your leather furniture every 6-12 months. But keep an eye on it—if your sofa gets a lot of direct sunlight or sees heavy daily use, you might want to condition it more often, maybe 3-4 times a year, to keep it from drying out.
Know Your Leather: The Critical First Step to a Lasting Clean
Before you grab a cloth or a bottle of cleaner, hold on. The most important thing you can do for your leather furniture is figure out exactly what kind you’re dealing with. It's a common mistake to assume all leather is the same, but using the wrong cleaning method can be a one-way ticket to a stiff, discolored, or permanently damaged sofa.
Think of it this way: you wouldn't wash a cashmere sweater the same way you wash a pair of rugged work jeans. Leather is no different. A few minutes of investigation now will save you a world of headache later.
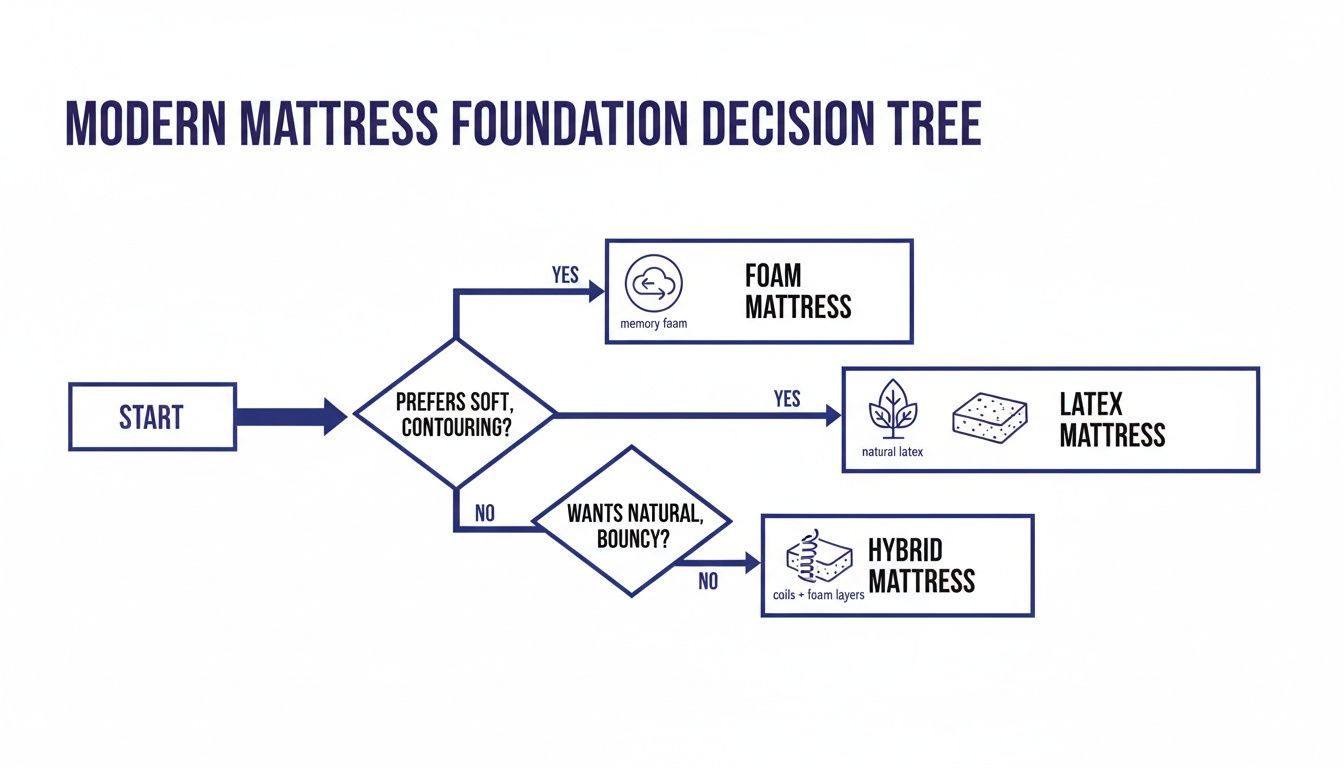
This quick flowchart is a helpful visual guide for the first steps in caring for your leather, whether it's fresh off the showroom floor or a well-loved family heirloom.

As you can see, everything starts with proper identification. From there, it’s all about consistent, gentle care.
The 3 Main Types of Furniture Leather
Most leather furniture out there falls into one of three buckets. Each one has a different level of built-in protection, which is the key factor that determines how you should clean it.
-
Protected or Finished Leather: This is the workhorse of the leather world and by far the most common type you'll find, especially on family-friendly furniture. It's coated with a polymer-based finish that acts like a shield, making it much more resistant to stains, spills, and fading. That topcoat gives you a precious few extra moments to wipe up a mess before it sinks in.
-
Aniline or Unfinished Leather: Often considered a luxurious option, aniline leather has no protective topcoat at all. It’s incredibly soft and showcases the hide's natural markings, pores, and character. The downside? It's highly absorbent and extremely vulnerable to stains.
-
Semi-Aniline Leather: This is a happy medium. It has a very thin protective coating that gives it a bit more durability than pure aniline while still keeping much of that soft, natural feel. It’s a good compromise, offering more resilience than unfinished leather but not quite the armor of a fully finished piece.
A Simple Test to Tell What You Have
You don't need a degree in upholstery to figure this out. The easiest, most reliable method is a quick water test. Just find a hidden spot on your furniture—think under a cushion or on the back panel near the floor.
Now, place a single drop of room-temperature water on the surface and watch what happens.
This simple table breaks down what to look for and what it means for your furniture.
| Identifying Common Leather Finishes |
| :— | :— | :— |
| Leather Type | Key Characteristics | Simple Water Test Result |
| Protected (Finished) | Most common type. Has a visible sheen and feels slightly slick. Color is uniform and consistent. | Water droplet beads up and sits on the surface without sinking in. |
| Aniline (Unfinished) | Very soft, natural, and buttery feel. You can see the hide's pores and natural markings. Looks matte. | Water soaks in almost instantly, leaving a dark spot. |
| Semi-Aniline | Feels soft but may have a very slight sheen. Offers a good balance between natural look and durability. | Droplet sits for a moment before slowly being absorbed. |
Understanding your test results is the key. Protected leather can generally handle gentle, water-based cleaners designed for that purpose. In contrast, that highly absorbent aniline leather needs specialized, solvent-based products and a much lighter touch to avoid creating a permanent water stain.
Once you’ve identified your leather type, you’re ready to move forward. You can now confidently pick the right supplies and use a technique that will keep your furniture looking beautiful for years to come.
Your Essential Toolkit For Proper Leather Care
You don't need a professional-grade arsenal to keep your leather furniture in top shape. In fact, a good approach often starts with a few simple, everyday supplies. Getting everything together beforehand makes the whole process smoother and safer—no more frantic searches while a spill is busy setting in.

Your first line of defense is surprisingly basic. The real goal is to get rid of the tiny, sharp particles of dust and dirt that can scratch and wear down your leather’s finish over time.
The Everyday Essentials
Before you even think about introducing liquids, you have to deal with the dry debris. These are your go-to tools for that weekly or bi-weekly maintenance.
- Soft-Bristle Brush Attachment for Your Vacuum: This is a valuable tool. It gently lifts dust and crumbs from seams, tufts, and crevices without a single scratch.
- Several Clean Microfiber Cloths: Microfiber is great for trapping dust instead of just pushing it around. You'll want at least three separate cloths—one for dusting, one for applying cleaner, and one for buffing later.
A great habit to get into is having a dedicated set of cloths just for your leather care. This prevents accidentally transferring oils or residues from other household cleaners that could harm the leather's finish.
Choosing Your Cleaning Solution
When it’s time for a more thorough clean, you've got a couple of solid options. Your choice really depends on your comfort level and the type of leather you’re working with.
The DIY Approach
For most protected leathers, a simple homemade solution works well. It’s gentle, effective, and you probably already have what you need.
- Mix a few drops of a mild, pH-neutral, non-detergent liquid soap (think gentle clear dish soap or even baby soap) into a bowl of distilled water.
- It's a good idea to skip tap water. Its mineral content can leave behind white spots or residue as it dries. Distilled water is helpful for a clean, spot-free finish.
The Commercial Cleaner Route
If you'd rather grab a dedicated product, look for a cleaner specifically formulated for your type of leather (e.g., for protected or aniline). The key is to read the label carefully. You're looking for a product that is:
- Water-based: These are generally much gentler than solvent-based cleaners.
- pH-neutral: A balanced pH is crucial. It stops the cleaner from stripping away the leather's natural oils and its protective topcoat.
- Free of harsh chemicals: Steer clear of anything containing ammonia, bleach, or solvents that weren't meant for leather.
Supplies for Conditioning
Cleaning is only half the battle. Conditioning is what keeps your leather supple and protects it from future damage. After a good cleaning, you’ll need a quality conditioner and a dedicated cloth to apply it.
- A Quality Leather Conditioner: Find a water-based cream or lotion that contains natural moisturizers. Good conditioners will absorb fully without leaving a greasy or sticky film.
- A Clean, Soft Applicator Cloth: Another microfiber or a soft cotton cloth is perfect for applying the conditioner in a thin, even layer.
With this simple toolkit, you're fully prepared to not just clean your leather furniture, but to actually care for it. This is how you ensure it remains a beautiful and comfortable centerpiece in your home for years to come.
A Practical Routine For Regular Leather Cleaning
The secret to keeping leather furniture looking great for years isn't some intense, weekend-long cleaning marathon. It all comes down to consistency. A simple, repeatable routine done weekly or bi-weekly is your best defense against the slow buildup of damaging dust, grime, and body oils that break down the leather's finish over time.
Think of it less as a chore and more as proactive maintenance. By regularly getting rid of all that surface-level stuff, you stop tiny abrasive particles from creating micro-scratches that dull the leather's natural sheen. This little bit of time you invest now can pay off in the long run.
Start With a Thorough Dry Clean
Before you even think about introducing moisture, the first job is to get rid of all the dry soil. If you skip this part, you risk turning fine dust and grit into an abrasive, muddy paste once you start wiping—and that's the last thing you want on your leather sofa.
Your vacuum cleaner, armed with its soft brush attachment, is ideal for this task. Gently go over every inch of the surface, making sure to hit the seams, button tufts, and those little crevices where cushions meet the frame. This is where crumbs, pet hair, and dust love to collect. If you're dealing with a furry friend, you'll find some great tips for getting rid of pet hair from furniture.
Once you're done vacuuming, follow up with a quick pass using a dry microfiber cloth. This will snatch up any fine dust particles the vacuum might have missed, setting you up for a safe and effective cleaning.
The Gentle Damp-Wiping Process
With the dust and debris gone, you're ready for the next phase. The most important thing to remember here is that your cloth should be damp, not saturated. A sopping-wet cloth is a recipe for watermarks, especially on more absorbent semi-aniline or aniline leathers.
Whether you're using a commercial cleaner made for your specific leather type or a DIY mix of mild, pH-neutral soap and distilled water, the technique doesn't change. Lightly dampen a clean microfiber cloth with your solution, then wring it out until it feels almost dry to the touch.
Work in small, manageable sections, like one cushion or one armrest at a time. Start at the top of the furniture piece and work your way down, using gentle, sweeping motions. This simple trick prevents dirty drips from streaking over areas you’ve already cleaned.
Pro Tip: Never spray a cleaner directly onto the leather itself, not even a gentle one. Always apply it to your cloth first. This gives you total control over the moisture level and ensures you get an even application without soaking the leather or causing spots.
After wiping a section with your cleaning solution, grab a second cloth dampened with just plain distilled water to "rinse" away any soap residue. Finally, take a third, completely dry microfiber cloth and gently buff the area. This step whisks away any leftover moisture and helps bring back the leather's natural luster.
Let the furniture air dry completely before anyone sits on it. This methodical approach is foundational to cleaning leather furniture the right way because it’s both effective and safe for the material.
Many owners find this simple process works well. A basic routine—vacuuming, wiping with a damp cloth and mild soap, and then air drying—is a proven way to keep sofas and chairs looking great. In fact, leather furniture maintained this way can last for many years, often longer than pieces that are neglected.
How To Handle Common Spills and Stains
Life happens. That glass of red wine, the buttery popcorn, your kid's leaky pen—sooner or later, spills on your favorite leather sofa are pretty much inevitable. The key is not to panic. When you act fast and use the right approach for the stain, you can usually handle these little emergencies without making things worse.
If you remember nothing else, remember this: always blot, never rub. Rubbing a fresh spill only grinds it deeper into the leather's pores, making it a much bigger headache to remove.

Here are some clear, actionable solutions for the most common culprits. But before you try any of them, please remember to test your cleaning solution on a small, hidden spot. Under a cushion or on the back of the sofa is perfect. This quick check ensures you won't accidentally cause any discoloration.
Tackling Water Stains and Rings
It’s one of life's little ironies—water itself can stain leather. This usually happens when a small spill is left to air-dry. The minerals in the water get left behind, creating a distinct ring or dark spot, especially on more absorbent aniline or nubuck leathers.
Your goal here isn't to remove the stain but to blend it away. Grab a clean, damp microfiber cloth and gently wipe the entire cushion or panel where the stain is. Start at the center of the stain and work your way outward, feathering the moisture into the dry leather around it. This technique helps the whole section dry evenly, which makes the original ring vanish.
Dealing with Grease and Oil Stains
Grease from food like pizza or chips, residue from hand lotions, or even the natural oils from our skin and hair can leave dark marks. For these kinds of stains, an absorbent powder is a helpful tool.
Here’s a simple method that works on most leather types:
- First, blot immediately. Use a dry, clean cloth to soak up as much of the oil as you can without any rubbing.
- Next, generously sprinkle cornstarch or talcum powder right onto the spot. The powder acts like a tiny sponge, pulling the oil right out of the leather’s pores.
- Now, just let it sit. For a small spot, a few hours might do it. For heavier stains, leaving it overnight is even better. Don't rub it in!
- Finally, use a soft-bristled brush to gently sweep the powder away. The stain should be much lighter or completely gone. If a faint spot remains, you can repeat the process.
This method is effective because it physically lifts the grease out of the material instead of trying to dissolve it with a liquid, which can sometimes just spread the mess.
A Crucial Reminder: Speed is your greatest ally. The faster you can get to a spill, the less time it has to soak in. Consider keeping a small "stain kit" with a couple of clean cloths and a little container of cornstarch near your living area for quick access.
Removing Ink and Other Tough Stains
Finding an ink mark on your leather sofa can be a heart-stopping moment. The right approach here really depends on your leather's finish.
For protected leather, you can often remove an ink line with a bit of rubbing alcohol. Dab a small amount onto a cotton swab and gently roll it over the ink—do not scrub. The alcohol should dissolve the ink, allowing you to lift it away with the swab. You have to work carefully and test this in a hidden spot first, as alcohol can sometimes lift a tiny bit of the color along with the ink.
If you have aniline or nubuck leather, you must avoid using alcohol altogether. These absorbent leathers are too delicate. Attempting a DIY alcohol removal will almost certainly leave you with a permanent, lightened blotch that looks far worse than the original ink stain. For these leathers, your safest bets are a specialized leather ink remover stick or calling in a professional.
By understanding these targeted approaches, you can handle most common spills with confidence and keep your leather furniture looking fantastic for years.
Why Conditioning Your Leather Is Non-Negotiable
If you think cleaning your leather furniture is the whole job, think again. Cleaning is only half the battle. Think of conditioning as the essential follow-up—like putting on lotion after you wash your hands. It’s not some optional step; it's a critical part of keeping your furniture healthy for the long haul, preventing it from drying out, cracking, and fading over time.
Leather is a natural material, and just like your own skin, it needs its oils replenished. Things we take for granted, like central heating, dry climates, and even a sunny spot in the living room, can slowly suck the moisture right out of it. When that happens, the leather gets stiff and brittle. Conditioning is how you reintroduce those vital oils, keeping the fibers flexible and bringing back that beautiful, natural luster.
The Real Impact of a Simple Routine
Seriously, a few minutes of care a couple of times a year can dramatically extend the life of your furniture. This one simple act preserves that soft, supple feel you love and even creates a protective barrier that helps ward off future stains and damage.
Regular conditioning is standard practice for long-term owners who report a significantly longer lifespan for their pieces. The fundamental act of moisturizing the hide is what truly counts. If you're curious, you can explore more insights on safe cleaning methods for different upholstery materials.
How to Condition Your Leather Furniture
The good news is that the application process is totally straightforward. No special skills required. Once you've thoroughly cleaned your furniture and given it time to dry completely, you're ready to get started.
- Pick a Quality Conditioner. You'll want to look for a water-based cream or lotion. Stay away from anything with silicone or waxes. These can clog the leather's pores, preventing it from breathing, and often leave behind a sticky residue.
- Apply to the Cloth First. Just like with cleaning, you never want to apply the conditioner directly to the leather itself. Squeeze a small, coin-sized amount onto a clean, soft microfiber cloth or an applicator pad.
- Work in Gentle, Circular Motions. Apply a thin, even layer, tackling one small section at a time. A little really does go a long way here; the goal is to moisturize, not saturate the leather.
- Give It Time to Absorb. Let the conditioner sit and soak into the hide for at least an hour. Some products might recommend a longer wait, so always give the bottle's instructions a quick read.
- Buff to a Natural Sheen. After the conditioner has been fully absorbed, grab a separate clean, dry cloth and gently buff the entire surface. This step removes any excess product and restores that beautiful, subtle sheen that makes leather look so good.
Remember the timeline: A good rule of thumb is to condition your leather every 6 to 12 months. But if your sofa sits near a sunny window or right over a heating vent, you might want to do it more often—maybe every four to six months—to counteract those extra drying effects. This simple routine is the best way to make sure your leather stays rich, comfortable, and beautiful for decades to come.
Common Questions We Get About Cleaning Leather Furniture
Even with a detailed cleaning guide, we know that specific questions pop up. It happens all the time in our showrooms. To help you feel completely confident in caring for your leather furniture, let's tackle some of the most common concerns we hear from homeowners just like you.
How Often Should I Really Clean and Condition My Sofa?
This is probably the number one question we get, and the honest answer is: it really depends on your lifestyle.
For basic upkeep, a quick dusting or vacuuming with a soft brush attachment once a week is a fantastic habit. This stops dust and grit from settling into the grain and acting like sandpaper over time. For a slightly deeper clean, a wipe-down with a damp cloth every month or two should do the trick.
Conditioning is a different beast—it's less frequent but absolutely essential. For the average home, conditioning your leather every 6 to 12 months is the sweet spot. However, if your sofa is the family's favorite hangout spot, sits in direct sunlight, or has to contend with pets and kids, you’ll want to lean closer to that 6-month mark to keep it from getting thirsty and dry.
Can I Use Common Household Cleaners on My Leather?
Please don't! This is one of those times where a shortcut can lead to a disaster. You should never use harsh chemicals like ammonia-based products, window cleaners, furniture polish, or any kind of abrasive cleaner on your leather. These things are designed to strip away grease and grime, but on leather, they strip away its natural oils and protective topcoat. This leads to cracking, discoloration, and damage that's often impossible to reverse.
While a heavily diluted, pH-neutral soap with distilled water can be okay for some protected leathers in a pinch, you're always better off sticking with products formulated specifically for cleaning leather upholstery.
When Is It Time to Call a Professional?
Knowing when to call for backup is key. If you're dealing with a large, old, or really stubborn stain—especially on delicate aniline or nubuck leather—calling a professional leather cleaning specialist is the smartest move. Trying to scrub out an old ink smudge or a deep-set grease stain with the wrong methods can easily make it worse. Professionals have the right tools and, more importantly, the experience to tackle these issues without causing more harm.
A professional cleaning isn't just for emergencies, either. Think of it as preventative care for your sofa. For a typical household, some experts suggest a professional cleaning can dramatically extend the life of your furniture. You can learn more about professional leather cleaning recommendations on stanleysteemer.com.
Is It Okay to Put Leather Furniture Near a Window?
We strongly advise against placing leather furniture where it will be exposed to direct sunlight. Same goes for parking it too close to a fireplace or radiator. Just like our own skin, leather doesn't do well with prolonged exposure to heat and UV rays. It will cause the color to fade and the material to dry out and crack ahead of its time.
If your room layout makes a spot near a window unavoidable, do yourself a favor and use curtains or blinds to filter that harsh light. It will make a huge difference in protecting your investment for years to come.
At Woodstock Furniture & Mattress Outlet, we believe that knowing how to care for your furniture is just as important as picking out the perfect piece. If you have more questions or want to see a great selection of quality leather options for yourself, our knowledgeable team is always here to help. Come visit one of our North Georgia locations today